Laying Out the GUI in Java
-
Nifty GUI XML Layout or Nifty GUI Java Layout
You can “draw” the GUI to the screen by writing Java code – alternatively to using XML. Typically you lay out the static base GUI in XML, and use Java commands if you need to change the GUI dynamically at runtime. In theory, you can also lay out the whole GUI in Java (but we don’t cover that here).
Sample Code
Sample project
-
Original Source Code: /nifty-examples/src/main/java/de/lessvoid/nifty/examples/defaultcontrols/.
-
Download demo project: niftyguidemo.zip (jme3-ready)
The full demo ZIP is based onde.lessvoid.nifty.examples.controls.ControlsDemo.java.-
The demo is a SimpleApplication-based game (use e.g. the BasicGame template in the jMonkeyEngine SDK).
-
Copy images and sound files into your project’s
assets/Interface/directory. (In this example, I copied them fromnifty-default-controls-examples/trunk/src/main/resources/toassets/Interface/). -
Make sure to use paths relative to your project’s
assets/directory.-
E.g. for .fnt/.png/.jpg files use filename
Interface/yang.pngnot filenameyang.png. -
E.g. for .wav/.ogg files use filename
Interface/sounds/gong.wavnot filenamesounds/gong.wav.
-
-
Just so you get a quick picture what Nifty GUI's Java Syntax looks like, here is the most basic example. It creates a screen with a layer and a panel that contains a button.
package mygame;

import com.jme3.app.Application;
import com.jme3.app.SimpleApplication;
import com.jme3.app.state.BaseAppState;
import com.jme3.niftygui.NiftyJmeDisplay;
import de.lessvoid.nifty.Nifty;
import de.lessvoid.nifty.builder.LayerBuilder;
import de.lessvoid.nifty.builder.PanelBuilder;
import de.lessvoid.nifty.builder.ScreenBuilder;
import de.lessvoid.nifty.controls.button.builder.ButtonBuilder;
import de.lessvoid.nifty.screen.DefaultScreenController;

public class MyStartScreen extends BaseAppState {

    @Override
    protected void initialize(Application app) {
        //It is technically safe to do all initialization and cleanup in the
        //onEnable()/onDisable() methods. Choosing to use initialize() and
        //cleanup() for this is a matter of performance specifics for the
        //implementor.
        //TODO: initialize your AppState, e.g. attach spatials to rootNode
    }

    @Override
    protected void cleanup(Application app) {
        //TODO: clean up what you initialized in the initialize method,
        //e.g. remove all spatials from rootNode
    }

    //onEnable()/onDisable() can be used for managing things that should
    //only exist while the state is enabled. Prime examples would be scene
    //graph attachment or input listener attachment.
    @Override
    protected void onEnable() {
        NiftyJmeDisplay niftyDisplay = NiftyJmeDisplay.newNiftyJmeDisplay(
                getApplication().getAssetManager(),
                getApplication().getInputManager(),
                getApplication().getAudioRenderer(),
                getApplication().getGuiViewPort());

        Nifty nifty = niftyDisplay.getNifty();
        getApplication().getGuiViewPort().addProcessor(niftyDisplay);
        ((SimpleApplication) getApplication()).getFlyByCamera().setDragToRotate(true);

        nifty.loadStyleFile("nifty-default-styles.xml");
        nifty.loadControlFile("nifty-default-controls.xml");

        // <screen>
        nifty.addScreen("Screen_ID", new ScreenBuilder("Hello Nifty Screen"){{
            controller(new DefaultScreenController()); // Screen properties

            // <layer>
            layer(new LayerBuilder("Layer_ID") {{
                childLayoutVertical(); // layer properties, add more...

                // <panel>
                panel(new PanelBuilder("Panel_ID") {{
                   childLayoutCenter(); // panel properties, add more...

                    // GUI elements
                    control(new ButtonBuilder("Button_ID", "Hello Nifty"){{
                        alignCenter();
                        valignCenter();
                        height("5%");
                        width("15%");
                    }});

                    //.. add more GUI elements here

                }});
                // </panel>
              }});
            // </layer>
          }}.build(nifty));
        // </screen>

        nifty.gotoScreen("Screen_ID"); // start the screen
    }

    @Override
    protected void onDisable() {
        //Called when the state was previously enabled but is now disabled
        //either because setEnabled(false) was called or the state is being
        //cleaned up.
    }

    @Override
    public void update(float tpf) {
        //TODO: implement behavior during runtime
    }

}
Implement Your GUI Layout
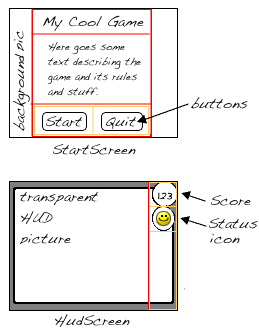
In this tutorial, you recreate the same screen as in the Laying out the GUI in XML example.
Create an Screen.Java file that extends BaseAppState in the mygame directory of your project. One Java file can contain several, or even all screens. As a reminder: Nifty displays one screen at a time; a screen contains several layers on top of one another; each layer contains panels that are embedded into another; the panels contain the actual content (text, images, or controls).
Next, setup your Nifty display.
NiftyJmeDisplay niftyDisplay = NiftyJmeDisplay.newNiftyJmeDisplay(
        getApplication().getAssetManager(),
        getApplication().getInputManager(),
        getApplication().getAudioRenderer(),
        getApplication().getGuiViewPort());

Nifty nifty = niftyDisplay.getNifty();
getApplication().getGuiViewPort().addProcessor(niftyDisplay);
((SimpleApplication) getApplication()).getFlyByCamera().setDragToRotate(true);

nifty.loadStyleFile("nifty-default-styles.xml");
nifty.loadControlFile("nifty-default-controls.xml");

// <!-- ... -->

nifty.gotoScreen("start"); // start the screen
Make Screens
The following minimal Java file contains a start screen and a HUD screen. (Neither has been defined yet.)
nifty.addScreen("start", new ScreenBuilder("start") {{
    controller(new DefaultScreenController());
    // <!-- ... -->
}}.build(nifty));

nifty.addScreen("hud", new ScreenBuilder("hud") {{
    controller(new DefaultScreenController());
    // <!-- ... -->
}}.build(nifty));
Every Nifty GUI must have a start screen. The others (in this example, the HUD screen) are optional.
Make Layers
The following Java code shows how we add layers to the start screen and HUD screen. Add the following to your Screen.java file:
nifty.addScreen("start", new ScreenBuilder("start") {{
    controller(new DefaultScreenController());
    // layer added
    layer(new LayerBuilder("background") {{
        childLayoutCenter();
        backgroundColor("#000f");

        // <!-- ... -->
    }});

    layer(new LayerBuilder("foreground") {{
        childLayoutVertical();
        backgroundColor("#0000");

        // <!-- ... -->
    }});
    // layer added

}}.build(nifty));
Repeat the same, but use
nifty.addScreen("hud", new ScreenBuilder("hud"){{for the HUD screen.
In a layer, you can now add panels and arrange them. Panels are containers that mark the areas where you want to display text, images, or controls (buttons etc) later.
Make Panels
A panel is the inner-most container (that will contain the actual content: text, images, or controls). You place panels inside layers. The following panels go into in the start screen foreground layer:
nifty.addScreen("start", new ScreenBuilder("start") {{
    controller(new DefaultScreenController());
    // layer added
    layer(new LayerBuilder("background") {{
        childLayoutCenter();
        backgroundColor("#000f");

        // <!-- ... -->
    }});

    layer(new LayerBuilder("foreground") {{
        childLayoutVertical();
        backgroundColor("#0000");

        // panel added
        panel(new PanelBuilder("panel_top") {{
            childLayoutCenter();
            alignCenter();
            backgroundColor("#f008");
            height("25%");
            width("75%");
        }});

        panel(new PanelBuilder("panel_mid") {{
            childLayoutCenter();
            alignCenter();
            backgroundColor("#0f08");
            height("50%");
            width("75%");
        }});

        panel(new PanelBuilder("panel_bottom") {{
            childLayoutHorizontal();
            alignCenter();
            backgroundColor("#00f8");
            height("25%");
            width("75%");

            panel(new PanelBuilder("panel_bottom_left") {{
                childLayoutCenter();
                valignCenter();
                backgroundColor("#44f8");
                height("50%");
                width("50%");
            }});

            panel(new PanelBuilder("panel_bottom_right") {{
                childLayoutCenter();
                valignCenter();
                backgroundColor("#88f8");
                height("50%");
                width("50%");
            }});
        }}); // panel added
    }});
    // layer added

}}.build(nifty));
The following panels go into in the hud screen:
nifty.addScreen("hud", new ScreenBuilder("hud") {{
controller(new DefaultScreenController());
layer(new LayerBuilder("background") {{
childLayoutCenter();
backgroundColor("#000f");
// <!-- ... -->
}});
layer(new LayerBuilder("foreground") {{
childLayoutHorizontal();
backgroundColor("#0000");
// panel added
panel(new PanelBuilder("panel_left") {{
childLayoutVertical();
backgroundColor("#0f08");
height("100%");
width("80%");
// <!-- spacer -->
}});
panel(new PanelBuilder("panel_right") {{
childLayoutVertical();
backgroundColor("#00f8");
height("100%");
width("20%");
panel(new PanelBuilder("panel_top_right1") {{
childLayoutCenter();
backgroundColor("#00f8");
height("15%");
width("100%");
}});
panel(new PanelBuilder("panel_top_right2") {{
childLayoutCenter();
backgroundColor("#44f8");
height("15%");
width("100%");
}});
panel(new PanelBuilder("panel_bot_right") {{
childLayoutCenter();
valignCenter();
backgroundColor("#88f8");
height("70%");
width("100%");
}});
}}); // panel added
}});
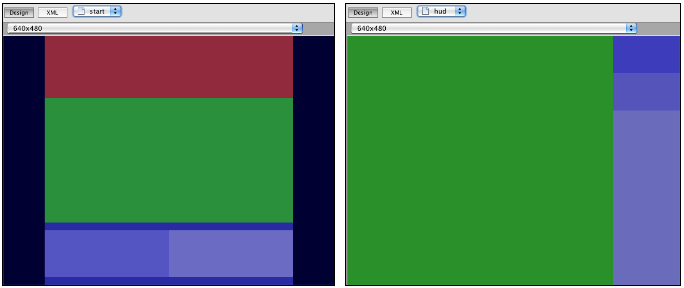
}}.build(nifty));Try the sample. Remember to activate a screen using nifty.gotoScreen("start"); or hud respectively.
The result should look as follows:
Adding Content to Panels
See also Nifty GUI - the Manual: Layouts on the Nifty GUI site.
Add Images
The start-background.png image is a fullscreen background picture. In the start screen, add the following image element:
nifty.addScreen("start", new ScreenBuilder("start") {{
    controller(new DefaultScreenController());
    // layer added
    layer(new LayerBuilder("background") {{
        childLayoutCenter();
        backgroundColor("#000f");

        // add image
        image(new ImageBuilder() {{
            filename("Interface/start-background.png");
        }});
    }});
    // <!-- ... -->
}}.build(nifty));
The hud-frame.png image is a transparent frame that we use as HUD decoration. In the hud screen, add the following image element:
nifty.addScreen("hud", new ScreenBuilder("hud") {{
    controller(new DefaultScreenController());

    layer(new LayerBuilder("background") {{
        childLayoutCenter();
        backgroundColor("#000f");

        // add image
        image(new ImageBuilder() {{
            filename("Interface/hud-frame.png");
        }});
    }});
    // <!-- ... -->
}}.build(nifty));
The face1.png image is an image that you want to use as a status icon.
In the hud screens foreground layer, add the following image element:
panel(new PanelBuilder("panel_top_right2") {{
    childLayoutCenter();
    backgroundColor("#44f8");
    height("15%");
    width("100%");

    // add image
    image(new ImageBuilder() {{
        filename("Interface/face1.png");
        valignCenter();
        alignCenter();
        height("50%");
        width("30%");
    }});
}});
This image is scaled to use 50% of the height and 30% of the width of its container.
Add Static Text
The game title is a typical example of static text. In the start screen foreground layer, add the following text element:
// panel added
panel(new PanelBuilder("panel_top") {{
    childLayoutCenter();
    alignCenter();
    backgroundColor("#f008");
    height("25%");
    width("75%");

    text(new TextBuilder() {{
        text("My Cool Game");
        font("Interface/Fonts/Default.fnt");
        height("100%");
        width("100%");
    }});
}});
For longer pieces of static text, such as an introduction, you can use wrap="true". Setting wrap="true" will only work when you set a width for the text element, so that Nifty knows when to wrap a line. Add the following text element to the Start screen foreground layer:
panel(new PanelBuilder("panel_mid") {{
    childLayoutCenter();
    alignCenter();
    backgroundColor("#0f08");
    height("50%");
    width("75%");

    // add text
    text(new TextBuilder() {{
        text("Here goes some text describing the game and the rules and stuff. "
           + "Incidentally, the text is quite long and needs to wrap at the end of lines.");
        font("Interface/Fonts/Default.fnt");
        wrap(true);
        height("100%");
        width("100%");
    }});
}});
The font used is jME3’s default font “Interface/Fonts/Default.fnt” which is included in the jMonkeyEngine.JAR. You can add your own fonts to your own assets/Interface directory. Set your font to the one you created during the start of the Gui Implementation phase of your game.
Add Controls
Before you can use any control, you must load a Control Definition first. That’s why we add the following two lines before the screen definitions:
nifty.loadStyleFile("nifty-default-styles.xml");
nifty.loadControlFile("nifty-default-controls.xml");
Label Control
Use label controls for text that you want to edit dynamically from Java. One example for this is the score display.
In the hud screen’s foreground layer, add the following text element:
panel(new PanelBuilder("panel_top_right1") {{
    childLayoutCenter();
    backgroundColor("#00f8");
    height("15%");
    width("100%");

    control(new LabelBuilder(){{
        color("#000");
        text("123");
        width("100%");
        height("100%");
    }});
}});
Note that the width and height do not scale the bitmap font, but make indirectly certain it is centered. If you want a different size for the font, you need to provide an extra bitmap font (they come with fixes sizes and don’t scale well).
Button Control
Our GUI plan asks for two buttons on the start screen. You add the Start and Quit buttons to the bottom panel of the start screen using the <control> element:
panel(new PanelBuilder("panel_bottom_left") {{
    childLayoutCenter();
    valignCenter();
    backgroundColor("#44f8");
    height("50%");
    width("50%");

    // add control
    control(new ButtonBuilder("StartButton", "Start") {{
        alignCenter();
        valignCenter();
        height("50%");
        width("50%");
    }});
}});

panel(new PanelBuilder("panel_bottom_right") {{
    childLayoutCenter();
    valignCenter();
    backgroundColor("#88f8");
    height("50%");
    width("50%");

    // add control
    control(new ButtonBuilder("QuitButton", "Quit") {{
        alignCenter();
        valignCenter();
        height("50%");
        width("50%");
    }});
}});
Note that these controls don’t do anything yet – we’ll get to that soon.
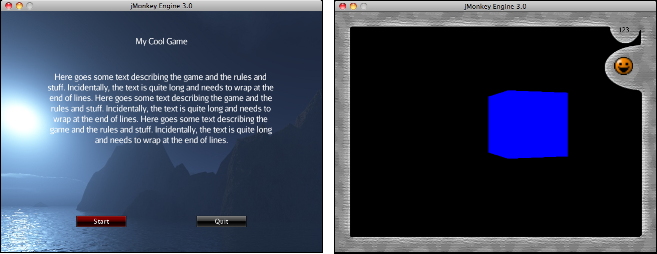
Intermediate Result
When you preview this code in the jMonkeyEngine SDK, our tutorial demo should looks as follows: A start screen with two buttons, and a game screen with a simple HUD frame and a blue cube (which stands for any jME3 game content).
| Remove all lines that set background colors, you only needed them to see the arrangement. |
Your Screen.java file should look like this:
package mygame;

import com.jme3.app.Application;
import com.jme3.app.SimpleApplication;
import com.jme3.app.state.BaseAppState;
import com.jme3.niftygui.NiftyJmeDisplay;
import de.lessvoid.nifty.Nifty;
import de.lessvoid.nifty.builder.ImageBuilder;
import de.lessvoid.nifty.builder.LayerBuilder;
import de.lessvoid.nifty.builder.PanelBuilder;
import de.lessvoid.nifty.builder.ScreenBuilder;
import de.lessvoid.nifty.builder.TextBuilder;
import de.lessvoid.nifty.controls.button.builder.ButtonBuilder;
import de.lessvoid.nifty.controls.label.builder.LabelBuilder;
import de.lessvoid.nifty.screen.DefaultScreenController;

public class Screen extends BaseAppState {

    @Override
    protected void initialize(Application app) {
        //It is technically safe to do all initialization and cleanup in the
        //onEnable()/onDisable() methods. Choosing to use initialize() and
        //cleanup() for this is a matter of performance specifics for the
        //implementor.
        //TODO: initialize your AppState, e.g. attach spatials to rootNode
    }

    @Override
    protected void cleanup(Application app) {
        //TODO: clean up what you initialized in the initialize method,
        //e.g. remove all spatials from rootNode
    }

    //onEnable()/onDisable() can be used for managing things that should
    //only exist while the state is enabled. Prime examples would be scene
    //graph attachment or input listener attachment.
    @Override
    protected void onEnable() {
        NiftyJmeDisplay niftyDisplay = NiftyJmeDisplay.newNiftyJmeDisplay(
                getApplication().getAssetManager(),
                getApplication().getInputManager(),
                getApplication().getAudioRenderer(),
                getApplication().getGuiViewPort());

        Nifty nifty = niftyDisplay.getNifty();
        getApplication().getGuiViewPort().addProcessor(niftyDisplay);
        ((SimpleApplication) getApplication()).getFlyByCamera().setDragToRotate(true);

        nifty.loadStyleFile("nifty-default-styles.xml");
        nifty.loadControlFile("nifty-default-controls.xml");

        nifty.addScreen("start", new ScreenBuilder("start") {{
            controller(new DefaultScreenController());
            // layer added
            layer(new LayerBuilder("background") {{
                childLayoutCenter();
//                backgroundColor("#000f");

                // add image
                image(new ImageBuilder() {{
                    filename("Interface/start-background.png");
                }});
            }});

            layer(new LayerBuilder("foreground") {{
                childLayoutVertical();
//                backgroundColor("#0000");

                // panel added
                panel(new PanelBuilder("panel_top") {{
                    childLayoutCenter();
                    alignCenter();
//                    backgroundColor("#f008");
                    height("25%");
                    width("75%");

                    text(new TextBuilder() {{
                        text("My Cool Game");
                        font("Interface/Fonts/Arial.fnt");
                        height("100%");
                        width("100%");
                    }});
                }});

                panel(new PanelBuilder("panel_mid") {{
                    childLayoutCenter();
                    alignCenter();
//                    backgroundColor("#0f08");
                    height("50%");
                    width("75%");

                    // add text
                    text(new TextBuilder() {{
                        text("Here goes some text describing the game and the rules and stuff. "
                           + "Incidentally, the text is quite long and needs to wrap at the end of lines. ");
                        font("Interface/Fonts/Arial.fnt");
                        wrap(true);
                        height("100%");
                        width("100%");
                    }});
                }});

                panel(new PanelBuilder("panel_bottom") {{
                    childLayoutHorizontal();
                    alignCenter();
//                    backgroundColor("#00f8");
                    height("25%");
                    width("75%");

                    panel(new PanelBuilder("panel_bottom_left") {{
                        childLayoutCenter();
                        valignCenter();
//                        backgroundColor("#44f8");
                        height("50%");
                        width("50%");

                        // add control
                        control(new ButtonBuilder("StartButton", "Start") {{
                            alignCenter();
                            valignCenter();
                            height("50%");
                            width("50%");
                        }});
                    }});

                    panel(new PanelBuilder("panel_bottom_right") {{
                        childLayoutCenter();
                        valignCenter();
//                        backgroundColor("#88f8");
                        height("50%");
                        width("50%");

                        // add control
                        control(new ButtonBuilder("QuitButton", "Quit") {{
                            alignCenter();
                            valignCenter();
                            height("50%");
                            width("50%");
                        }});
                    }});
                }}); // panel added
            }});
            // layer added

        }}.build(nifty));

        nifty.addScreen("hud", new ScreenBuilder("hud") {{
            controller(new DefaultScreenController());

            layer(new LayerBuilder("background") {{
                childLayoutCenter();
//                backgroundColor("#000f");

                // add image
                image(new ImageBuilder() {{
                    filename("Interface/hud-frame.png");
                }});
            }});

            layer(new LayerBuilder("foreground") {{
                childLayoutHorizontal();
//                backgroundColor("#0000");

                // panel added
                panel(new PanelBuilder("panel_left") {{
                    childLayoutVertical();
//                    backgroundColor("#0f08");
                    height("100%");
                    width("80%");
                    // <!-- spacer -->
                }});

                panel(new PanelBuilder("panel_right") {{
                    childLayoutVertical();
//                    backgroundColor("#00f8");
                    height("100%");
                    width("20%");

                    panel(new PanelBuilder("panel_top_right1") {{
                        childLayoutCenter();
//                        backgroundColor("#00f8");
                        height("15%");
                        width("100%");

                        control(new LabelBuilder(){{
                            color("#000");
                            text("123");
                            width("100%");
                            height("100%");
                        }});
                    }});

                    panel(new PanelBuilder("panel_top_right2") {{
                        childLayoutCenter();
//                        backgroundColor("#44f8");
                        height("15%");
                        width("100%");

                        // add image
                        image(new ImageBuilder() {{
                            filename("Interface/face1.png");
                            valignCenter();
                            alignCenter();
                            height("50%");
                            width("30%");
                        }});
                    }});

                    panel(new PanelBuilder("panel_bot_right") {{
                        childLayoutCenter();
                        valignCenter();
//                        backgroundColor("#88f8");
                        height("70%");
                        width("100%");
                    }});
                }}); // panel added
            }});
        }}.build(nifty));

        nifty.gotoScreen("hud"); // start the screen

    }

    @Override
    protected void onDisable() {
        //Called when the state was previously enabled but is now disabled
        //either because setEnabled(false) was called or the state is being
        //cleaned up.
    }

    @Override
    public void update(float tpf) {
        //TODO: implement behavior during runtime
    }

}
Nifty Java Settings
Before initializing the nifty screens, you set up properties and register media.
| Nifty Method | Description |
|---|---|
registerSound("mysound", "Interface/abc.wav"); |
|
registerMusic("mymusic", "Interface/xyz.ogg"); |
|
registerMouseCursor("mypointer", "Interface/abc.png", 5, 4); |
|
registerEffect(?); |
? |
setDebugOptionPanelColors(true); |
Highlight all panels, makes it easier to arrange them. |
Example:
nifty.registerMouseCursor("hand", "Interface/mouse-cursor-hand.png", 5, 4);Next Steps
Integrate the GUI into the game. Typically, you will overlay the GUI.
-
Nifty GUI Overlay (recommended)
-
Nifty GUI Projection (optional)