Simple Water
jMonkeyEngine offers a SimpleWaterProcessor that turns any quad (flat rectangle) into a reflective water surface with waves. You can use this quad for simple limited water surfaces such as water troughs, shallow fountains, puddles, shallow water in channels. The SimpleWaterProcessor has less performance impact on your game than the full featured SeaMonkey WaterFilter; the main difference is that the SimpleWaterProcessor does not include under-water effects.
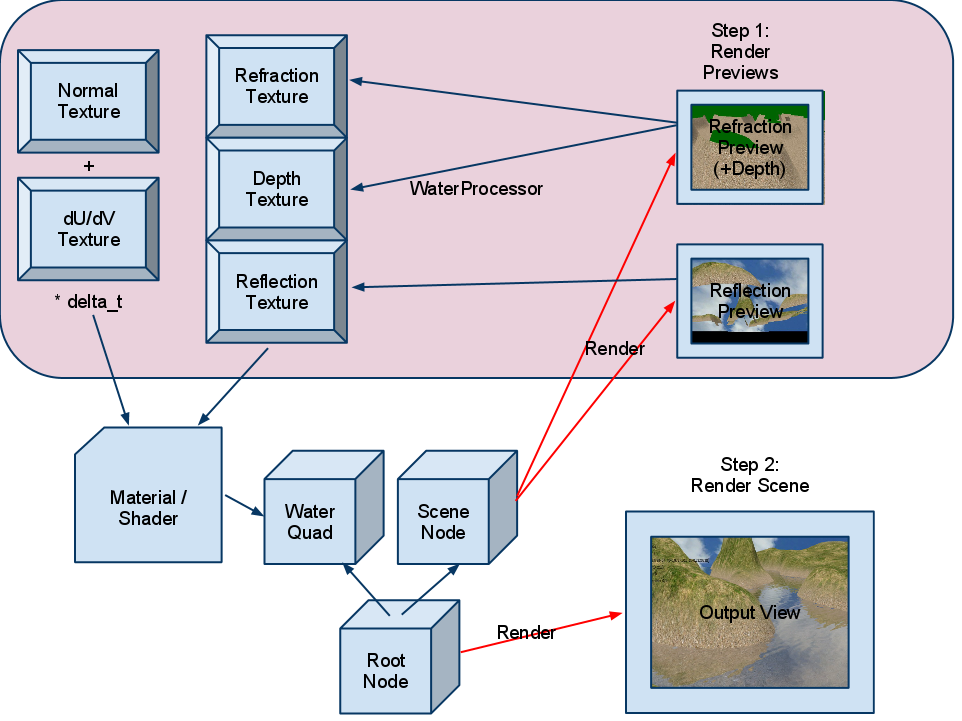
Here is some background info for JME3’s basic water implementation:
SimpleWaterProcessor
A JME3 scene with water can use a com.jme3.water.SimpleWaterProcessor (which implements the SceneProcessor interface).
To achieve a water effect, JME3 uses shaders and a special material, Common/MatDefs/Water/SimpleWater.j3md. The water surface is a quad, and we use normal map and dU/dV map texturing to simulate the waves.
-
Every frame, we render to three texture maps:
-
For the water surface (reflection), we take a snapshot of the environment, flip it upside down, and clip it to the visible water surface. Note that we do not actually use a “water” texture color map: The “texture” of the water is solely a distorted reflection.
-
For the “wavy” distortion (refraction), we use the derivative of a normal map, a dU/dV map.
-
For the fogginess of water (depth) we use a depth map from the terrains z-buffer.
-
-
In the shaders, we add all of the texture maps together.
-
For the “bumpy” displacement of the waves, we use a normal map and a du/dv map that are shifted against each other over time to create the wave effect.
-
For the light reflection vectors on the water surface, we use the Fresnel formula, together with normal vectors.
-
We add specular lighting.
-
-
(For the underwater caustics effect, we use splatted textures. – WIP/TODO)
Usage
-
Create a
mainSceneNode-
Attach the
mainSceneNode to therootNode
-
-
Load your
sceneSpatial-
Add a light source to the
sceneSpatial -
Attach the
sceneSpatial to themainSceneNode
-
-
Load your sky Geometry
-
Attach the sky Geometry to the
mainSceneNode
-
-
Create the SimpleWaterProcessor
waterProcessor-
Set the processor’s ReflectionScene to the
mainSceneSpatial (!) -
Set the processor’s Plane to where you want your water surface to be
-
Set the processor’s WaterDepth, DistortionScale, and WaveSpeed
-
Attach the processor to the
viewPort
-
-
Create a Quad
quad-
Set the quad’s TextureCoordinates to specify the size of the waves
-
-
Create a
waterGeometry from the Quad-
Set the water’s translation and rotation (same Y value as Plane above!)
-
Set the water’s material to the processor’s output material
-
Attach the
waterGeometry to therootNode. (Not to the mainScene!)
-
Sample Code
The sample code can be found in TestSimpleWater.java and TestSceneWater.java.
Here is the most important part of the code:
// we create a water processor
SimpleWaterProcessor waterProcessor = new SimpleWaterProcessor(assetManager);
waterProcessor.setReflectionScene(mainScene);

// we set the water plane
Vector3f waterLocation=new Vector3f(0,-6,0);
waterProcessor.setPlane(new Plane(Vector3f.UNIT_Y, waterLocation.dot(Vector3f.UNIT_Y)));
viewPort.addProcessor(waterProcessor);

// we set wave properties
waterProcessor.setWaterDepth(40);         // transparency of water
waterProcessor.setDistortionScale(0.05f); // strength of waves
waterProcessor.setWaveSpeed(0.05f);       // speed of waves

// we define the wave size by setting the size of the texture coordinates
Quad quad = new Quad(400,400);
quad.scaleTextureCoordinates(new Vector2f(6f,6f));

// we create the water geometry from the quad
Geometry water=new Geometry("water", quad);
water.setLocalRotation(new Quaternion().fromAngleAxis(-FastMath.HALF_PI, Vector3f.UNIT_X));
water.setLocalTranslation(-200, -6, 250);
water.setShadowMode(ShadowMode.Receive);
water.setMaterial(waterProcessor.getMaterial());
rootNode.attachChild(water);
Settings
You can lower the render size to gain higher performance:
waterProcessor.setRenderSize(128,128);The deeper the water, the more transparent. (?)
waterProcessor.setWaterDepth(40);A higher distortion scale makes bigger waves.
waterProcessor.setDistortionScale(0.05f);A lower wave speed makes calmer water.
waterProcessor.setWaveSpeed(0.05f);If your scene does not have a lightsource, you can set the light direction for the water:
waterProcessor.setLightDirection( new Vector3f(0.55f, -0.82f, 0.15f));Instead of creating a quad and specifying a plane, you can get a default waterplane from the processor:
Geometry waterPlane = waterProcessor.createWaterGeometry(10, 10);
waterPlane.setLocalTranslation(-5, 0, 5);
waterPlane.setMaterial(waterProcessor.getMaterial());
You can offer a switch to set the water Material to a static texture – for users with slow PCs.