jMonkeyEngine SDK: Importing and Viewing Models
The jMonkeyEngine SDK imports models from your project and stores them in the assets folder. The imported models are converted to a jME3 compatible binary format called .j3o. Double-click .j3o files in the jMonkeyEngine SDK to display them in the SceneViewer, or load them in-game using the AssetManager.
Presently, Blender 3D is the preferred modelling tool for jME3 as it is also Open-Source Software and an exporter for GLTF files exists. View the 3D model Supported External File Types and their export/conversion options for more info.
|
Blender no longer supports Ogre exporting as of version 2.8. It’s highly recommended that you export and convert files using the GLTF type. Ogre will eventually be removed from this wiki. |
Also, see this demo video on importing models.
Installing the OgreXML Exporter in Blender
The jMonkeyEngine SDK includes a tool to install the correct exporter tools in Blender to export OgreXML files. To install the exporter, do the following:
-
Select
in the jMonkeyEngine SDK Menu. -
If you are presented a filechooser, select the folder where your blender scripts reside.
-
Press “Install” in the window that opens.
Also check out how to create compatible models in blender and how to organize your assets.
Using the model files directly
-
Create a separate folder for each model in the
assetsfolder of your project. -
Export the model created in Blender to the
assetfolder of your project, -
Make sure all textures used in the .blend file are in the assets folder of the project.
-
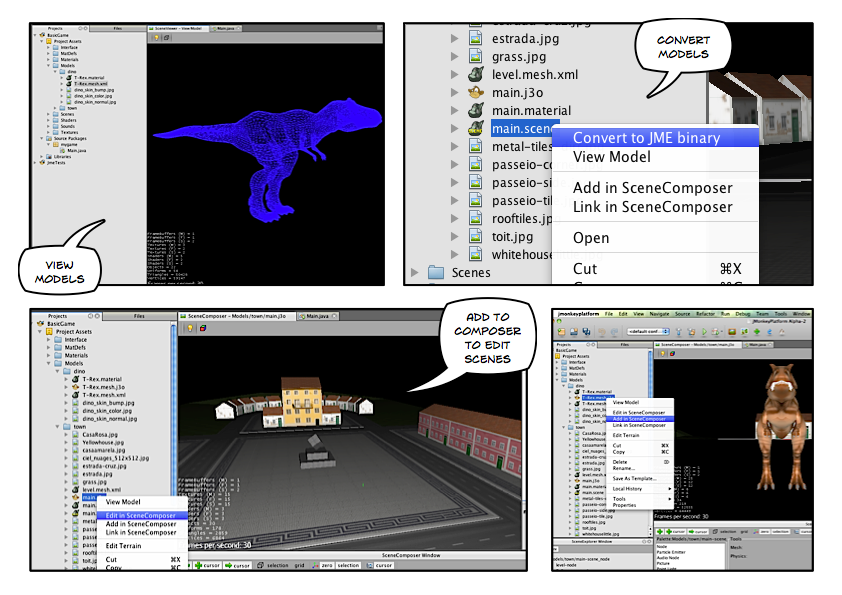
Double-click the model or right-click and select “Convert to JME binary” from the context-menu.
-
In the Projects Explorer Assets node you should see your model j3o file.
-
Double-click it to view it in the SceneViewer.
-
Click on the lightbulb to turn on the light if you cannot see your model.
|
It is important that you export the model file and its textures to the correct assets folder before creating the j3o file because the paths for textures (and possibly other things) will be stored as absolute (to the assets folder root) when you convert that model. This means the texture location should not change after the import. |
|
If the SceneViewer doesn’t work refer to Troubleshooting jMonkeyEngine3 SDK. |
Working With a Model
-
Open
to view sub-nodes of the model. -
Open
to view the properties of the model’s nodes. -
Click the cube button in the SceneViewer to toggle between Wireframe mode and Textured mode.
-
Click the lightbulb to view Materials that require a light source
Notes About Model Assets
The original OgreXML .mesh.xml, .scene, .material, .skeleton.xml or .gltf model files will not be included in the distribution assets.jar file of your distributed game, they are only available in the assets folder so you are able to recreate the .j3o file from the original if you ever come to change it in blender and have to export it again.
About the SceneViewer and SceneExplorer window
The SceneViewer and SceneExplorer windows are shared among plugins to save system resources. This means that you will have to keep an eye on what plugin is using the scene right now and what you are actually modifying in these windows.
Most plugins will deliver their own UI elements to modify the scene so the SceneExplorer is more of a global tool. The simple SceneComposer however heavily relies on its functions as other plugins might too in the future.
About the projects AssetManager
Each jMonkeyEngine SDK project has its own internal AssetManager that has the projects assets folder registered as a FileLocator. When the project is run, the assets folder is compressed into a jar file and added to the projects main jar classpath. This way the editors in jMonkeyEngine SDK and the running game have the same asset folder structure.
You might wonder why jMonkeyEngine SDK requires you to copy the model that is to be converted to j3o into the assets folder before. The Model Import Tool also copies the model and associated files to the project directory before converting. To load the model it needs to be in a folder (or jar etc..) that belongs to the projects AssetManager root. To load a model from some other folder of the filesystem, that folder would have to be added to the AssetManager root. If every folder that contains a model was in the root of the AssetManager, all textures named “hull.jpg” for example would be the same for the AssetManager and it would only deliver the texture of the first model folder that was added.
To have a valid jME3 object, the paths to textures and other assets belonging to the model have to be read with the correct, final path that can then be stored in the j3o object. The j3o object will use those paths when it is loaded with the AssetManager and it requires the AssetManager to deliver the assets on those paths, this is why the folder structure while converting has to be the same as when loading.