jMonkeyEngine SDK: Application Deployment
After you have written and tested your game, you want to brand it and distribute it to your users. If you use the build script provided by the jMonkeyEngine SDK’s BaseGame, you have the following deployment options:
-
Desktop application (.JAR)
-
WebStart from URL (.JNLP + .JAR)
-
Applet in web browser (.JNLP + .JAR)
-
Android mobile device (.APK)
-
iOS mobile device (XCode project)
Requirements
Since JAR files are platform independent, your customers can play your jMonkeyEngine application on Windows, Mac OS, or Linux. The only requirement is that the user has the correct version of the free Java Runtime (or browser plugin) installed. For more information see http://java.com.
Branding
Make your game unique and recognizable:
-
Open your game project in the SDK’s “Projects” window.
-
RMB click the project and open the “Properties”
-
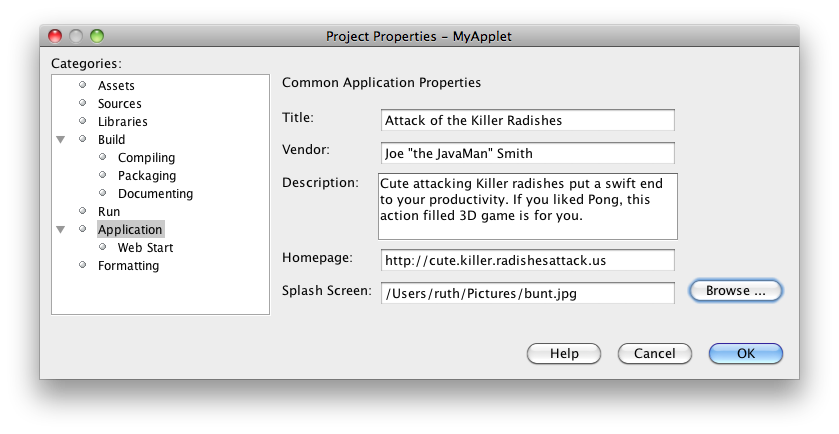
Open the section. Here you configure your branding:
-
Title: Enter the game’s name
-
Vendor: Enter your name (the development team)
-
Description: Write one line why your game is the coolest ever

-
Homepage: Enter your web URL, so your fans can find you
-
Splashscreen: Browse to a cool screenshot that will be displayed while the game loads.
-
-
Click OK.
-
Clean and Build.
Your executables are now branded.
TODO: where does this info actually show up?
Creating the Distributable
When you run the build script provided by the jMonkeyEngine SDK, it automatically compiles your classes, libraries, and assets. It creates a dist directory in your project directory which contains the executable JAR and a directory with libraries.
In the simplest case, you zip up the dist directory and distribute it to your customers. Companies often have additional tools to create executables and installers.
Here are your deployment options in detail:
Desktop Application (JAR)
The JAR file is the most common deployment method for Java desktop applications. The user downloads the executable JAR file to his machine and runs it to start the game.
-
RMB click your project and open the “Project Properties”.
-
In the category, make sure the box “Enable Web Start” is not checked. Click OK.
-
RMB click your project and “Clean and Build”.
-
If the build succeeds you see a line similar to
Building jar: /home/joe/jMonkeyPlatform/MySuperTestGame/dist/MySuperTestGame.jar
this means the executable JAR has been generated successfully in your project directory. -
Zip up the
distdirectory and distribute it to your users. Make sure to keep thelibdirectory in it!
Most operating systems execute a JAR when users double-click on it, but you can also create a launcher.
Desktop Executables (.EXE, .APP, .JAR)
jMonkeyEngine SDK allows you to create launchers for different desktop platforms, like an .exe file for Windows systems, an Application for MaxOSX and a launcher for Linux systems.
-
RMB click your project and open the “Project Properties”.
-
In the category, select the checkboxes for the platforms you want to distribute to.
-
Click OK.
A resources folder in your project folder will be created that contains the template icons and settings files for each selected platform. If you change one of them, de-selecting the deployment for that platform will not delete this resource file anymore and it will not be overwritten when you re-enable deployment for that platform.
When you build your project, zip files for each selected platform will be created in the dist folder that contain all that is needed to run your application on that platform.
Web Start (.JNLP)
Web Start allows your users to start your application by simply clicking a link that you provide, for example in a button on your web page. The browser downloads the JAR file and then automatically runs your game in an extra window. The only requirement is that the user’s browser has the Java plugin installed. This is a very user-friendly way for your customers to play your game without any extra steps to install it. Optionally, you can set it up so the file is saved to their desktop and can be restarted later, so they do not need to be online to play.
-
RMB click your project and open the “Project Properties”.
-
In the category, check the box to “Enable Web Start”.
-
Check the box to make the application self-signed.
-
Optionally, check the box to allow offline use.
-
Make sure
Application Descriptoris activated. Click OK.
-
-
RMB click your project and Clean and Build. The
distdirectory is generated. -
Upload the contents of the
distdirectory to a public http server. -
Either edit the sample launch.html file, or simply add a standard link (A HREF) pointing to your .jnlp file to one of your web pages.
-
Tell your users to open your page in a web browser, and click the link to webstart the application.
Look at the sample launch.html, you can have any custom content around the link. Keep a copy of your launcher file because the jMonkeyEngine SDK will always regenerate its default launch.html. Also, see this demo video on creating WebStarts.
Browser Applet
A browser Applet is a Java application that runs in the web browser while the user is visiting your web page. The only requirement is that the user’s browser has the Java plugin installed. There is no installation step, the user can play right away in the browser. The user will not be able to save the game to his harddrive, nor can he play offline.
These instructions assume that you have already written a game that you want to turn into an Applet. As opposed to other jME3 games, Applets cannot capture the mouse for navigation, so the camera will be switched to dragToRotate mode. The jMonkeyEngine SDK and the included build script already contain what you need.
To Turn a Project Into an Applet
-
RMB click your project and open the “Project Properties”.
-
In the category, check the box to enable “Applet” creation.
-
Change the applet width and height as you want it.
-
Click OK.
-
-
RMB click your project and “Clean and Build”.
The dist/Applet directory now contains all the files necessary for the game to run as Applet. To test the Applet-based game, run the project in the jMonkeyEngine SDK.
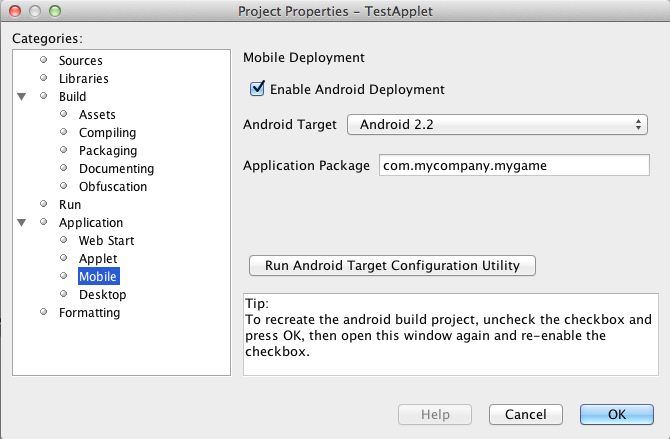
Android Mobile Device
You can set the jMonkeyEngine SDK to build an executable for Android mobile platforms.
Learn more about Android Support here.
iOS Device
You can set the jMonkeyEngine SDK to build an executable for iOS platforms. A Mac with XCode installed is needed.
Learn more about iOS Support here.
Tip: Switching Build Configurations
The jMonkeyEngine SDK has a Run Configuration menu in the toolbar. Use it to save your various sets of Project Property configurations, and switch between them.
-
Click the
Set Project Configurationpopup in the toolbar and choose Customize. -
The Project Properties Run section opens. Under Configuration, click New.
-
Name the saved configuration, for instance “my webstart” vs “my desktop app”, or “development” vs “deployment”. Click OK.
-
Make sure the new config is selected in the
Set Project Configurationpopup above the editor. -
Make changes to the Project Properties as described above.
Now you can use the Set Project Configuration popup menu to switch between your run/build configurations.
Tip: Reduce Distribution File Size
There may be several parts of the full jMonkeyEngine library that you do not even use in your application. You should leave out the corresponding libraries from your distribution.
To remove unused libraries:
-
RMB click your project and select “Properties”
-
Select “Libraries” on the left
-
Select the “jme3-libraries” entry and press “remove”.
This library package contains all libraries for jME3 and is quite large. -
Press the “Add Library” button
-
Select the “jme3-libraries-lwjgl-minimum” library
-
Add other jME3 libraries in the same way depending which features you use:
jme3-libraries-gui, jme3-libraries-physics, jme3-libraries-video, etc. -
Click OK.
-
Clean, Build and Run the project and make sure you have not missed anything.