jMonkeyEngine SDK: AssetPacks and AssetPack Browser
AssetPacks are a way to package jME3 compatible assets (like models, textures, sounds and whole scenes!) into a package that contains publisher info, license info, descriptions etc. for all of the assets. An AssetPack basically consists of an assetpack.xml file that describes the content and an assets folder that contains the content. The integrated browser in the jMonkeyEngine SDK allows you to add the assets from installed AssetPacks to any jme3 project scene you are working on.
The AssetPack Browser
Browsing Assets
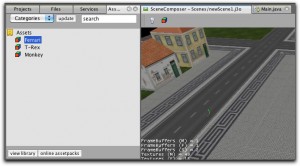
The AssetPack browser in jMonkeyEngine SDK makes browsing the installed AssetPacks easy. Browse categories, search for tags and find the right asset for your project. When you have found it, you can add it with one click to your current scene. The AssetPack manager will automagically copy all needed textures, sounds etc. to your projects assets folder.
|
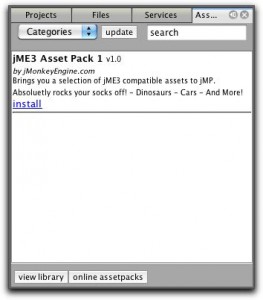
You can also browse a selection of online assetpacks that are available on jMonkeyEngine.org for download and install them to your jMonkeyEngine SDK’s AssetPack browser. |
The AssetPack browser uses a predefined directory to store the AssetPacks which is also used for new AssetPack projects. You can see and change the folder path in the AssetPack preferences (jMonkeyEngine SDK→Settings).
Adding Assets to Your Scene
To preview a model from the browser, right-click it and select “Preview Asset”
To add a model from the AssetPack browser to a scene do the following:
-
Create a new scene (j3o) file or use an existing one
-
Open it in the SceneComposer by right-clicking it and selecting “Edit” in SceneComposer
-
Select the root node of the scene (or another node you want to add the model to)
-
Right-click a model in the AssetBrowser and select “Add” to SceneComposer
The model will be added to your scene and all needed texture files will be copied to your projects assets folder.
Create Your Own AssetPack Project
AssetPack projects are a way to create your own AssetPacks, either for personal use or for publishing. With this project type in jMonkeyEngine SDK you can create a library of assets on your computer that you can use in any of your projects via the AssetPack browser. Editing of asset and project info, adding of new assets and setting their properties, everything you need to create and publish your AssetPacks is there.
-
Choose from the menu
-
Choose “AssetPack Project”
-
Fill in the project info and press “finish”
You can access and change the project properties by right-clicking the project and selecting “Properties”.
Add Your Own Assets
To add new assets to your AssetPack do the following:
-
Right-Click the “Assets” node of the AssetPack project
-
Select “Add Asset”..
-
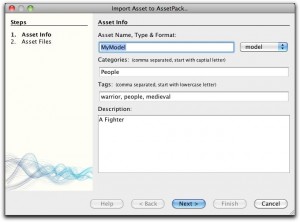
Specify the info about your asset and press Next
-
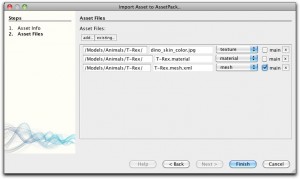
Press the “add” files button and select all files belonging to your asset
-
Select the “main” checkbox for the main model file if your asset is a model file
-
Change the asset paths and types if needed and press “finish”
The global asset type can be “model”, “scene”, “texture”, “sound”, “shader” or “other”
With the “model” or “scene” types, the AssetPack browser will try to load and add a model file from the selected assets when the user selects “Add” to SceneComposer. Specify the “load” this model with material flag for the model file that should be loaded via the AssetManager, you can also specify multiple mesh or scene files to be loaded. All texture and other needed files will be copied to the users project folder.
On the “Add Files” page you define the path of the files in the AssetPack. The importer tries to generate a proper path from the info entered on the first page. Note that for j3o binary models, the texture paths have to be exactly like they were during conversion. The given paths will also be used when copying the data to the users “assets” folder.
With the “add files” button you can open a file browser to select files from your harddisk that will be copied into the assets/ folder of the AssetPack project. With the “add existing” button you can add a file that’s already in your AssetPack assets folder to a new asset item. This way you can reuse e.g. textures for asset items or make items for an existing collection of asset files that you copied to the projects assets folder.
You can specify a specific material to be used for the single mesh/scene files, just select it in the dropdown below the mesh or scene file. If you don’t select a material file here, the first found material file is used or none if none is found.
If the material file is an Ogre material file (.material) it will be used for loading an Ogre scene or mesh file. If it is a jMonkeyEngine3 material file (.j3m), it will be applied to the mesh regardless of model type. Note that for j3o models you don’t need material files as the material is stored inside the j3o file.
|
In your AssetPack Project, right-click each asset and select “preview asset” to see your model. Verify hat it looks correctly, because then it should work for other users as well. |
You can change the single assets properties in the properties window after you have added them. Just select an asset and open the properties window (Windows→Properties).
Supported formats for models (main files) are:
-
OgreXML .mesh.xml / .scene
-
Wavefront .obj
-
jMonkeyEngine3 .j3o
-
Blender .blend (unpack textures)
AssetPack Publishing
You can publish your AssetPacks either as a zip file or directly to jmonkeyengine.org, using your website user name and login. This means other jMonkeyEngine SDK users can download your AssetPacks and install them to their local database right off the AssetPack online packages browser.
|
To make sure you can upload, you have to be registered on jmonkeyengine.org, and have to enter your login info in the AssetPack preferences: jMonkeyEngine SDK→Options→Asset Packs first. |
-
Right-Click your AssetPack project in the SDK and select “Publish AssetPack”…
-
Check the description etc. settings, and press “Next”.
-
Select the checkbox for online and/or local publishing and press “finish”.