Engine Release Guide
Repo and Branches
Authoritative source code for the Engine lives in a public repository at GitHub. The repo’s homepage is at https://github.com/jMonkeyEngine/jmonkeyengine
The default branch in the public repo is named "master". That’s where the leading-edge code is kept. All incoming pull requests should be integrated to "master".
The other branches in the repo fall into 2 categories:
-
release branches, used to develop stable releases, and
-
development branches, used to develop features or fixes that involve multiple commits.
Release branch names, such as "v3.2" and "v3.3", refer to release numbers. Development branches should have descriptive names, such as "opengles2-fixes".
Continuous Integration
Every push to "master" causes a continuous-integration (CI) workflow to run at GitHub Actions. The workflow is defined by the "main.yml" script. It performs clean builds of the Engine across a matrix of 4 operating systems and 2 Java versions. It also performs a clean build of the merged javadoc.
Any failure of the CI workflow causes notifications to be sent. To register for notifications, follow the instructions at https://docs.github.com/en/github/managing-subscriptions-and-notifications-on-github/configuring-notifications
Every step in the workflow generates a detailed log, which can be browsed via the web interface. Often the cause of a CI failure can be deduced from the log of the first failed step.
|
GitHub provides an easy way to determine whether CI is failing. Browse to https://github.com/jMonkeyEngine/jmonkeyengine/commits/master and look for colored icons to the right of the dates of recent push commits.
Selecting a colored icon causes a list of jobs ("checks") to pop up. Select the "Details" link after a job description to access detailed information about that job. |
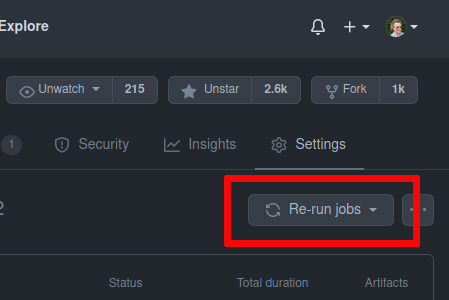
Sometimes CI fails due to transient networking issues. In this case, someone with the necessary privileges should retry the failed run by clicking on the "Re-run jobs" button on the summary page of the run. To reach the summary page, browse to https://github.com/jMonkeyEngine/jmonkeyengine/actions and select on the failed run from the displayed list.
Breakage (persistent CI failures) of the "master" branch should be addressed promptly. When "master" is broken, no commits should be integrated except those intended to diagnose or repair the breakage.
Additional information about Engine development and integration may be found in the "CONTRIBUTING.md" file.
Release Naming
Official engine releases fall into 3 categories:
-
Alpha releases are "pre-release" builds intended only for internal testing.
-
Beta releases are "pre-release" builds intended for broader testing.
-
Stable releases are fully tested builds suitable for production use.
The name of an Engine release is precisely the "version" portion of its Maven coordinates (<groupId>:<artifactId>:<version>). The name will always begin with a digit, currently "3". For extra clarity, the letter "v" (for "version") is prepended in some contexts. Thus "v3.2.4-stable" and "3.2.4-stable" both refer to the same release.
| To avoid confusion, release names should never be re-used. |
Names for stable releases should end with the "-stable" suffix. For instance, the first stable release from the "v3.2" branch was named "3.2.0-stable".
Patch (or "dot-dot" releases) are stable releases that don’t introduce any new features. For instance, the first patch release after "3.2.0-stable" was named "3.2.1-stable". Like its predecessor, it was released from the "v3.2" branch.
Names for alpha and beta releases should use "-alpha" or "-beta" and a sequentially assigned numeric ID in place of "-stable". For instance, the first alpha release leading up to "3.3.0-stable" was named "3.3.0-alpha1".
| To prevent interference between releases and ongoing development, beta releases and stable releases should be built only from release branches, never from "master". |
Initiating a New Release
The release process starts with the creation of a Git tag.
Do not use the git push command for this purpose!
Use GitHub’s web interface instead:
Browse to https://github.com/jMonkeyEngine/jmonkeyengine/releases/new and fill out the new-release web form, paying special attention to the target branch. The target branch defaults to "master", but more often you’ll want to specify a release branch as the target.
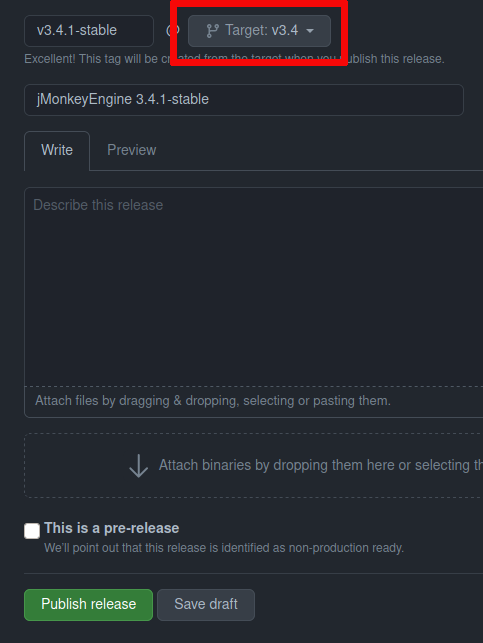
For the tag version, specify "v" followed by the version name. This determines the name of the Git tag that will be created.
For the release title, specify "jMonkeyEngine " followed by the version name. This field can be added or edited later.
For the description, write something brief. Like the title, this field can be added or edited later.
For an alpha or beta release, tick the "This is a pre-release" checkbox. This helps ensure that naive users are steered toward a stable release.
| Double-check the target branch before proceeding. Then triple-check it! |
To start the process, click on the green "Publish release" button at the bottom of the page.
Monitoring the Release Run
A release run takes 15-30 minutes, depending how busy GitHub’s server farm is.
Discord provides an easy way to verify that the run has begun. (A Discord client is not required.)
-
Log in to your Discord account.
-
Select the "github-builds" channel on the "jMonkeyEngine Community" server.
-
Look for a recent message from the "GitHub" bot saying "[jMonkeyEngine/jmonkeyengine] New release published". This indicates that a run has started, not that it’s complete!
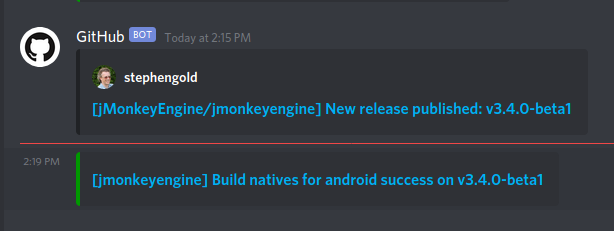
You can monitor its progress in the "github-builds" channel, where you will see job messages from the GitHub bot, such as "[jmonkeyengine] Build natives for android success". Each job message is linked to the GitHub webpage for that job.
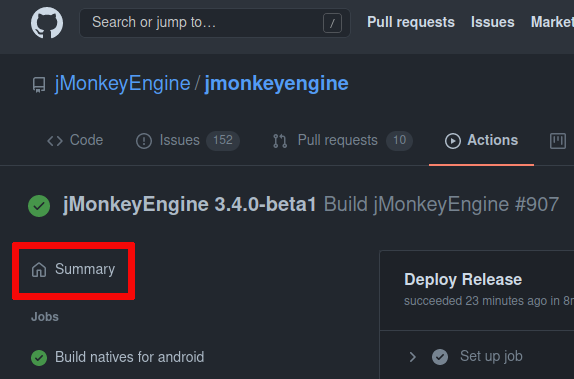
From any GitHub job page, select the "Summary" link to see a graphical summary of the run which contains the job.
Results of the Release Run
A successful release run automatically deploys various build products:
-
It deploys the merged javadoc to https://javadoc.jmonkeyengine.org/
-
It deploys the test chooser’s executable (a ZIP file) as an asset listed under the release description at GitHub Releases.
-
It also "stages" the signed Maven artifacts to Sonatype, as a "repository". However, staging to Sonatype does not make the artifacts publicly visible. For that to happen, the staging repository must be closed and synched.
Managing Repos at Sonatype
The official instructions are available from https://central.sonatype.org/publish/release/
Browse to the Nexus Repository Manager.
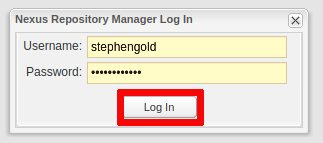
Select the "Log in" link in the upper right corner of the page.

Type your Sonatype credentials into the dialog box and click on the "Log In" button below.
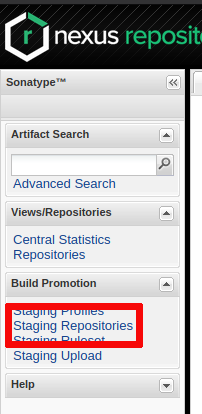
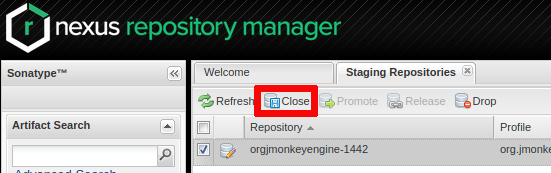
Under "Build Promotion" on the left sidebar, select "Staging Repositories".
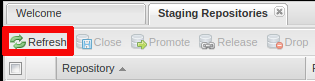
If you don’t see a freshly updated repo named "orgjmonkeyengine", click on the "Refresh" button occasionally until its record appears.
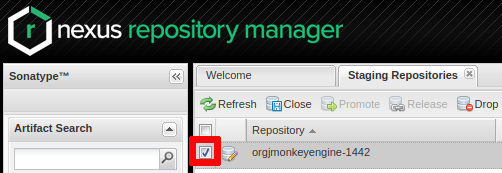
Select the newly staged repo by ticking the checkbox to the left of its record.
In the bottom half of the page, select the "Content" tab to browse the contents of newly staged repo.

When satisfied that the staged repo is 100% complete, click on the "Close" button and then the "Confirm" button to begin the automated validation process.
Click on the "Refresh" button again. In the bottom half of the page, select the "Activity" tab to watch the progress. Click on the "Refresh" button occasionally until a "Repository closed" message appears in the progress.
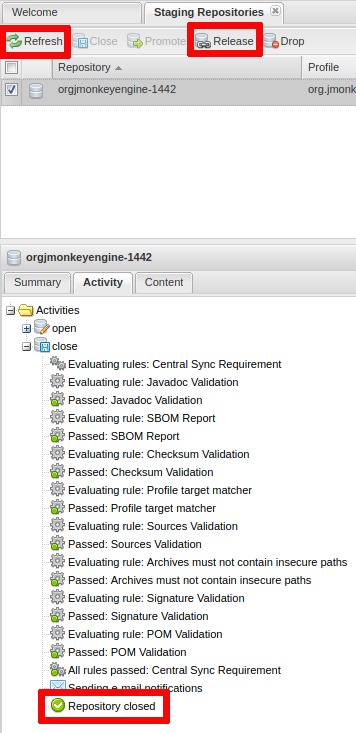
To begin the synching process, click on the "Release" button and then the "Confirm" button. The process usually takes about 20 minutes. I don’t know a good way to monitor this process. To detect completion, browse to https://repo1.maven.org/maven2/org/jmonkeyengine/jme3-core/ and refresh the web browser until the new folder appears.
Allow an additional hour or two for the new release to show up on Maven Central Repository Search.