Physically Based Rendering – Part one
I’ve been looking at Physically Based Rendering (PBR from now on) since a few weeks, because that’s what all the cool kids are talking about these days. I read almost all the interweb about it and finally somehow wrapped my head around the mechanics behind the concept.
None of the papers I read gave me the epiphany though, the understanding came little by little, literally reading some of the papers 10 times.
The intent of this series of posts is first to brush up the concept of PBR from the artist point of view (the easy part :D), and then to explain the physical concepts behind it and what you have to understand as a developer.
This paper aims to present PBR as I would explain it to my mother. You shouldn’t need a degree in image rendering theories, neither should you need to be a genius to understand what’s coming.
There are a lot of papers out there, with a lot of complicated words and equations, that assume a solid background knowledge of image rendering, lighting, shading etc…
I won’t assume this here.
Of course, I’d like this to be as accurate as possible, so if you have more information, or if explanations are not clear, feel free to chime in.
I’m an artist, I want to know what PBR is :
So you’re an artist, and have some experience in making assets for games. The most commonly used model for describing a material is the Phong reflection model (from Bui Tuong Phong, a clever guy that died very young).
This model describes how light reflects on a material by splitting it in 3 factors: Ambient color, Diffuse color, Specular color. This should sound familiar to 3D game artists.
This model is a very rough approximation of what’s really going on when light hit a surface of a real life material, but until then it was pretty much enough for a video game. Of course there are dozens of other models and even modification of Phong model, but this one is the most used, and that’s the one we use in jMonkeyEngine.
The issue with this model is that it’s complicated to have a material that looks consistent under different lighting environment.
-
Ambient is supposed to represent Ambient lighting, being some sort of omnipresent dim light, that tries to fake indirect lighting coming from reflection of light on the surrounding objects.
-
Diffuse is more straightforward: it’s the actual color of the object when it’s under a white light.
-
Specular represent the color of the reflected highlights, and the intensity is driven by a “shininess” parameter (at least in jME but that’s pretty common). The issue is that the specular color also drives the intensity because the brighter the color the more intense the specular will be.
All of this leads to a lot of tweaking to look correct, and may not look as good as it should under a different lighting environment. It also relies heavily on an artist’s best guesses about the material.
So here comes Physically Based Rendering. Not that the previous one was not physically based…but whatever, that sounds pretty cool.
Everybody has their own way to implement PBR, but every implementation share common goals and concepts.
Goals :
-
Ease the artist’s material workflow.
-
More “photo realistic” rendering.
Concepts :
-
Every surface has a reflection (specular); even the rougher ones at grazing angles.
-
Energy conservation: a surface cannot reflect more light that it has received.
This wraps up the entire concept but how does it translate in practice?
A material can now be described with 3 parameters :
Base color : Base color is the raw color of the material, it’s also often referred as the Albedo. It’s similar to the Diffuse color you know from Phong model, but with some crucial differences :
-
It should not contain any shading information. Very often with phong model, Ambient Occlusion (AO) is baked into the diffuse map. Here Base color must be the raw color of the material
-
It does not only influence the diffuse color, but also the specular color of the material.
Metalness : The degree of metallicity of the material. What does that mean? is your material rather metallic or rather not (non metallic materials are called dielectric materials in the literature). Some implementation calls that parameter “specular”, but I found it pretty misleading as it’s completely different as the specular we know today. In practice, just start out with extreme values to get the feel for it: 1 for metallic, 0 for dielectric.
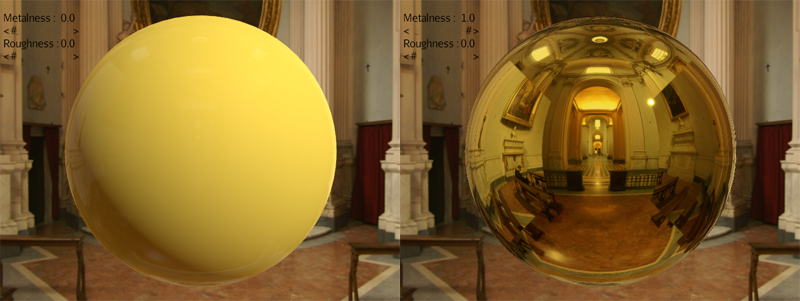
Here is the same material with metalness of 0 (dielectric) on the left and 1 (metallic) on the right.
Of course there are intermediary values, but from my reading, most dielectric material should vary from 0.04 and 0.1, and metallic are usually 1. Those values are based on real life measures and you can find some references about them here and here. Note that those values are not subject to interpretation, and are “known” factors and artist may follow them if they want to keep realistic look.
Roughness : The degree of roughness of the material : Is your material smooth or rough. 0 means smooth, 1 means rough. Some implementations refer to this as Smoothness or Glossiness. That’s essentially the same except it’s the other way around. 1 is smooth and 0 is rough. I find the term “Roughness” pretty much self explanatory and doesn’t leave room for misinterpretation.

Here is the same material with different level of roughness from 0 (left) to 1 (right). As opposed to metalness, this parameter is very artist driven. The roughness of a material does not really depend on physics, it’s more related to micro scratches, wearing, etc… So that’s where artists should be creative!
These parameters are the basics of PBR. Of course, each of them can be stored in a texture, and more common additional parameters can be used.
For example :
-
Normal map : the same as with phong model.
-
AO map : since we can’t bake AO in diffuse anymore, it’s now an extra channel.
The nice thing is that Metalness, Roughness and AO are grey scaled textures, so basically they only use one channel of a texture. So you can pack those 3 maps in one texture.
You can find an example asset that should work in a typical PBR implementation here. This page showcases pretty well what the textures should look like.
That’s it for PBR from the artist’s point of view. Next week I’ll explain what’s under the hood for you fellow developers 😉
Updates (01/01/2015)
Since this post I had some discussions about it and it appears, it lacks some information about the different art pipelines you may come across, the differences and what to expect from them.
The post above is about the Metalness Workflow.
The question I had frequently about it is “how one specify the specular color if you just have a black and white metalness texture?”.
The answer is you do in the albedo map.
In the metalness workflow the albedo map is used for both diffuse color and specular color. When the metalness is zero (dielectric material) the base color is the diffuse color of the material. When the metalness is one (metallic material), the base color is the specular color.
So if you wonder what this base color should be, just look at it in the most naive way. “What color is that thing?” and don’t care if that’s diffuse or specular.
The other common workflow is called the Specular workflow as it uses a specular color map instead of the metalness map. In this workflow, the albedo map is the diffuse color, the specular map is the specular color, and you have a gray scale gloss map that is the same as the roughness map but inverted (1 is smooth and 0 is rough).
Now there are pro and cons on using one or the other. Here are the main points :
Metalness workflow :
Pros
-
Use less texture space. Albedo map is an rgba map, metal and roughness can be packed in another rgba map and you have 2 additional channels for whatever you want (AO, cavity, …w/e)
-
Harder to make implausible materials (some may see this as a con thought). it’s not more physically accurate, but you’re sure to follow the energy conservation paradigm.
-
Easier color concept : base color is the color of the material.
Cons
-
May produce some white artifacts at the junction between metal and non metal
-
Harder to make implausible materials, not impossible though.
Specular workflow
Pros
-
Closer to the current phong workflow : diffuse map, specular map. Must be easier for seasoned artists to transition to PBR.
Cons
-
You’re in charge of the energy conservation paradigm (may be seen as a + for some).
-
More memory used : 2 rgba textures for diffuse and specular, you may be able to pack glossiness in the alpha channel of specular map, but you have no room left for anything and you may have to use a third texture.
IMO, the metalness workflow is more suited to real time 3D engine. And as an artist I find it more intuitive.
That said, as a developer making his PBR pipeline; especially for an engine mainly used by Indie devs; whatever pipeline you choose, you can’t ignore the other. Free or charged PBR ready model you can find are done with whatever workflow suited the artist. Some conversion are possible, but that’s easier for user to be able to use the model as is. That’s why I decided to support both in my implementation.