jMonkeyEngine 3 Tutorial (6) - Hello Materials
The term Material includes everything that influences what the surface of a 3D model looks like: The color, texture, shininess, and opacity/transparency. Plain coloring is covered in Hello Node. Loading models that come with materials is covered in Hello Asset. In this tutorial you learn to create and use custom JME3 Material Definitions.
|
To use the example assets in a new jMonkeyEngine SDK project, right-click your project, select , and add the “jme3-test-data” library. |
Sample Code
package jme3test.helloworld;
import com.jme3.app.SimpleApplication;
import com.jme3.light.DirectionalLight;
import com.jme3.material.Material;
import com.jme3.material.RenderState.BlendMode;
import com.jme3.math.ColorRGBA;
import com.jme3.math.Vector3f;
import com.jme3.renderer.queue.RenderQueue.Bucket;
import com.jme3.scene.Geometry;
import com.jme3.scene.shape.Box;
import com.jme3.scene.shape.Sphere;
import com.jme3.texture.Texture;
import com.jme3.util.TangentBinormalGenerator;
/** Sample 6 - how to give an object's surface a material and texture.
* How to make objects transparent. How to make bumpy and shiny surfaces. */
public class HelloMaterial extends SimpleApplication {
public static void main(String[] args) {
HelloMaterial app = new HelloMaterial();
app.start();
}
@Override
public void simpleInitApp() {
/** A simple textured cube -- in good MIP map quality. */
Box cube1Mesh = new Box( 1f,1f,1f);
Geometry cube1Geo = new Geometry("My Textured Box", cube1Mesh);
cube1Geo.setLocalTranslation(new Vector3f(-3f,1.1f,0f));
Material cube1Mat = new Material(assetManager,
"Common/MatDefs/Misc/Unshaded.j3md");
Texture cube1Tex = assetManager.loadTexture(
"Interface/Logo/Monkey.jpg");
cube1Mat.setTexture("ColorMap", cube1Tex);
cube1Geo.setMaterial(cube1Mat);
rootNode.attachChild(cube1Geo);
/** A translucent/transparent texture, similar to a window frame. */
Box cube2Mesh = new Box( 1f,1f,0.01f);
Geometry cube2Geo = new Geometry("window frame", cube2Mesh);
Material cube2Mat = new Material(assetManager,
"Common/MatDefs/Misc/Unshaded.j3md");
cube2Mat.setTexture("ColorMap",
assetManager.loadTexture("Textures/ColoredTex/Monkey.png"));
cube2Mat.getAdditionalRenderState().setBlendMode(BlendMode.Alpha);
cube2Geo.setQueueBucket(Bucket.Transparent);
cube2Geo.setMaterial(cube2Mat);
rootNode.attachChild(cube2Geo);
/** A bumpy rock with a shiny light effect.*/
Sphere sphereMesh = new Sphere(32,32, 2f);
Geometry sphereGeo = new Geometry("Shiny rock", sphereMesh);
sphereMesh.setTextureMode(Sphere.TextureMode.Projected); // better quality on spheres
TangentBinormalGenerator.generate(sphereMesh); // for lighting effect
Material sphereMat = new Material(assetManager,
"Common/MatDefs/Light/Lighting.j3md");
sphereMat.setTexture("DiffuseMap",
assetManager.loadTexture("Textures/Terrain/Pond/Pond.jpg"));
sphereMat.setTexture("NormalMap",
assetManager.loadTexture("Textures/Terrain/Pond/Pond_normal.png"));
sphereMat.setBoolean("UseMaterialColors",true);
sphereMat.setColor("Diffuse",ColorRGBA.White);
sphereMat.setColor("Specular",ColorRGBA.White);
sphereMat.setFloat("Shininess", 64f); // [0,128]
sphereGeo.setMaterial(sphereMat);
sphereGeo.setLocalTranslation(0,2,-2); // Move it a bit
sphereGeo.rotate(1.6f, 0, 0); // Rotate it a bit
rootNode.attachChild(sphereGeo);
/** Must add a light to make the lit object visible! */
DirectionalLight sun = new DirectionalLight();
sun.setDirection(new Vector3f(1,0,-2).normalizeLocal());
sun.setColor(ColorRGBA.White);
rootNode.addLight(sun);
}
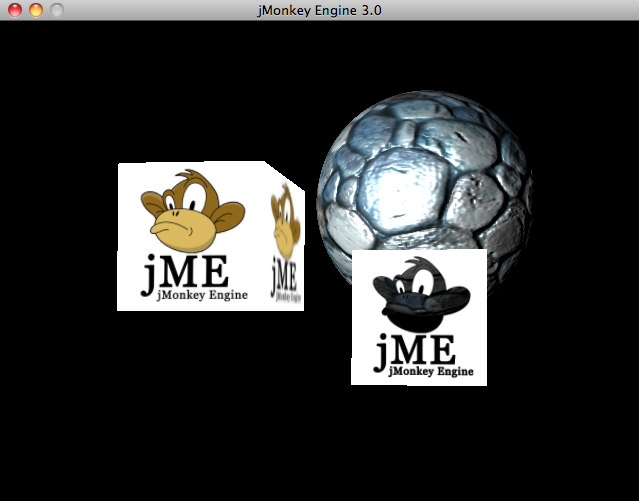
}You should see
-
Left – A cube with a brown monkey texture.
-
Right – A translucent monkey picture in front of a shiny bumpy rock.
Move around with the WASD keys to have a closer look at the translucency, and the rock’s bumpiness.
Simple Unshaded Texture
Typically you want to give objects in your scene textures: It can be rock, grass, brick, wood, water, metal, paper… A texture is a normal image file in JPG or PNG format. In this example, you create a box with a simple unshaded Monkey texture as material.
    /** A simple textured cube -- in good MIP map quality. */
    Box cube1Mesh = new Box( 1f,1f,1f);
    Geometry cube1Geo = new Geometry("My Textured Box", cube1Mesh);
    cube1Geo.setLocalTranslation(new Vector3f(-3f,1.1f,0f));
    Material cube1Mat = new Material(assetManager,
        "Common/MatDefs/Misc/Unshaded.j3md");
    Texture cube1Tex = assetManager.loadTexture(
        "Interface/Logo/Monkey.jpg");
    cube1Mat.setTexture("ColorMap", cube1Tex);
    cube1Geo.setMaterial(cube1Mat);
    rootNode.attachChild(cube1Geo);
Here is what we did: to create a textured box:
-
Create a Geometry
cube1Geofrom a Box meshcube1Mesh. -
Create a Material
cube1Matbased on jME3’s defaultUnshaded.j3mdmaterial definition. -
Create a texture
cube1Texfrom theMonkey.jpgfile in theassets/Interface/Logo/directory of the project. -
Load the texture
cube1Texinto theColorMaplayer of the materialcube1Mat. -
Apply the material to the cube, and attach the cube to the rootnode.
Transparent Unshaded Texture
Monkey.png is the same texture as Monkey.jpg, but with an added alpha channel. The alpha channel allows you to specify which areas of the texture you want to be opaque or transparent: Black areas of the alpha channel remain opaque, gray areas become translucent, and white areas become transparent.
For a partially translucent/transparent texture, you need:
-
A Texture with alpha channel
-
A Texture with blend mode of
BlendMode.Alpha -
A Geometry in the
Bucket.Transparentrender bucket.
This bucket ensures that the transparent object is drawn on top of objects behind it, and they show up correctly under the transparent parts.
    /** A translucent/transparent texture, similar to a window frame. */
    Box cube2Mesh = new Box( 1f,1f,0.01f);
    Geometry cube2Geo = new Geometry("window frame", cube2Mesh);
    Material cube2Mat = new Material(assetManager,
    "Common/MatDefs/Misc/Unshaded.j3md");
    cube2Mat.setTexture("ColorMap",
        assetManager.loadTexture("Textures/ColoredTex/Monkey.png"));
    cube2Mat.getAdditionalRenderState().setBlendMode(BlendMode.Alpha);  // !
    cube2Geo.setQueueBucket(Bucket.Transparent);                        // !
    cube2Geo.setMaterial(cube2Mat);
    rootNode.attachChild(cube2Geo);
For non-transparent objects, the drawing order is not so important, because the z-buffer already keeps track of whether a pixel is behind something else or not, and the color of an opaque pixel doesn’t depend on the pixels under it, this is why opaque Geometries can be drawn in any order.
What you did for the transparent texture is the same as before, with only one added step for the transparency.
-
Create a Geometry
cube2Geofrom a Box meshcube2Mesh. This Box Geometry is flat upright box (because z=0.01f). -
Create a Material
cube2Matbased on jME3’s defaultUnshaded.j3mdmaterial definition. -
Create a texture
cube2Texfrom theMonkey.pngfile in theassets/Textures/ColoredTex/directory of the project. This PNG file must have an alpha layer. -
Activate transparency in the material by setting the blend mode to Alpha.
-
Set the QueueBucket of the Geometry to
Bucket.Transparent. -
Load the texture
cube2Texinto theColorMaplayer of the materialcube2Mat. -
Apply the material to the cube, and attach the cube to the rootnode.
|
Learn more about creating PNG images with an alpha layer in the help system of your graphic editor. |
Shininess and Bumpiness
But textures are not all. Have a close look at the shiny sphere – you cannot get such a nice bumpy material with just a plain texture. You see that JME3 also supports so-called Phong-illuminated materials:
In a lit material, the standard texture layer is referred to as DiffuseMap, any material can use this layer. A lit material can additionally have lighting effects such as Shininess used together with the SpecularMap layer and Specular color. And you can even get a realistically bumpy or cracked surface with help of the NormalMap layer.
Let’s have a look at the part of the code example where you create the shiny bumpy rock.
-
Create a Geometry from a Sphere shape. Note that this shape is a normal smooth sphere mesh.
Sphere sphereMesh = new Sphere(32,32, 2f); Geometry sphereGeo = new Geometry("Shiny rock", sphereMesh);-
(Only for Spheres) Change the sphere’s TextureMode to make the square texture project better onto the sphere.
sphereMesh.setTextureMode(Sphere.TextureMode.Projected); -
You must generate TangentBinormals for the mesh so you can use the NormalMap layer of the texture.
TangentBinormalGenerator.generate(sphereMesh);
-
-
Create a material based on the
Lighting.j3mddefault material.Material sphereMat = new Material(assetManager, "Common/MatDefs/Light/Lighting.j3md");-
Set a standard rocky texture in the
DiffuseMaplayer.
sphereMat.setTexture("DiffuseMap", assetManager.loadTexture("Textures/Terrain/Pond/Pond.jpg")); -
Set the
NormalMaplayer that contains the bumpiness. The NormalMap was generated for this particular DiffuseMap with a special tool (e.g. Blender).
sphereMat.setTexture("NormalMap", assetManager.loadTexture("Textures/Terrain/Pond/Pond_normal.png")); -
Set the Material’s Shininess to a value between 1 and 128. For a rock, a low fuzzy shininess is appropriate. Use material colors to define the shiny Specular color.
    sphereMat.setBoolean("UseMaterialColors",true);
    sphereMat.setColor("Diffuse",ColorRGBA.White);  // minimum material color
    sphereMat.setColor("Specular",ColorRGBA.White); // for shininess
    sphereMat.setFloat("Shininess", 64f); // [1,128] for shininess
-
-
Assign your newly created material to the Geometry.
sphereGeo.setMaterial(sphereMat); -
Let’s move and rotate the geometry a bit to position it better.
    sphereGeo.setLocalTranslation(0,2,-2); // Move it a bit
    sphereGeo.rotate(1.6f, 0, 0);          // Rotate it a bit
    rootNode.attachChild(sphereGeo);
Remember that any Lighting.j3md-based material requires a light source, as shown in the full code sample above.
|
To deactivate Shininess, do not set |
Default Material Definitions
As you have seen, you can find the following default materials in jme/core-data/Common/MatDefs/….
| Default Definition | Usage | Parameters |
|---|---|---|
|
Colored: Use with mat.setColor() and ColorRGBA. |
Color : Color |
|
Use with shiny Textures, Bump- and NormalMaps textures. |
Ambient, Diffuse, Specular : Color |
For a game, you create custom Materials based on these existing MaterialDefintions – as you have just seen in the example with the shiny rock’s material.
Exercises
Exercise 1: Custom .j3m Material
Look at the shiny rocky sphere above again. It takes several lines to create and set the Material.
-
Note how it loads the
Lighting.j3mdMaterial definition. -
Note how it sets the
DiffuseMapandNormalMapto a texture path. -
Note how it activates
UseMaterialColorsand setsSpecularandDiffuseto 4 float values (RGBA color). -
Note how it sets
Shininessto 64.
If you want to use one custom material for several models, you can store it in a .j3m file, and save a few lines of code every time.
You create a j3m file as follows:
-
Create a plain text file
assets/Materials/MyCustomMaterial.j3min your project directory, with the following content:Material My shiny custom material : Common/MatDefs/Light/Lighting.j3md { MaterialParameters { DiffuseMap : Textures/Terrain/Pond/Pond.jpg NormalMap : Textures/Terrain/Pond/Pond_normal.png UseMaterialColors : true Specular : 1.0 1.0 1.0 1.0 Diffuse : 1.0 1.0 1.0 1.0 Shininess : 64.0 } }-
Note that
Materialis a fixed keyword. -
Note that
My shiny custom materialis a String that you can choose to describe the material. -
Note how the code sets all the same properties as before!
-
-
In the code sample, comment out the eight lines that have
sphereMatin them. -
Below this line, add the following line:
sphereGeo.setMaterial((Material) assetManager.loadMaterial( "Materials/MyCustomMaterial.j3m")); -
Run the app. The result is the same.
Using this new custom material MyCustomMaterial.j3m only takes one line. You have replaced the eight lines of an on-the-fly material definition with one line that loads a custom material from a file. Using .j3m files is very handy if you use the same material often.
Exercise 2: Bumpiness and Shininess
Go back to the bumpy rock sample above:
-
Comment out the DiffuseMap line, and run the app. (Uncomment it again.)
-
Which property of the rock is lost?
-
-
Comment out the NormalMap line, and run the app. (Uncomment it again.)
-
Which property of the rock is lost?
-
-
Change the value of Shininess to values like 0, 63, 127.
-
What aspect of the Shininess changes?
-
Conclusion
You have learned how to create a Material, specify its properties, and use it on a Geometry. You know how to load an image file (.png, .jpg) as texture into a material. You know to save texture files in a subfolder of your project’s assets/Textures/ directory.
You have also learned that a material can be stored in a .j3m file. The file references a built-in MaterialDefinition and specifies values for properties of that MaterialDefinition. You know to save your custom .j3m files in your project’s assets/Materials/ directory.
See also: