jMonkeyEngine 3 Tutorial (10) - Hello Terrain
One way to create a 3D landscape is to sculpt a huge terrain model. This gives you a lot of artistic freedom – but rendering such a huge model can be quite slow. This tutorial explains how to create fast-rendering terrains from heightmaps, and how to use texture splatting to make the terrain look good.

|
To use the example assets in a new jMonkeyEngine SDK project, right-click your project, select , and add the “jme3-test-data” library. |
Sample Code
package jme3test.helloworld;

import com.jme3.app.SimpleApplication;
import com.jme3.material.Material;
import com.jme3.renderer.Camera;
import com.jme3.terrain.geomipmap.TerrainLodControl;
import com.jme3.terrain.heightmap.AbstractHeightMap;
import com.jme3.terrain.geomipmap.TerrainQuad;
import com.jme3.terrain.geomipmap.lodcalc.DistanceLodCalculator;
import com.jme3.terrain.heightmap.HillHeightMap; // for exercise 2
import com.jme3.terrain.heightmap.ImageBasedHeightMap;
import com.jme3.texture.Texture;
import com.jme3.texture.Texture.WrapMode;
import java.util.ArrayList;
import java.util.List;

/** Sample 10 - How to create fast-rendering terrains from heightmaps,
and how to use texture splatting to make the terrain look good.  */
public class HelloTerrain extends SimpleApplication {

  private TerrainQuad terrain;
  Material mat_terrain;

  public static void main(String[] args) {
    HelloTerrain app = new HelloTerrain();
    app.start();
  }

  @Override
  public void simpleInitApp() {
    flyCam.setMoveSpeed(50);

    /** 1. Create terrain material and load four textures into it. */
    mat_terrain = new Material(assetManager,
            "Common/MatDefs/Terrain/Terrain.j3md");

    /** 1.1) Add ALPHA map (for red-blue-green coded splat textures) */
    mat_terrain.setTexture("Alpha", assetManager.loadTexture(
            "Textures/Terrain/splat/alphamap.png"));

    /** 1.2) Add GRASS texture into the red layer (Tex1). */
    Texture grass = assetManager.loadTexture(
            "Textures/Terrain/splat/grass.jpg");
    grass.setWrap(WrapMode.Repeat);
    mat_terrain.setTexture("Tex1", grass);
    mat_terrain.setFloat("Tex1Scale", 64f);

    /** 1.3) Add DIRT texture into the green layer (Tex2) */
    Texture dirt = assetManager.loadTexture(
            "Textures/Terrain/splat/dirt.jpg");
    dirt.setWrap(WrapMode.Repeat);
    mat_terrain.setTexture("Tex2", dirt);
    mat_terrain.setFloat("Tex2Scale", 32f);

    /** 1.4) Add ROAD texture into the blue layer (Tex3) */
    Texture rock = assetManager.loadTexture(
            "Textures/Terrain/splat/road.jpg");
    rock.setWrap(WrapMode.Repeat);
    mat_terrain.setTexture("Tex3", rock);
    mat_terrain.setFloat("Tex3Scale", 128f);

    /** 2. Create the height map */
    AbstractHeightMap heightmap = null;
    Texture heightMapImage = assetManager.loadTexture(
            "Textures/Terrain/splat/mountains512.png");
    heightmap = new ImageBasedHeightMap(heightMapImage.getImage());
    heightmap.load();

    /** 3. We have prepared material and heightmap.
     * Now we create the actual terrain:
     * 3.1) Create a TerrainQuad and name it "my terrain".
     * 3.2) A good value for terrain tiles is 64x64 -- so we supply 64+1=65.
     * 3.3) We prepared a heightmap of size 512x512 -- so we supply 512+1=513.
     * 3.4) As LOD step scale we supply Vector3f(1,1,1).
     * 3.5) We supply the prepared heightmap itself.
     */
    int patchSize = 65;
    terrain = new TerrainQuad("my terrain", patchSize, 513, heightmap.getHeightMap());

    /** 4. We give the terrain its material, position & scale it, and attach it. */
    terrain.setMaterial(mat_terrain);
    terrain.setLocalTranslation(0, -100, 0);
    terrain.setLocalScale(2f, 1f, 2f);
    rootNode.attachChild(terrain);

    /** 5. The LOD (level of detail) depends on were the camera is: */
    TerrainLodControl control = new TerrainLodControl(terrain, getCamera());
    terrain.addControl(control);
  }
}
When you run this sample you should see a landscape with dirt mountains, grass plains, plus some winding roads in between.
What is a Heightmap?
Heightmaps are an efficient way of representing the shape of a hilly landscape. Not every pixel of the landscape is stored, instead, a grid of sample values is used to outline the terrain height at certain points. The heights between the samples is interpolated.
In Java, a heightmap is a float array containing height values between 0f and 255f. Here is a very simple example of a terrain generated from a heightmap with 5x5=25 height values.
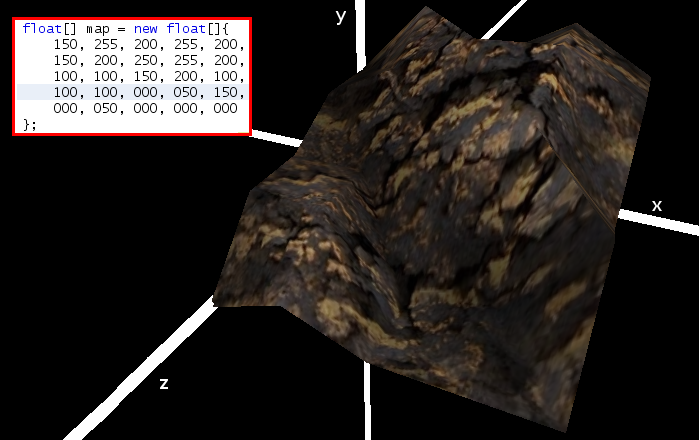
Important things to note:
-
Low values (e.g. 0 or 50) are valleys.
-
High values (e.g. 200, 255) are hills.
-
The heightmap only specifies a few points, and the engine interpolates the rest. Interpolation is more efficient than creating a model with several millions vertices.
When looking at Java data types to hold an array of floats between 0 and 255, the Image class comes to mind. Storing a terrain’s height values as a grayscale image has one big advantage: The outcome is a very userfriendly, like a topographical map:
-
Low values (e.g. 0 or 50) are dark gray – these are valleys.
-
High values (e.g. 200, 255) are light grays – these are hills.
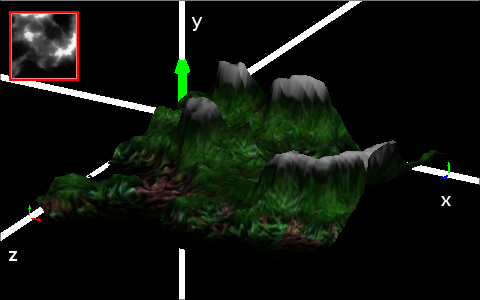
Look at the next screenshot: In the top left you see a 128x128 grayscale image (heightmap) that was used as a base to generate the depicted terrain. To make the hilly shape better visible, the mountain tops are colored white, valleys brown, and the areas inbetween green:
In a real game, you will want to use more complex and smoother terrains than the simple heightmaps shown here. Heightmaps typically have square sizes of 512x512 or 1024x1024, and contain hundred thousands to 1 million height values. No matter which size, the concept is the same as described here.
Looking at the Heightmap Code
The first step of terrain creation is the heightmap. You can create one yourself in any standard graphic application. Make sure it has the following properties:
-
The size must be square, and a power of two.
-
Examples: 128x128, 256x256, 512x512, 1024x1024
-
-
Color mode must be 255 grayscales.
-
Don’t supply a color image, it will be interpreted as grayscale, with possibly weird results.
-
-
Save the map as a .jpg or .png image file
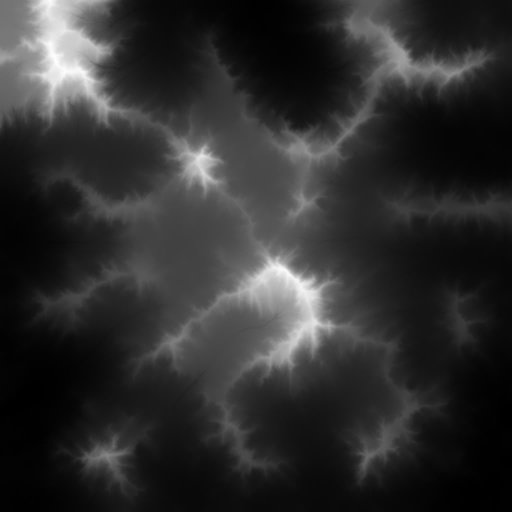
The file mountains512.png that you see here is a typical example of an image heightmap.
Here is how you create the heightmap object in your jME code:
-
Create a Texture object.
-
Load your prepared heightmap image into the texture object.
-
Create an AbstractHeightMap object from an ImageBasedHeightMap.
It requires an image from a JME Texture. -
Load the heightmap.
    AbstractHeightMap heightmap = null;
    Texture heightMapImage = assetManager.loadTexture(
            "Textures/Terrain/splat/mountains512.png");
    heightmap = new ImageBasedHeightMap(heightMapImage.getImage());
    heightmap.load();
What is Texture Splatting?
Previously you learned how to create a material for a simple shape such as a cube. All sides of the cube have the same color. You can apply the same material to a terrain, but then you have one big meadow, one big rock desert, etc. This is not always what you want.
Texture splatting allows you create a custom material, and ‘paint textures’ on it like with a ‘paint brush’. This is very useful for terrains: As you see in the example here, you can paint a grass texture into the valleys, a dirt texture onto the mountains, and free-form roads inbetween.
|
The jMonkeyEngine SDK comes with a TerrainEditor plugin. Using the TerrainEditor plugin, you can sculpt the terrain with the mouse, and save the result as heightmap. You can paint textures on the terrain and the plugin saves the resulting splat textures as alphamap(s). The following paragraphs describe the manual process for you. |
Splat textures are based on the Terrain.j3md material definition. If you open the Terrain.j3md file, and look in the Material Parameters section, you see that you have several texture layers to paint on: Tex1, Tex2, Tex3, etc.
Before you can start painting, you have to make a few decisions:
-
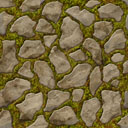
Choose three textures. For example grass.jpg, dirt.jpg, and road.jpg.

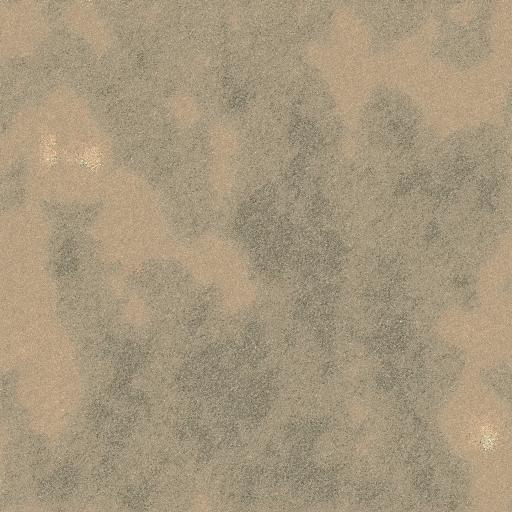
-
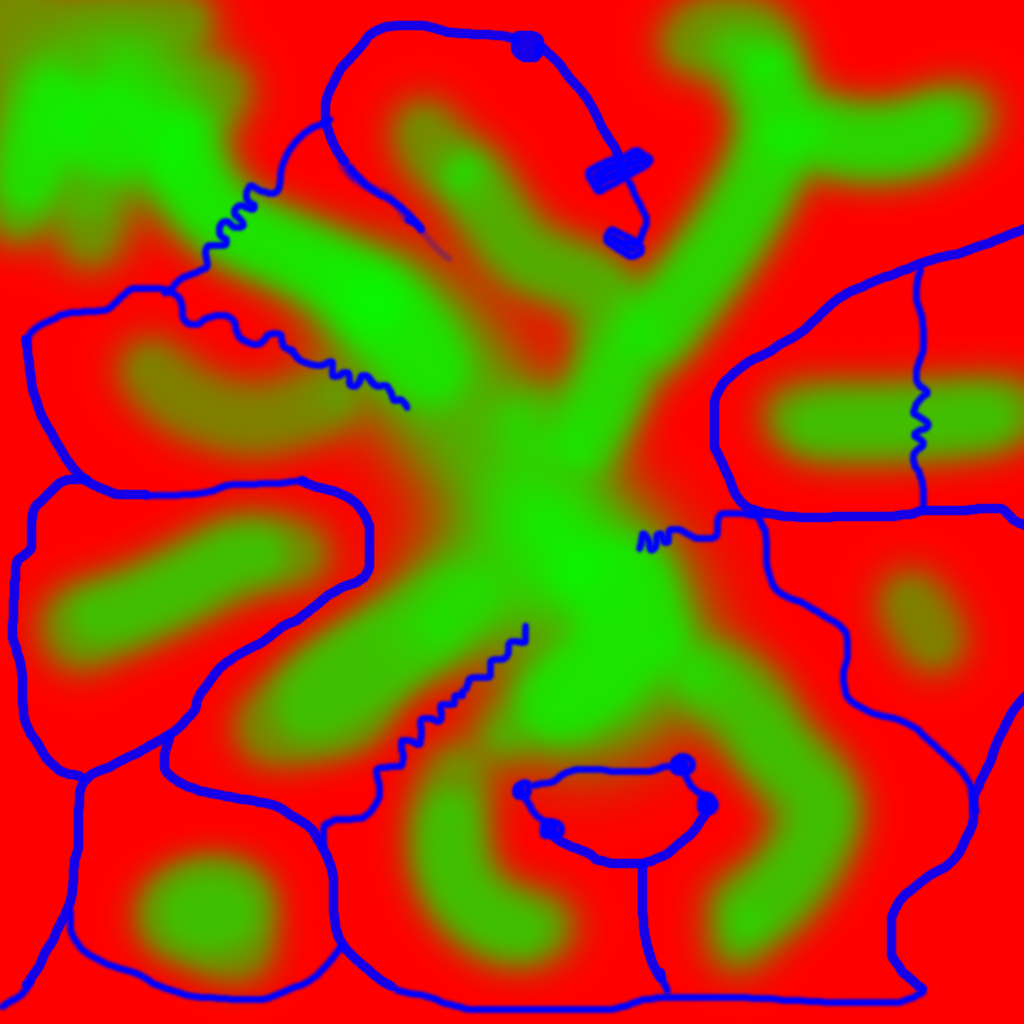
You ‘paint’ three texture layers by using three colors: Red, blue and, green. You arbitrarily decide that…
-
Red is grass – red is layer
Tex1, so put the grass texture into Tex1. -
Green is dirt – green is layer
Tex2, so put the dirt texture into Tex2. -
Blue is roads – blue is layer
Tex3, so put the roads texture into Tex3.
-
Now you start painting the texture:
-
Make a copy of your terrains heightmap,
mountains512.png. You want it as a reference for the shape of the landscape. -
Name the copy
alphamap.png. -
Open
alphamap.pngin a graphic editor and switch the image mode to color image.-
Paint the black valleys red – this will be the grass.
-
Paint the white hills green – this will be the dirt of the mountains.
-
Paint blue lines where you want roads to criss-cross the landscape.
-
-
The end result should look similar to this:
⇒ 
Looking at the Texturing Code
As usual, you create a Material object. Base it on the Material Definition Terrain.j3md that is included in the jME3 framework.
Material mat_terrain = new Material(assetManager, "Common/MatDefs/Terrain/Terrain.j3md");Load four textures into this material. The first one, Alpha, is the alphamap that you just created.
mat_terrain.setTexture("Alpha",
    assetManager.loadTexture("Textures/Terrain/splat/alphamap.png"));
The three other textures are the layers that you have previously decided to paint: grass, dirt, and road. You create texture objects and load the three textures as usual. Note how you assign them to their respective texture layers (Tex1, Tex2, and Tex3) inside the Material!
    /** 1.2) Add GRASS texture into the red layer (Tex1). */
    Texture grass = assetManager.loadTexture(
            "Textures/Terrain/splat/grass.jpg");
    grass.setWrap(WrapMode.Repeat);
    mat_terrain.setTexture("Tex1", grass);
    mat_terrain.setFloat("Tex1Scale", 64f);

    /** 1.3) Add DIRT texture into the green layer (Tex2) */
    Texture dirt = assetManager.loadTexture(
            "Textures/Terrain/splat/dirt.jpg");
    dirt.setWrap(WrapMode.Repeat);
    mat_terrain.setTexture("Tex2", dirt);
    mat_terrain.setFloat("Tex2Scale", 32f);

    /** 1.4) Add ROAD texture into the blue layer (Tex3) */
    Texture rock = assetManager.loadTexture(
            "Textures/Terrain/splat/road.jpg");
    rock.setWrap(WrapMode.Repeat);
    mat_terrain.setTexture("Tex3", rock);
    mat_terrain.setFloat("Tex3Scale", 128f);
The individual texture scales (e.g. mat_terrain.setFloat("Tex3Scale", 128f);) depend on the size of the textures you use.
-
You can tell you picked too small a scale if, for example, your road tiles appear like tiny grains of sand.
-
You can tell you picked too big a scale if, for example, the blades of grass look like twigs.
Use setWrap(WrapMode.Repeat) to make the small texture fill the wide area. If the repetition is too visible, try adjusting the respective Tex*Scale value.
What is a Terrain?
Internally, the generated terrain mesh is broken down into tiles and blocks. This is an optimization to make culling easier. You do not need to worry about ‘tiles’ and ‘blocks’ too much, just use recommended values for now – 64 is a good start.
Let’s assume you want to generate a 512x512 terrain. You already have created the heightmap object. Here are the steps that you perform every time you create a new terrain.
Create a TerrainQuad with the following arguments:
-
Specify a name: E.g.
my terrain. -
Specify tile size: You want to terrain tiles of size 64x64, so you supply 64+1 = 65.
-
In general, 64 is a good starting value for terrain tiles.
-
-
Specify block size: Since you prepared a heightmap of size 512x512, you supply 512+1 = 513.
-
If you supply a block size of 2x the heightmap size (1024+1=1025), you get a stretched out, wider, flatter terrain.
-
If you supply a block size 1/2 the heightmap size (256+1=257), you get a smaller, more detailed terrain.
-
-
Supply the 512x512 heightmap object that you created.
Looking at the Terrain Code
Here’s the code:
terrain = new TerrainQuad(
  "my terrain",               // name
  65,                         // tile size
  513,                        // block size
  heightmap.getHeightMap());  // heightmap
You have created the terrain object.
-
Remember to apply the created material:
terrain.setMaterial(mat_terrain); -
Remember to attach the terrain to the rootNode.
rootNode.attachChild(terrain); -
If needed, scale and translate the terrain object, just like any other Spatial.
|
Terrain.j3md is an unshaded material definition, so you do not need a light source. You can also use TerrainLighting.j3md plus a light, if you want a shaded terrain. |
What is LOD (Level of Detail)?
JME3 includes an optimization that adjusts the level of detail (LOD) of the rendered terrain depending on how close or far the camera is.
    TerrainLodControl control = new TerrainLodControl(terrain, getCamera());
    terrain.addControl(control);
Close parts of the terrain are rendered in full detail. Terrain parts that are further away are not clearly visible anyway, and JME3 improves performance by rendering them less detailed. This way you can afford to load huge terrains with no penalty caused by invisible details.
Exercises
Exercise 1: Texture Layers
What happens when you swap two layers, for example Tex1 and Tex2?
...
mat_terrain.setTexture("Tex2", grass);
...
mat_terrain.setTexture("Tex1", dirt);
You see it’s easier to swap layers in the code, than to change the colors in the alphamap.
Exercise 2: Randomized Terrains
The following three lines generate the heightmap object based on your user-defined image:
    AbstractHeightMap heightmap = null;
    Texture heightMapImage = assetManager.loadTexture(
        "Textures/Terrain/splat/mountains512.png");
    heightmap = new ImageBasedHeightMap(heightMapImage.getImage());
Instead, you can also let JME3 generate a random landscape for you:
-
What result do you get when you replace the above three heightmap lines by the following lines and run the sample?
HillHeightMap heightmap = null; HillHeightMap.NORMALIZE_RANGE = 100; // optional try { heightmap = new HillHeightMap(513, 1000, 50, 100, (byte) 3); // byte 3 is a random seed } catch (Exception ex) { ex.printStackTrace(); } -
Change one parameter at a time, and the run the sample again. Note the differences. Can you find out which of the values has which effect on the generated terrain (look at the javadoc also)?
-
Which value controls the size?
-
What happens if the size is not a square number +1 ?
-
-
Which value controls the number of hills generated?
-
Which values control the size and steepness of the hills?
-
What happens if the min is bigger than or equal to max?
-
What happens if both min and max are small values (e.g. 10/20)?
-
What happens if both min and max are large values (e.g. 1000/1500)?
-
What happens if min and max are very close(e.g. 1000/1001, 20/21)? Very far apart (e.g. 10/1000)?
-
-
You see the variety of hilly landscapes that can be generated using this method.
|
For this exercise, you can keep using the splat Material from the sample code above. Just don’t be surprised that the Material does not match the shape of the newly randomized landscape. If you want to generate real matching splat textures for randomized heightmaps, you need to write a custom method that, for example, creates an alphamap from the heightmap by replacing certain grayscales with certain RGB values. |
Exercise 3: Solid Terrains
Can you combine what you learned here and in Hello Collision, and make the terrain solid?
Conclusion
You have learned how to create terrains that are more efficient than loading one giant model. You know how to generate random or create handmade heightmaps. You can add a LOD control to render large terrains faster. You are aware that you can combine what you learned about collision detection to make the terrain solid to a physical player. You are also able to texture a terrain, like a boss, using layered Materials and texture splatting. You are aware that the jMonkeyEngine SDK provides a TerrainEditor that helps with most of these manual tasks.
See also: