jMonkeyEngine 3 Tutorial (12) - Hello Effects
When you see one of the following in a game, then a particle system is likely behind it:
-
Fire, flames, sparks;
-
Rain, snow, waterfalls, leaves;
-
Explosions, debris, shockwaves;
-
Dust, fog, clouds, smoke;
-
Insects swarms, meteor showers;
-
Magic spells.
These scene elements cannot be modeled by meshes. In very simple terms:
-
The difference between an explosion and a dust cloud is the speed of the particle effect.
-
The difference between flames and a waterfall is the direction and the color of the particle effect.
Particle effects can be animated (e.g. sparks, drops) and static (strands of grass, hair). Non-particle effects include bloom/glow, and motion blur/afterimage. In this tutorial you learn how to make animated particles (com.jme3.effect).
|
To use the example assets in a new jMonkeyEngine SDK project, right-click your project, select , and add the “jme3-test-data” library. |
Sample Code
package jme3test.helloworld;

import com.jme3.app.SimpleApplication;
import com.jme3.effect.ParticleEmitter;
import com.jme3.effect.ParticleMesh;
import com.jme3.material.Material;
import com.jme3.math.ColorRGBA;
import com.jme3.math.Vector3f;

/** Sample 11 - how to create fire, water, and explosion effects. */
public class HelloEffects extends SimpleApplication {

  public static void main(String[] args) {
    HelloEffects app = new HelloEffects();
    app.start();
  }

  @Override
  public void simpleInitApp() {

    ParticleEmitter fire =
            new ParticleEmitter("Emitter", ParticleMesh.Type.Triangle, 30);
    Material mat_red = new Material(assetManager,
            "Common/MatDefs/Misc/Particle.j3md");
    mat_red.setTexture("Texture", assetManager.loadTexture(
            "Effects/Explosion/flame.png"));
    fire.setMaterial(mat_red);
    fire.setImagesX(2);
    fire.setImagesY(2); // 2x2 texture animation
    fire.setEndColor(  new ColorRGBA(1f, 0f, 0f, 1f));   // red
    fire.setStartColor(new ColorRGBA(1f, 1f, 0f, 0.5f)); // yellow
    fire.getParticleInfluencer().setInitialVelocity(new Vector3f(0, 2, 0));
    fire.setStartSize(1.5f);
    fire.setEndSize(0.1f);
    fire.setGravity(0, 0, 0);
    fire.setLowLife(1f);
    fire.setHighLife(3f);
    fire.getParticleInfluencer().setVelocityVariation(0.3f);
    rootNode.attachChild(fire);

    ParticleEmitter debris =
            new ParticleEmitter("Debris", ParticleMesh.Type.Triangle, 10);
    Material debris_mat = new Material(assetManager,
            "Common/MatDefs/Misc/Particle.j3md");
    debris_mat.setTexture("Texture", assetManager.loadTexture(
            "Effects/Explosion/Debris.png"));
    debris.setMaterial(debris_mat);
    debris.setImagesX(3);
    debris.setImagesY(3); // 3x3 texture animation
    debris.setRotateSpeed(4);
    debris.setSelectRandomImage(true);
    debris.getParticleInfluencer().setInitialVelocity(new Vector3f(0, 4, 0));
    debris.setStartColor(ColorRGBA.White);
    debris.setGravity(0, 6, 0);
    debris.getParticleInfluencer().setVelocityVariation(.60f);
    rootNode.attachChild(debris);
    debris.emitAllParticles();
  }
}
You should see an explosion that sends debris flying, and a fire. More example code is here.
Texture Animation and Variation
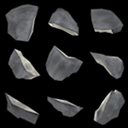
Start by choosing a material texture for your effect. If you provide the emitter with a set of textures (see image), it can use them either for variation (random order), or as animation steps (fixed order).
Setting emitter textures works just as you have already learned in previous chapters. This time you base the material on the Particle.j3md material definition. Let’s have a closer look at the material for the Debris effect.
    ParticleEmitter debris =
            new ParticleEmitter("Debris", ParticleMesh.Type.Triangle, 10);
    Material debris_mat = new Material(assetManager,
            "Common/MatDefs/Misc/Particle.j3md");
    debris_mat.setTexture("Texture", assetManager.loadTexture(
            "Effects/Explosion/Debris.png"));
    debris.setMaterial(debris_mat);
    debris.setImagesX(3);
    debris.setImagesY(3); // 3x3 texture animation
    debris.setSelectRandomImage(true);
...-
Create a material and load the texture.
-
Tell the Emitter into how many animation steps (x*y) the texture is divided.
The debris texture has 3x3 frames. -
Optionally, tell the Emitter whether the animation steps are to be at random, or in order.
For the debris, the frames play at random.
As you see in the debris example, texture animations improve effects because each “flame” or “piece” of debris now looks different. Also think of electric or magic effects, where you can create very interesting animations by using an ordered morphing series of lightning bolts; or flying leaves or snow flakes, for instance.
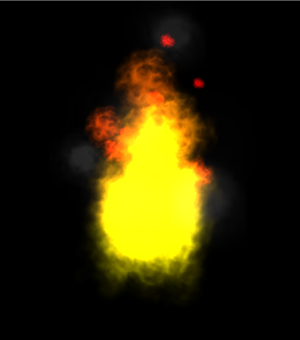
The fire material is created the same way, just using “Effects/Explosion/flame.png” texture, which has with 2x2 ordered animation steps.
Default Particle Textures
The following particle textures are included in test-data.jar. You can copy and use them in your own effects.
| Texture Path | Dimension | Preview |
|---|---|---|
Effects/Explosion/Debris.png |
3*3 |
|
Effects/Explosion/flame.png |
2*2 |
|
Effects/Explosion/flash.png |
2*2 |
|
Effects/Explosion/roundspark.png |
1*1 |
|
Effects/Explosion/shockwave.png |
1*1 |
|
Effects/Explosion/smoketrail.png |
1*3 |
|
Effects/Explosion/spark.png |
1*1 |
|
Effects/Smoke/Smoke.png |
1*15 |
|
Copy them into your assets/Effects directory to use them.
Creating Custom Textures
For your game, you will likely create custom particle textures. Look at the fire example again.
    ParticleEmitter fire =
            new ParticleEmitter("Emitter", ParticleMesh.Type.Triangle, 30);
    Material mat_red = new Material(assetManager,
            "Common/MatDefs/Misc/Particle.j3md");
    mat_red.setTexture("Texture", assetManager.loadTexture(
            "Effects/Explosion/flame.png"));
    fire.setMaterial(mat_red);
    fire.setImagesX(2);
    fire.setImagesY(2); // 2x2 texture animation
    fire.setEndColor(  new ColorRGBA(1f, 0f, 0f, 1f));   // red
    fire.setStartColor(new ColorRGBA(1f, 1f, 0f, 0.5f)); // yellow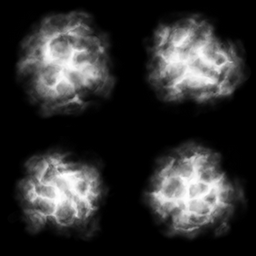
Compare the texture with the resulting effect.
-
Black parts of the image become fully transparent.
-
White/gray parts of the image are translucent and get colorized.
-
You set the color using
setStartColor()andsetEndColor().
For fire, it’s a gradient from yellow to red. -
By default, the animation is played in order and loops.
Create a grayscale texture in a graphic editor, and save it to your assets/Effects directory. If you split up one image file into x*y animation steps, make sure each square is of equal size–just as you see in the examples here.
Emitter Parameters
A particle system is always centered around an emitter.
Use the setShape() method to change the EmitterShape:
-
EmitterPointShape(Vector3f.ZERO) – particles emit from a point (default)
-
EmitterSphereShape(Vector3f.ZERO,2f) – particles emit from a sphere-sized area
-
EmitterBoxShape(new Vector3f(-1f,-1f,-1f),new Vector3f(1f,1f,1f)) – particles emit from a box-sized area
Example:
emitter.setShape(new EmitterPointShape(Vector3f.ZERO));You create different effects by changing the emitter parameters:
| Parameter | Method | Default | Description |
|---|---|---|---|
number |
|
N/A |
The maximum number of particles visible at the same time. Value is specified by user in constructor. This influences the density and length of the “trail”. |
velocity |
|
Vector3f.ZERO |
Specify a vector how fast particles move and in which start direction. |
direction |
|
0.2f |
Optional accessors that control in which direction particles face while flying. |
lifetime |
|
3f |
Minimum and maximum time period before particles fade. |
emission rate |
|
20 |
How many new particles are emitted per second. |
color |
|
gray |
Set to the same colors, or to two different colors for a gradient effect. |
size |
|
0.2f |
Set to two different values for shrink/grow effect, or to same size for constant effect. |
gravity |
|
0,1,0 |
Whether particles fall down (positive) or fly up (negative). Set to 0f for a zero-g effect where particles keep flying. |
You can find details about effect parameters here. Add and modify one parameter at a time, and try different values until you get the effect you want.
|
Use the SceneComposer in the jMonkeyEngine SDK to create effects more easily. Create an empty scene and add an emitter object to it. Change the emitter properties and watch the outcome live. You can save created effects as .j3o file and load them like scenes or models. |