Next Generation Particle Emitters
This is a new particle system for jME3 posted for review and comments. This is an opportunity for people to comment on and request changes to the API or the internal functionality of the system. The code for this particle system can be found jMonkeyEngine-Contributions
Apologies for the slight jitter in some of the videos, the VideoRecorderState seems to be causing some issues which are not present when the application is running normally.
Credits
These particle emitters are inspired by and use some code from t0neg0ds particle emitters as described here
Those in turn were based on the original jME3 particle system by Kirill Vainer
The Big Picture
The core of all Particle Emitters is a ParticleController. That is used to manage all of the particles, the behaviour of the particles themselves though is controlled though a number of other classes that are plugged in to the ParticleController to provide the required functionality. You can think of the ParticleController as providing the central hub into which you plug all the modules you need to get the desired behaviour.
An easy way to see what you need is to create a new ParticleController and then look at the constructor, you can see what parameters need to be supplied there.
| name | The name to use for the geometry in the scene graph |
|---|---|
mesh |
The mesh to use (Usually either PointMesh or QuadMesh) |
maxParticles |
The maximum number of particles to allow active at any one time |
lifeMin |
The minimum amount of time (in seconds) for which each particle lives |
lifeMax |
The maximum amount of time (in seconds) for which each particle lives |
source |
The source from which the particles are spawned |
emissionController |
The frequency and timing with which particles are spawned. If null then no particles are automatically spawned and they must be triggered manually using emitNextParticle() or emitAllParticles() |
influencers |
Zero or more ParticleInfluencers, each of which changes the behaviour of the particles. |
By selecting the behaviour you desire for each option you can configure up a virtually infinite array of possible particle emitters.
We will now walk through some common examples and possible uses, and then in the end we will document all of the possible choices for these options.
For a full reference of the standard options available see the Reference Page.
Simple Fire
public class HelloParticles1_SimpleFire extends SimpleApplication {

    public static void main(String[] args){
        HelloParticles1_SimpleFire app = new HelloParticles1_SimpleFire();
        app.start(); // start the game
    }

    @Override
    public void simpleInitApp() {

// Construct a new ParticleController
        ParticleController pCtrl = new ParticleController(
// The name of the emitter
                "SimpleFire",
// Use a simple point mesh (the fastest but most limitted mesh type) with the specified
// image (from jME3-testdata). The image actually contains a 2x2 grid of sprites.
                new PointMesh(assetManager, "Effects/Explosion/flame.png", 2, 2),
// Allow at most 32 particles at any time
                32,
// Particles last for at least 2 seconds
                2,
// And at most 3 seconds
                3,
// Point sources always generate particles at the location of the source, the particles
// are given a random velocity between the two given.
                new PointSource(new Vector3f(-3, 0, -3), new Vector3f(3, 0, 3)),
// Emit particles at regular intervals, 10 particles every second
                new RegularEmission(10),
// ** Influencers start here
// Select a random sprite from the 4 available for each particle
                new RandomSpriteInfluencer(),
// Particles start off with a size of 0.5 units, end with a radius of 0.1
                new SizeInfluencer(0.5f, 0.1f),
// Particles start yellow full opacity and fade towards red with very low opacity
                new ColorInfluencer(new ColorRGBA(1,1,0.2f,1), new ColorRGBA(1,0,0,0.1f)),
// No matter what velocity particles started with they will start moving upwards.
                new PreferredDirectionInfluencer(new Vector3f(0, 1, 0), 0.25f));

// Finally attach the geometry to the rootNode in order to start the particles running
        rootNode.attachChild(pCtrl.getGeometry());
    }
}
Run that and the result should look something like:
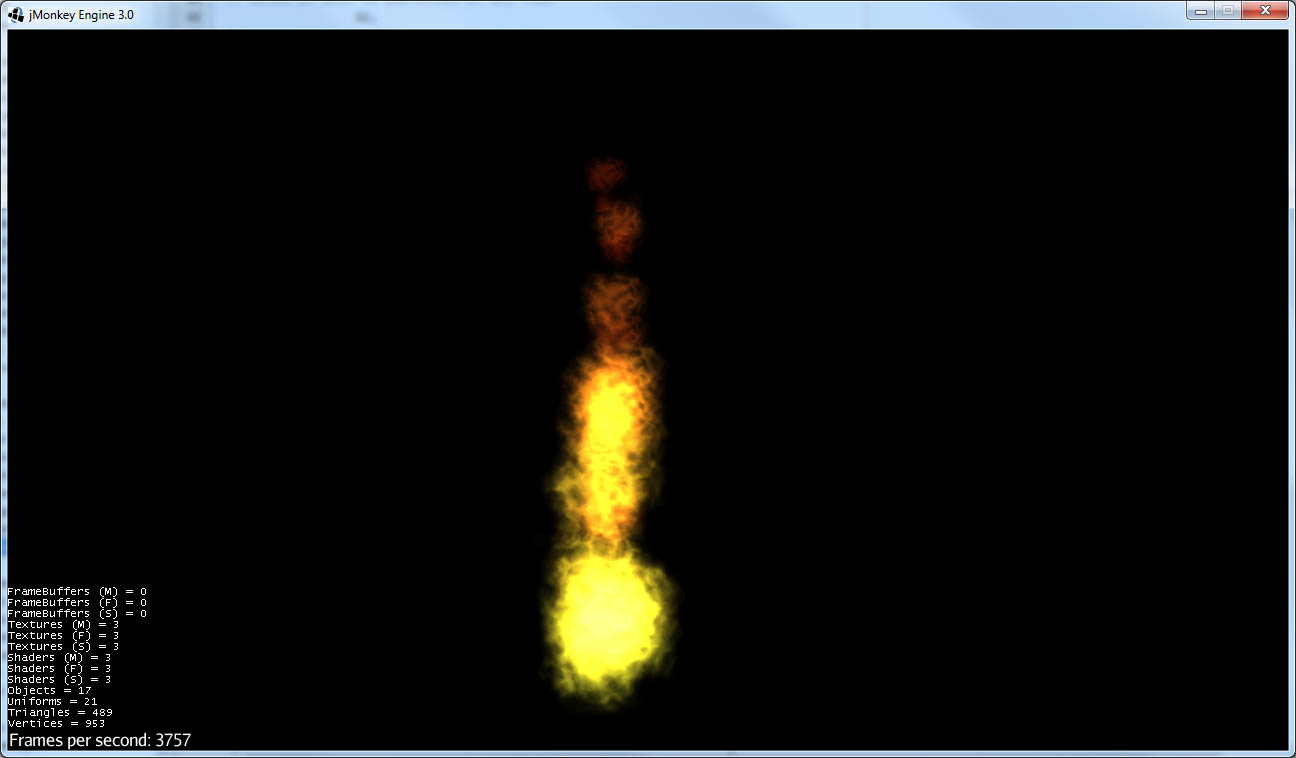
Simple Fire and Smoke
    @Override
    public void simpleInitApp() {

// Construct a new ParticleController
        ParticleController pCtrl = new ParticleController(
// The name of the emitter
                "SimpleFire",
// Use a simple point mesh (the fastest but most limitted mesh type) with the specified
// image (from jME3-testdata). The image actually contains a 2x2 grid of sprites.
                new PointMesh(assetManager, "Effects/Explosion/flame.png", 2, 2),
// Allow at most 50 particles at any time, the particles are lasting longer this time
// so we need to allow more on screen at once
                50,
// Particles last for at least 4 seconds
                4,
// And at most 5 seconds
                5,
// Point sources always generate particles at the location of the source, the particles
// are given a random velocity between the two given.
                new PointSource(new Vector3f(-3, 0, -3), new Vector3f(3, 0, 3)),
// Emit particles at regular intervals, 10 particles every second
                new RegularEmission(10),
// ** Influencers start here
// Select a random sprite from the 4 available for each particle
                new RandomSpriteInfluencer(),
// Particles start off with a size of 0.5 units, end with a radius of 0.1
                new SizeInfluencer(0.5f, 0.25f),
// Particles start yellow full opacity and fade towards red with very low opacity
                new MultiColorInfluencer(
                    new MultiColorInfluencer.Stage(0, new ColorRGBA(1, 1, 0.1f, 1)),
                    new MultiColorInfluencer.Stage(0.15f, new ColorRGBA(1, 0, 0, 0.25f)),
                    new MultiColorInfluencer.Stage(0.3f, new ColorRGBA(1f, 1f, 1f, 0.5f)),
                    new MultiColorInfluencer.Stage(1, new ColorRGBA(1f,1f,1f,0f))
                ),
// No matter what velocity particles started with they will start moving upwards.
                new PreferredDirectionInfluencer(new Vector3f(0, 1, 0), 0.25f));

// Finally attach the geometry to the rootNode in order to start the particles running
        rootNode.attachChild(pCtrl.getGeometry());
    }
You can see that the only change is to make the particles last a little longer and to change the ColorInfluencer for a MultiColorInfluencer, and yet the results look quite different:
This isn’t a very convincing fire yet, but it is very simple to get up and running. One problem with this approach is that particles are done using an alpha-additive material, they can only make things brighter but never darker. That is not ideal for smoke which should be able to make them darker too. We will look at this again later but for now we will move on to some different mesh types.
Quad Meshes and Billboarding
Point Meshes are extremely fast, but they have a number of limitations. The main ones being that the sprites must always be facing towards the screen and that on certain graphics cards the maximum number of pixels a sprite can occupy on the screen is limited.
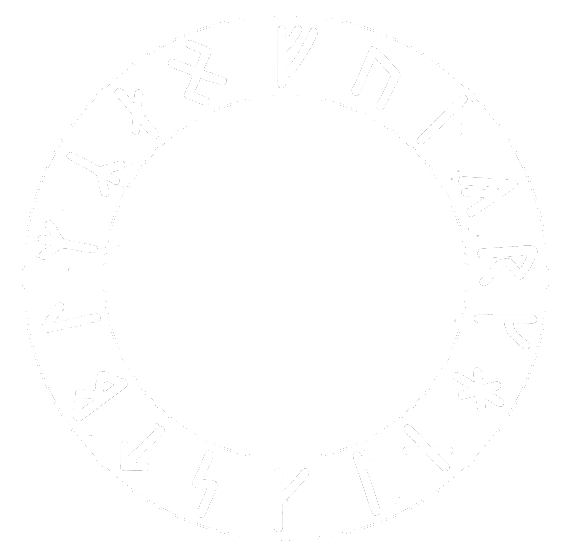
While PointMesh is recommended for basic particles for more advanced options there is the QuadMesh, this constructs each particle using a quad and as a result can allow any size on the screen and any orientation. The following example combines two separate particle emitters to produce a spell-like effect.
|
The flame image from before is used for the second emitter, the first emitter uses this image which you can download and use:
|
    @Override
    public void simpleInitApp() {

// Construct a new ParticleController to provide the actual spell runes effect
        ParticleController pCtrl = new ParticleController(
// The name of the emitter
                "SpellRunes",
// Use a Quad Mesh, this image is available for download on this page. The texture file contains
// a single image so there are no sprite columns and rows to set up. The BillboardStrategy is how
// the particles should be oriented, in this case it uses the particle rotation.
                new QuadMesh(QuadMeshBillboardStrategy.USE_PARTICLE_ROTATION, assetManager, "Textures/runeCircle.png"),
// Allow at most 9 particles at any time
                9,
// Particles always last for 4 seconds
                4,
                4,
// We want to generate all particles from the same location with the same velocity.
                new PointSource(new Vector3f(0, 1f, 0), new Vector3f(0, 1f, 0)),
// Emit particles at regular intervals, 4 particles every second
                new RegularEmission(2),
// ** Influencers start here
// These particles should be size 3 and stay the same size
                new SizeInfluencer(3, 3),
// Start the particles at full opacity blue and then fade them out to 0 opacity cyan.
                new ColorInfluencer(ColorRGBA.Blue, new ColorRGBA(0, 1, 1, 0)),
// Rotate all particles by the same amount. The units are radians-per-second
                new RotationInfluencer(
                    new Vector3f(0, FastMath.QUARTER_PI, 0),
                    new Vector3f(0, FastMath.QUARTER_PI, 0), false));

// Finally attach the geometry to the rootNode in order to start the particles running
        rootNode.attachChild(pCtrl.getGeometry());


// Construct a new ParticleController to provide the central glow effect
        pCtrl = new ParticleController(
// The name of the emitter
                "SpellBase",
// Use a simple point mesh (the fastest but most limitted mesh type) with the specified
// image (from jME3-testdata). The image actually contains a 2x2 grid of sprites.
                new PointMesh(assetManager, "Textures/flame.png", 2, 2),
// Allow at most 76 particles at any time
                76,
// Particles last for at least 5 seconds
                5,
// And at most 5 seconds
                5,
// Point sources always generate particles at the location of the source, the particles
// are given a random velocity between the two given.
                new PointSource(new Vector3f(-1f, 0, -1f), new Vector3f(1f, 0.5f, 1f)),
// Emit particles at regular intervals, 15 particles every second
                new RegularEmission(15),
// ** Influencers start here
// Select a random sprite from the 4 available for each particle
                new RandomSpriteInfluencer(),
// Particles start red with some blue and green and fade towards blue zero opacity
// Because particles are rendered using an additive blend then any area where a lot
// of particles overlap will end up white.
                new ColorInfluencer(new ColorRGBA(1,0.25f,0.25f,0.25f), new ColorRGBA(0,0,1,0f)));

// Finally attach the geometry to the rootNode in order to start the particles running
        rootNode.attachChild(pCtrl.getGeometry());


        cam.setLocation(new Vector3f(0, 10, -10));
        cam.lookAt(Vector3f.ZERO, Vector3f.UNIT_Y);
    }
The result should look something like:
Using a mesh as the particle source
There is a model of a monkeys head in the test data that is used in this example, although you can use any other model you like. Just make sure you can find the geometry within the model for the next step.
    @Override
    public void simpleInitApp() {

        Node monkey = (Node) assetManager.loadModel("Models/MonkeyHead/MonkeyHead.mesh.xml");
        rootNode.attachChild(monkey);

        DirectionalLight dl = new DirectionalLight();
        dl.setDirection(new Vector3f(-0.1f,-0.7f,-1).normalizeLocal());
        dl.setColor(new ColorRGBA(0.88f, 0.60f, 0.60f, 1.0f));
        rootNode.addLight(dl);

        AmbientLight al = new AmbientLight();
        al.setColor(ColorRGBA.White);
        rootNode.addLight(al);
...
}
The result should look something like:
Now lets set fire to the monkey! (No monkeys were harmed during the making of this particle system!).
// Construct a new ParticleController
        ParticleController pCtrl = new ParticleController(
// The name of the emitter
                "SimpleFire",
// Use a simple point mesh (the fastest but most limitted mesh type) with the specified
// image (from jME3-testdata). The image actually contains a 2x2 grid of sprites.
                new PointMesh(assetManager, "Textures/flame.png", 2, 2),
// Allow at most 1200 particles at any time, the particles are lasting longer this time
// so we need to allow more on screen at once
                1200,
// Particles last for at least 4 seconds
                4,
// And at most 5 seconds
                5,
// A MeshSource scans a geometry and picks a random point on the surface of that
// geometry in order to emit the particle from it. The particle has an inital velocity
// of 1wu/s along the normal of the triangle from which it is emitted.
                new MeshSource(g),
// Emit particles at regular intervals, 10 particles every second
                new RegularEmission(240),
// ** Influencers start here
// Select a random sprite from the 4 available for each particle
                new RandomSpriteInfluencer(),
// Particles start off with a size of 0.1 units, end with a size of 0.15
                new SizeInfluencer(0.1f, 0.15f),
// Particles have a constant speed of 0.25f, this will modify the original speed
// from the emitter and then allow the GravityInfluencer to change the direction
// of motion but constrain the speed
                new SpeedInfluencer(0.25f, 0.25f),
// Fade the paticles through a range of colours
                new MultiColorInfluencer(
                    new MultiColorInfluencer.Stage(0, new ColorRGBA(1, 1, 0.1f, 1)),
                    new MultiColorInfluencer.Stage(0.25f, new ColorRGBA(1, 0, 0, 0.25f)),
                    new MultiColorInfluencer.Stage(0.5f, new ColorRGBA(1f, 1f, 1f, 0.25f)),
                    new MultiColorInfluencer.Stage(1, new ColorRGBA(1f,1f,1f,0f))
                ),
// No matter what velocity particles started with they will start moving upwards.
                new GravityInfluencer(new Vector3f(0, 0.5f, 0)));

// Finally attach the geometry to the rootNode in order to start the particles running
        rootNode.attachChild(pCtrl.getGeometry());
Again this is just a very simple example, much more sophisticated fire effects are possible with the use of the right textures and mixture of emitters and influencers. The result though should look something like this:
Meshes and Weighted Meshes
The previous example uses a MeshSource, this picks a random triangle from the mesh without any regard given to the size of different triangles. This means areas with small triangles are actually more likely to emit particles than areas with large triangles. For most meshes this is not visible, however there is a WeightedMeshSource available if this should be a problem.
The WeightedMeshSource scans the mesh and works out a weight for each triangle based on its relative size, so that the result is an even spread of particles even with very large differences in triangle sizes. There are some limitations with this though:
-
The WeightedMeshSource consumes more memory as it needs to remember the weights
-
The WeightedMeshSource is slower as it needs to do more work to pick a triangle
-
The WeightedMeshSource does not update automatically if the mesh changes, if triangles are added they will not emit, if triangles are removed it could cause a crash. If triangles change shape then the weights are not updated.
There is a method available to cause the weights to be recalculated which can be used if changing the mesh, but really if possible a non-weighted MeshSource should be used for dynamic meshes.
3d Particles - TemplateMesh
The previous mesh examples all use simple 2d quads to display images. There is another mesh type though, the TemplateMesh, which allows fully featured 3d particles to be used.
|
There is a rock texture available in the jME3 test data, or you can substitute any other suitable texture. The model for this example is: FracturedCube.j3o |
    @Override
    public void simpleInitApp() {

        // Since we actually use a full lit material for these particles we need
        // to add a light to the scene in order to see anything.
        DirectionalLight dl = new DirectionalLight();
        dl.setDirection(new Vector3f(-0.1f,-0.7f,-1).normalizeLocal());
        dl.setColor(new ColorRGBA(0.6f, 0.60f, 0.60f, 1.0f));
        rootNode.addLight(dl);

// A standard lit material is used, this rock texture was taking from the
// jme3 test data but you can easily substitute your own.
        Material rock = new Material(assetManager, "Common/MatDefs/Light/Lighting.j3md");
        rock.setTexture("DiffuseMap", assetManager.loadTexture("Textures/Rock.PNG"));
        rock.setFloat("Shininess", 100f);

// A PointSource is actually a fully featured Spatial object, in this case
// we simply adjust its translation, but it can actually be attached to the
// scene graph and the source will automatically move as the Node to which
// it is attached is transformed.
        PointSource source = new PointSource(new Vector3f(-5,-5,-5), new Vector3f(5,5,5));
        source.setLocalTranslation(0, 10, -20);

// A TemplateMesh uses any number of standard meshes to be the template for
// each 3d particle. This model was generated simply by taking a cube in
// Blender and running a fracture script on it to generate 20 fragments.
        Node n = (Node) assetManager.loadModel("Models/FracturedCube.j3o");
        Mesh[] templates = new Mesh[n.getChildren().size()];
        int i = 0;
        for (Spatial s: n.getChildren()) {
            Geometry g = (Geometry)((Node)s).getChild(0);
            templates[i++] = g.getMesh();
        }

// Construct the new particle controller
        ParticleController rockCtrl = new ParticleController(
                "TemplateMesh",
// The TemplateMesh uses the rock material we created previously, the two boolean
// flags say that we are not interested in vertex colours but we do want the vertex
// normals. The array of meshes extracted from the model is then passed in to use
// as models for each particle.
                new TemplateMesh(rock, false, true, templates),
// A maximum of 64 particles at once, each lasting for 5 to 5.5 seconds.
                64,
                5,
                5.5f,
// Particles are emitted from the source that we created and positioned earlier
                source,
// Emit 8 particles per second
                new RegularEmission(8),
// The "sprites" in this case are the available templates. The TemplateMesh has
// one spriteColumn for each template it has been provided, so the standard
// RandomSpriteInfluencer just causes one to be picked at random each time a
// particle is emitted.
                new RandomSpriteInfluencer(),
// Rocks fall.
                new GravityInfluencer(new Vector3f(0, -4, 0)),
// Rocks spin.
                new RotationInfluencer(new Vector3f(-2, -2, -2), new Vector3f(2, 2, 2), false));

        rootNode.attachChild(rockCtrl.getGeometry());
    }
The result should look like:
Any number and mixture of models can be used, although as it is all a single mesh the same material must be used for all of them. It is recommended to keep a similar number of vertices for each of the models but that is not a strict requirement.
Emitting Particles from Particles
To add more dramatic effects sometimes you want to emit particles from particles, this could be done simply by attaching a MeshSource for the second controller to the mesh from the first controller. There are a number of limitations to this approach though, which will be demonstrated now:
Adding the following code:
        ParticleController pCtrl = new ParticleController(
                "TemplateFlames",
                new PointMesh(assetManager, "Textures/flame.png", 2, 2),
                1300,
                3,
                4,
                new MeshSource(rockCtrl.getGeometry()),
                new RegularEmission(320),
                new SizeInfluencer(0.5f, 2),
                new ColorInfluencer(new ColorRGBA(1,1,0.1f, 1f), new ColorRGBA(1,0,0,0.05f)),
                new GravityInfluencer(new Vector3f(0, 0.3f, 0)),
                new RandomImpulseInfluencer(
                    RandomImpulseInfluencer.ImpulseApplicationTime.INITIALIZE,
                    new Vector3f(-0.5f, -0.5f, -0.5f),
                    new Vector3f(0.5f, 0.5f, 0.5f)));

        rootNode.attachChild(pCtrl.getGeometry());
Results in something that looks like this:
You can see that while dramatic the fire is left behind each particle, this is because although it is emitted from the face of the particle at its current position it has no knowledge of how that particle is moving.
To allow for this we also offer a different emitter, this allows one ParticleController to act as the source for another. The emitted particles are then able to start with the same velocity and rotation of the particle they are being emitted from and then move onwards from there as appropriate.
Leave everything else the same but change the MeshSource into
new ParticleParticleSource(rockCtrl),You can see that this gives much better results:
There is a lot of falling rocks and fire here, but not much in the way of smoke. That could be added using a multi-colour emitter as previously, but the standard particle material is additive. That means it can only make colours brighter, never darker. For smoke it should be able to darken as well as lighten.
To add smoke we can add a third emitter after the other two:
// Construct a new material for the smoke based off the default particle material
        Material smokeMat = new Material(
               assetManager, "Common/MatDefs/Misc/Particle.j3md");
// The Smoke.png texture can be found in the jme3 test data
        smokeMat.setTexture("Texture",
            assetManager.loadTexture("Textures/Smoke.png"));
// Set the blend mode to Alpha rather than AlphaAdditive so that dark smoke
// can darken the scene behind it
        smokeMat.getAdditionalRenderState().setBlendMode(RenderState.BlendMode.Alpha);
// For point sprite meshes this parameter must be set
        smokeMat.setBoolean("PointSprite", true);

// Construct the new particle controller
        pCtrl = new ParticleController(
                "TemplateSmoke",
// The Smoke.png texture contains 15 sprites, if you use a different texture adjust
// these parameters accordingly.
                new PointMesh(smokeMat, 15, 1),
                800,
                4,
                5,
                new ParticleParticleSource(rockCtrl),
                new RegularEmission(180),
                new SizeInfluencer(1f, 2.5f),
                new MultiColorInfluencer(
                    new MultiColorInfluencer.Stage(0, new ColorRGBA(1, 1, 1, 0)),
                    new MultiColorInfluencer.Stage(0.5f, new ColorRGBA(0, 0, 0, 0.5f)),
                    new MultiColorInfluencer.Stage(1, new ColorRGBA(1, 1, 1, 0))),
                new GravityInfluencer(new Vector3f(0, 0.75f, 0)),
                new RandomImpulseInfluencer(
                    RandomImpulseInfluencer.ImpulseApplicationTime.INITIALIZE,
                    new Vector3f(-0.5f, -0.5f, -0.5f),
                    new Vector3f(0.5f, 0.5f, 0.5f)));

        rootNode.attachChild(pCtrl.getGeometry());
The results look something like:
To complete the effect one final line of code adds a skybox (using another texture that can be find in the test data):
rootNode.attachChild(SkyFactory.createSky(assetManager, "Textures/BrightSky.dds", false));Now we have the final effect which looks like: