Ragdoll Physics
The jMonkeyEngine3 has built-in support for jBullet physics via the com.jme3.bullet package. Physics are not only responsible for handing collisions, but they also make hinges and joints possible. One special example of physical joints are ragdoll physics, shown here.
Sample Code
-
TestRagDoll.java (Tip: Click to pull the ragdoll up)
Preparing the Physics Game
-
Create a SimpleApplication with a BulletAppState
-
This gives us a PhysicsSpace for PhysicControls
-
-
Add a physical floor (A box collision shape with mass zero)
Creating the Ragdoll
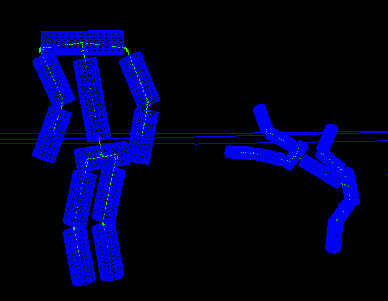
A ragdoll is a simple “person” (dummy) that you build out of cylinder collision shapes. The ragdoll has 11 limbs: 1 for shoulders, 1 for the body, 1 for hips; plus 2 arms and 2 legs that are made up of two limbs each. In your game, you will likely replace the cylinders with your own (better looking) limb models. In this example here we just use simple cylinders.
Limbs
Since you’re just creating the ragdoll for this example, all the limbs have the same shape, and you can write a simple helper method to create them. The function returns a PhysicsControl with CollisionShape with the width, height, location, and rotation (vertical or horizontal) that you specify. You choose a CapsuleCollisionShape (a cylinder with rounded top and bottom) so the limbs collide smoothly against one another.
private Node createLimb(float width, float height, Vector3f location, boolean rotate) {
        int axis = rotate ? PhysicsSpace.AXIS_X : PhysicsSpace.AXIS_Y;
        CapsuleCollisionShape shape = new CapsuleCollisionShape(width, height, axis);
        Node node = new Node("Limb");
        RigidBodyControl rigidBodyControl = new RigidBodyControl(shape, 1);
        node.setLocalTranslation(location);
        node.addControl(rigidBodyControl);
        return node;
}
You write a custom helper method to initialize the limbs. Look at the screenshot above for orientation.
-
All cylinders have the same diameter, 0.2f.
-
You make the body and shoulders longer than the other limbs, 1.0f instead of 0.5f.
-
You determine the coordinates for positioning the limbs to form a person.
-
The shoulders and hips are vertical cylinders, this is why we set the rotation to true.
Node shoulders = createLimb(0.2f, 1.0f, new Vector3f( 0.00f, 1.5f, 0), true);
Node     uArmL = createLimb(0.2f, 0.5f, new Vector3f(-0.75f, 0.8f, 0), false);
Node     uArmR = createLimb(0.2f, 0.5f, new Vector3f( 0.75f, 0.8f, 0), false);
Node     lArmL = createLimb(0.2f, 0.5f, new Vector3f(-0.75f,-0.2f, 0), false);
Node     lArmR = createLimb(0.2f, 0.5f, new Vector3f( 0.75f,-0.2f, 0), false);
Node      body = createLimb(0.2f, 1.0f, new Vector3f( 0.00f, 0.5f, 0), false);
Node      hips = createLimb(0.2f, 0.5f, new Vector3f( 0.00f,-0.5f, 0), true);
Node     uLegL = createLimb(0.2f, 0.5f, new Vector3f(-0.25f,-1.2f, 0), false);
Node     uLegR = createLimb(0.2f, 0.5f, new Vector3f( 0.25f,-1.2f, 0), false);
Node     lLegL = createLimb(0.2f, 0.5f, new Vector3f(-0.25f,-2.2f, 0), false);
Node     lLegR = createLimb(0.2f, 0.5f, new Vector3f( 0.25f,-2.2f, 0), false);
You now have the outline of a person. But if you ran the application now, the individual limbs would fall down independently of one another – the ragdoll is still lacking joints.
Joints
As before, you write a small helper method. This time its purpose is to quickly join two limbs A and B at the connection point that we specify.
-
Convert A’s and B’s connectionPoint vector from world coordinate space to local coordinate space.
-
Use a ConeJoint, a special joint that approximates the degree of freedom that limbs typically have. The ConeJoint constructor requires the two nodes, and the two local pivot coordinates that we just determined.
-
Set the joints limits to allow swinging, but not twisting.
private PhysicsJoint join(Node A, Node B, Vector3f connectionPoint) {
        Vector3f pivotA = A.worldToLocal(connectionPoint, new Vector3f());
        Vector3f pivotB = B.worldToLocal(connectionPoint, new Vector3f());
        ConeJoint joint = new ConeJoint(A.getControl(RigidBodyControl.class),
                                        B.getControl(RigidBodyControl.class),
                                        pivotA, pivotB);
        joint.setLimit(1f, 1f, 0);
        return joint;
}
Use the helper method to connect all limbs with joints where they belong, at one end of the limb.
join(body,  shoulders, new Vector3f( 0.00f,  1.4f, 0));
join(body,       hips, new Vector3f( 0.00f, -0.5f, 0));
join(uArmL, shoulders, new Vector3f(-0.75f,  1.4f, 0));
join(uArmR, shoulders, new Vector3f( 0.75f,  1.4f, 0));
join(uArmL,     lArmL, new Vector3f(-0.75f,  0.4f, 0));
join(uArmR,     lArmR, new Vector3f( 0.75f,  0.4f, 0));
join(uLegL,      hips, new Vector3f(-0.25f, -0.5f, 0));
join(uLegR,      hips, new Vector3f( 0.25f, -0.5f, 0));
join(uLegL,     lLegL, new Vector3f(-0.25f, -1.7f, 0));
join(uLegR,     lLegR, new Vector3f( 0.25f, -1.7f, 0));
Now the ragdoll is connected. If you ran the app now, the doll would collapse, but the limbs would stay together.
Attaching Everything to the Scene
We create one (non-physical) Node named ragDoll, and attach all other nodes to it.
ragDoll.attachChild(shoulders);
ragDoll.attachChild(body);
ragDoll.attachChild(hips);
ragDoll.attachChild(uArmL);
ragDoll.attachChild(uArmR);
ragDoll.attachChild(lArmL);
ragDoll.attachChild(lArmR);
ragDoll.attachChild(uLegL);
ragDoll.attachChild(uLegR);
ragDoll.attachChild(lLegL);
ragDoll.attachChild(lLegR);
To use the ragdoll in a scene, we attach its main node to the rootNode, and to the PhysicsSpace.
rootNode.attachChild(ragDoll);
bulletAppState.getPhysicsSpace().addAll(ragDoll);
Applying Forces
To pull the doll up, you could add an input handler that triggers the following action:
Vector3f upforce = new Vector3f(0, 200, 0);
shoulders.applyContinuousForce(true, upforce);
We can use the action to pick the doll up and put it back on its feet, or what ever. Read more about Forces here.
Detecting Collisions
Read the Physics Listeners documentation on how to detect collisions. You can detect collisions between limbs or between limbs and the floor, and trigger game events.
Best Practices
If you experience weird behaviour in a ragdoll – such as exploding into pieces and then reassembling – check your collision shapes. Verify you did not position the limbs too close to one another when assmebling the ragdoll. You typically see physical nodes being ejected when their collision shapes intersect, which puts physics in an impossible state.
Ragdoll Physics using KinematicRagdollControl (deprecated as of JMonkeyEngine v3.3)
KinematicRagdollControl is an unfinished work in progress. The intent was to automate the creation of limbs and joints for ragdoll physics. The idea was to create a control,
ragdoll = new KinematicRagdollControl(0.5f);and add it to a rigged model and also to physics space:
model.addControl(ragdoll);
getPhysicsSpace().add(ragdoll);
A rigid body and a physics joint would be created automatically for each bone in the skeleton, or alternatively just for the bones specified by invoking the addBoneName() method. As long as the control was in kinematic mode, the physics objects would mimic the motion of the bones, including skeletal animations and rotation/translation of the model. When it was time to simulate a ragdoll, you would invoke
ragdoll.setRagdollMode();and thereafter physical forces would override any skeletal animation.
Sample Code
-
v3.2-branch TestRagdollCharacter.java In this example, the control remains in kinematic mode. Hold down the "U" key to advance the model toward the wall. Press the spacebar to play the "Slice" animation. When the model comes into contact with the wall, the blocks will tumble.
-
v3.2-branch TestBoneRagdoll.java Press the left mouse button to shoot a cannonball at the model. Ragdoll physics starts when a cannonball touches the model. Press the spacebar to resume kinematic mode and cause the model to rise to his feet.
Ragdoll Physics using DynamicAnimControl (JME 3.3 and later)
DynamicAnimControl is a replacement for KinematicRagdollControl. The intent is similar, except that a DynamicAnimControl can be simultaneously kinematic for some bones and dynamic for others. Also, DynamicAnimControl can be configured to work with a wider variety of models than KinematicRagdollControl.
To simplify the implementation, the ragdoll created by a DynamicAnimControl is composed of "links". Just as a RigidBodyControl connects a rigid body to a spatial, a link connects a rigid body to one or more bones in the model’s skeleton. Just like a RigidBodyControl, a link can be in kinematic mode or dynamic mode.
And just as the bones in a skeleton are arranged in parent/child hierarchy, so are the links in a DynamicAnimControl ragdoll. In the ragdoll hierarchy, there is exactly one link that has no parent; it is referred to as the "torso". Every other link is a "bone link" which has another link as its parent. Each bone link is connected to its parent by a physics joint.
As with KinematicRagdollControl, you start by creating a control,
ragdoll = new DynamicAnimControl();but before adding it to the model, you must configure it by specifying the mass of the torso and also the mass and range of motion for each linked bone:
ragdoll.setMass(DacConfiguration.torsoName, 1f);
ragdoll.link("Waist", 1f, new RangeOfMotion(1f, -0.4f, 0.8f, -0.8f, 0.4f, -0.4f));
...
You probably don’t want to link every bone in the model’s skeleton. For instance, if the model has articulated fingers, you probably want to link the hand bones but not the individual finger bones. Unlinked bones will be managed by their nearest linked ancestor, and the torso will manage any bones for which no ancestor is linked. If you link too many bones, the ragdoll may become inflexible or jittery due to collisions between rigid bodies that don’t share a physics joint.
Only after the control is configured should you add it to the model and to physics space:
model.addControl(ragdoll);
getPhysicsSpace().add(ragdoll);
Note that the control must be added to the Spatial with the SkinningControl, which isn’t necessarily the model’s root spatial.
As long as a link is in kinematic mode, its physics objects will mimic the motion of the bones, including skeletal animations. When it’s time to simulate a ragdoll, you can invoke
ragdoll.setRagdollMode();to put all links into dynamic mode. Thereafter, physical forces will override any skeletal animation.
Sample Code
-
master-branch TestBoneRagdoll.java Press the left mouse button to shoot a cannonball at the model. Ragdoll physics starts when a cannonball touches the model. Press the spacebar to resume kinematic mode and cause the model to rise to his feet.