Android Support in the jMonkeyEngine
jMonkeyEngine supports android deployment, and it’s fully integrated in the SDK. The android support is in constant enhancement so if you have questions or suggestions, please leave a comment on the Android forum thread!
Requirements
Developer Requirements
-
Install jMonkeyEngine SDK (Remember to install JDK)
-
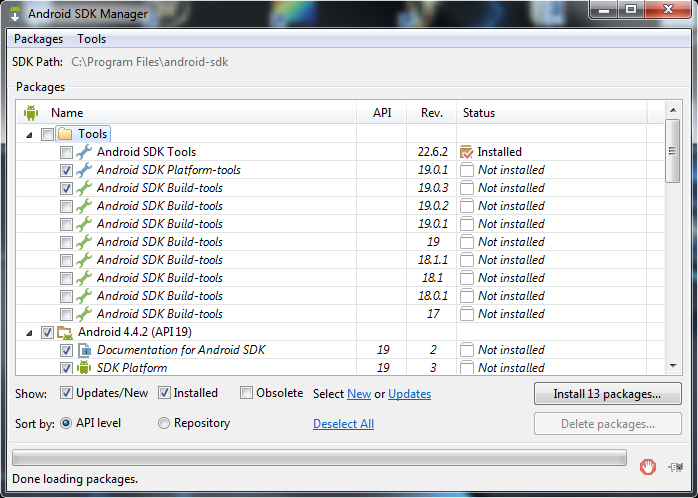
Install Android SDK Manager 22.6.2 or newer.
-
(You don’t need the ADT Bundle for Windows. Choose “USE AN EXISTING IDE” and download the SDK Tools)
-
It’s recommended to choose another destination folder.
-
Start the SDK Manager and install the default selected 13 packages (accept licenses)
-
-
(Optional) Install NBAndroid in the jMonkeyEngine SDK:
-
Go to Tools→Plugins→Available Plugins.
-
Install the “Android” plugin.
-
User Requirements
-
Android 2.3 device or better with development mode (“USB-Debugging”) enabled
-
Graphic card that supports OpenGL ES 2.0 or better
-
Does my phone meet the requirements necessary to run jMonkeyEngine 3?
-
Remember to install the driver software on your computer
Features
jMonkeyEngine3 Android Integration
-
JME app encapsulated in an Android activity (the AndroidHarness).
-
JME display in a GlSurfaceView.
-
Android touch events are encapsulated into JME touch event or translated into mouse events.
-
Errors are handled universally in the Harness.
-
Lifecycle management
-
Leaving the activity with the Back key destroys the app (quit).
-
Leaving the activity with the Home key freezes the app in the background. When you return, the app is in the same state as when you left it (pause).
-
-
Currently supports all jmetests except:
-
Post processing filters. Functional but most of the time very slow
-
Shadows. Functional but most of the time very slow
-
Water. Functional but very slow.
-
jMonkeyEngine SDK Android Integration
Mobile deployment is a “one-click” option next to Desktop/WebStart/Applet deployment in the jMonkeyEngine SDK.
-
Automatic creation of Android harness and settings.
-
Ant script build target creates APK file.
-
Ant script run target executes APK on Android Emulator or mobile device.
-
Instructions
-
Make sure you have installed the Android Project Support into the jMonkeyEngine SDK.
-
Open the jMonkeyEngine SDK Options>Mobile and enter the path to your Android SDK directory, and click OK. E.g.
C:\Program Files\android-sdk
Activate Android Deployment
-
Open an existing JME3 project, or create a new JME3 project.
-
Right-click the project node in the Projects Window and open the Properties.
-
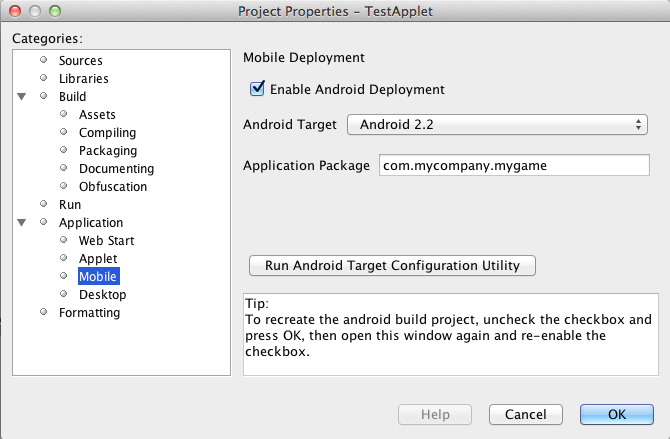
In the Application>Android Properties, enable Android Deployment, and select an Android target. E.g.
Android 4.2.2
This creates a “mobile” folder in your projects directory. This folder contains a complete android project with correct settings to run the application using the AndroidHarness. -
(Restart the jMonkeyEngine)
-
A Mobile Files node appears in the Project window.
It lets you edit the MainActivitity.java, the AndroidManifest.xml, and build.properties.
The Android deployment option creates a separate sub-project for android and makes the main project and associated libraries available to the sub-project as libraries. The sub-project can be edited using NBAndroid (see below) or using Eclipse or any other IDE that supports standard android projects. Normally you do not need to edit the android project files. Exceptions are described further below. The libraries are first added to the android sub-project when the main project is built for the first time.
Build and Run
Open your game project in the jMonkeyEngine SDK.
Building
Right-click the project node to build your project.
An APK file is created in the “dist” folder.
Running
-
Right-click the project node and choose Set Main Project.
-
Select the “Android Device” build configuration next to the Run toolbar button.
-
Make sure “Compile on Save” is disabled in your project preferences.
-
Run the application on a connected phone by right-clicking it and selecting “Run” or press the “Play” button in the toolbar.
-
The application will run and output its log to the “Output” window of the SDK.
-
When finished testing, click the “x” next to the run status in the lower right to quit the logging output.
The default android run target uses the default device set in the Android configuration utility. If you set that to a phone you can run the application directly on your phone, the emulator does not support OpenGLES 2.0 and cannot run the engine.
|
When running your application on some Android devices, having a debugging session open via certain IDEs will significantly lower performance (some reports suggest a drop from 60 FPS to 4-8 FPS) until the debug session is detached or the application is started directly from the device. |
Optionally, download Jme3Beta1Demo.apk
During build, the libraries and main jar file from the main project are copied to the android project libs folder for access. During this operation the desktop-specific libraries are replaced with android specific JARs.
Be aware that logging has been identified as having a significant performance hit in Android applications. If getting poor performance please try turning logging either down or off and retesting.
Installing NBAndroid
Activating the nbandroid plugin in the jMonkeyEngine SDK is optional, but recommended. You do not need the nbandroid plugin for Android support to work, however nbandroid will not interfere and will in fact allow you to edit the android source files and project more conveniently. To be able to edit, extend and code android-specific code in Android projects, install NBAndroid from the update center:
-
Open Tools→Plugins→Settings
-
Go to Tools→Plugins→Available Plugins.
-
Install the NbAndroid plugin. (Will show up as Android)
If the android plugin is not in that list follow these instructions.
Notes
-
The package name parameter is only used when creating the project and only sets the android MainActivity package name
-
The needed android.jar comes with the plugin and is automatically added to the android build
-
All non-android project libraries are automatically excluded from the android build. This is currently hard-coded in the build script, check nbproject/mobile-impl.xml for the details.
-
The main application class parameter for the AndroidHarness is taken from the jme3 project settings when enabling android deployment. Currently it is not updated when you change the main class package or name.
-
When you disable the mobile deployment option, the whole “mobile” folder is deleted.
-
The “errors” shown in the MainActivity are wrongly displayed only in the editor and will disappear when you install NBAndroid (see below).
-
To sign your application, edit the mobile/build.properties file to point at valid keystore files.
Android Considerations
You can use the jMonkeyEngine SDK to save (theoretically) any jMonkeyEngine app as Android app. But the application has to be prepared for the fact that Android devices have a smaller screen resolution, touchscreens instead of mouse buttons, and (typically) no keyboards.
-
Inputs: Devise an alternate control scheme that works for Android users (e.g. using com.jme3.input.controls.TouchListener). This mobile scheme is likely quite different from the desktop scheme.
-
Effects: Android devices do no support 3D features as well as PCs – or even not at all. This restriction includes post-processor filters (depth-of-field blur, bloom, light scattering, cartoon, etc), drop shadows, water effects, 3D Audio. Be prepared that these effects will (at best) slow down the application or (in the worst case) not work at all. Provide the option to switch to a low-fi equivalent!
-
Nifty GUI: Use different base UI layout XML files for the mobile version of your app to account for a different screen resolution.
Best Practice: Ideally, you write the core application code in a way that it checks for the environment it’s being run on, and automatically adapts the device’s limitations by switching off effects, changing input mechanisms etc. Learn how to read graphic card capabilites here.
Using Android specific functions
As described above, you should always try to design your application as platform independent as possible. If your game becomes a sudden hit on android, why not release it on Facebook as an applet as well? When your application is designed in a platform independent way, you don’t have to do much more but check a checkbox to deploy your application as an applet. But what if you want to for example access the camera of an android device? Inevitably you will have to use android specific api to access the camera.
Since the main project is not configured to access the android api directly, you have to install NBAndroid (see above) to be able to edit the created android project in the SDK. After installing, click the “open” project button and navigate to the “mobile” folder inside the main project folder (it should show up with an android “a” icon) and open it.
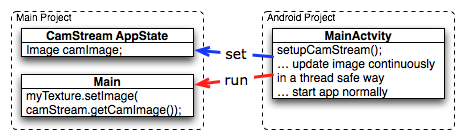
Although you will use android specific api, using a camera is not exactly android specific and so you should try to design this part of the application as platform independent as possible as well. As an example, if you want to use the phones camera as an image input stream for a texture, you can create e.g. the AppState that manages the image and makes it available to the application inside the main project (no android code is needed). Then in the android part of the code you make a connection to the camera and update the image in the AppState. This also allows you to easily support cameras on other platforms in the same way or fallback to something else in case the platform doesn’t support a camera.
Note that you have to build the whole project once to make (new) classes in the main project available to the android part.
Signing an APK
When you have a mobile project in the “important files” section you have an “Android Properties” file.
There are 2 entries in this file :
key.store=path/to/your/keystore/on/your/drive/mykeystore.keystore
key.alias=mykeystorealias
If those entries are filled, the apk will be signed during the build.
You’ll be prompted when building to enter the password (twice). It will generate a signed apk in the dist folder of your project.