jMonkeyEngine SDK: Scene Composer
SceneComposer allows you to edit scenes stored in j3o files and add content or modify existing content. Please note that the Scene Composer and Explorer are a work in progress and will provide more powerful functions in the future. Also other plugins will allow creation of more specific game type scenes in jMonkeyEngine SDK.
Most buttons in the SceneComposer have tooltips that appear when you hover the mouse over the button for a short while.
Mouse/Cursor Controls
-
Left-click and drag to rotate the camera around the cam center
-
Right-click and drag to move the cam center
-
Scoll the mouse wheel to zoom in/out the cam center
-
Left-click a geometry to select it
-
Right-click a geometry to place the cursor
In the SceneComposer toolbar are buttons to snap the camera to the cursor, snap the cursor to the selection and etc.
Creating a scene file
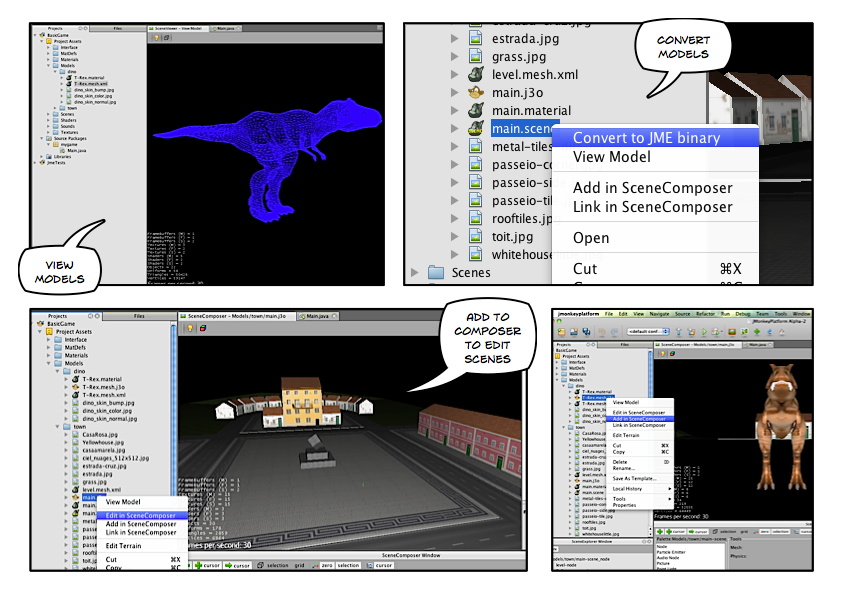
The jMonkeyEngine SDK stores the scene in a j3o file, this binary file contains the whole scenegraph including all settings for spatials, materials, physics, effects etc. Textures are not stored in the j3o file but as absolute locators to the textures.
To create a blank scene file do the following:
-
Right click the “Scenes” folder in your Project Assets and select
-
Select “Scene” to the left then select “Empty jME3 Scene” and press “Next”
-
Enter a file name for your scene like “MyScene” and press “OK”
Loading the scene
To open a scene
-
In the Project Explorer, right-click the *.j3o file of the scene
-
Choose “Open” in SceneComposer
Now the SceneComposer window opens at the bottom and displays the scene in the SceneViewer. The SceneExplorer displays the contained scene graph as a tree and when selecting a node, you can edit the properties of the corresponding scene graph object in the Properties window.
For now, you only see the cursor in the SceneViewer and a single node (the root node of the scene) in the SceneExplorer.
Adding light to the scene
-
Select the root node in the SceneExplorer
-
Select "Directional Light" in the SceneComposer window
-
Press the “+” button in the SceneComposer window
A directional light has been added to your scene, you can see it in the SceneExplorer.
Adding effects etc. to the scene
You can add a variety of special objects with the SceneComposer, including lights, effects, audio etc.
-
Select root Node in the SceneExplorer
-
Select the object type in the list displayed in the SceneComposer window
-
Press the “+” cursor button in the SceneComposer window
Adding Models to the scene
You can directly import 3d models to your scene so that they will be part of your scene file. To be able to import for example an OgreXML file, first export it from your 3D editor to a separate folder in the assets folder of your project (e.g. assets/Models/MyModel/).
-
Place the SceneComposer cursor where you want the model to be
-
Select the parent Node for the model in the SceneExplorer
-
In the Project Explorer right-click the model file you want to import
-
Choose “Add to SceneComposer”
Note that when importing a model the texture paths are stored absolute, so the folder you import the model from will later only be a textures folder because the original model file is not included in the release.
Also note that when adding models this way, changes in the original model file will not be reflected in the scene file as its a complete copy of the original file. If you change the original model, delete the models node from the scene and import it again.
Linking Models to the scene
You can also link models/objects into your scene, this way they are reloaded dynamically from the other/original file.
-
Place the SceneComposer cursor where you want the model to be
-
Select the parent Node for the model in the SceneExplorer
-
In the Project Explorer right-click the model file you want to link
-
Choose “Link in SceneComposer”
Note that when linking objects this way, you cannot edit them as part of the scene. To change the model you have to change the original j3o file.
Also note that although it its possible to directly link external model files (OgreXML, OBJ etc.), this is not recommended. Convert the original file to a j3o file by right-clicking it and selecting “Convert to jME Binary” before linking it. This is required because the original model files are not included in the release version of the application.