jMonkeyEngine 3 Tutorial (3) - Hello Assets
In this tutorial we will learn to load 3D models and text into the scene graph, using the jME Asset Manager. You will also learn how to determine the correct paths, and which file formats to use.
|
To use the example assets in a new jMonkeyEngine SDK project, right-click your project, select , and add the “jme3-test-data” library. |
Code Sample
package jme3test.helloworld;
import com.jme3.app.SimpleApplication;
import com.jme3.font.BitmapText;
import com.jme3.light.DirectionalLight;
import com.jme3.material.Material;
import com.jme3.math.Vector3f;
import com.jme3.scene.Geometry;
import com.jme3.scene.Spatial;
import com.jme3.scene.shape.Box;
/** Sample 3 - how to load an OBJ model, and OgreXML model,
* a material/texture, or text. */
public class HelloAssets extends SimpleApplication {
public static void main(String[] args) {
HelloAssets app = new HelloAssets();
app.start();
}
@Override
public void simpleInitApp() {
Spatial teapot = assetManager.loadModel("Models/Teapot/Teapot.obj");
Material mat_default = new Material(
assetManager, "Common/MatDefs/Misc/ShowNormals.j3md");
teapot.setMaterial(mat_default);
rootNode.attachChild(teapot);
// Create a wall with a simple texture from test_data
Box box = new Box(2.5f,2.5f,1.0f);
Spatial wall = new Geometry("Box", box );
Material mat_brick = new Material(
assetManager, "Common/MatDefs/Misc/Unshaded.j3md");
mat_brick.setTexture("ColorMap",
assetManager.loadTexture("Textures/Terrain/BrickWall/BrickWall.jpg"));
wall.setMaterial(mat_brick);
wall.setLocalTranslation(2.0f,-2.5f,0.0f);
rootNode.attachChild(wall);
// Display a line of text with a default font
guiNode.detachAllChildren();
guiFont = assetManager.loadFont("Interface/Fonts/Default.fnt");
BitmapText helloText = new BitmapText(guiFont, false);
helloText.setSize(guiFont.getCharSet().getRenderedSize());
helloText.setText("Hello World");
helloText.setLocalTranslation(300, helloText.getLineHeight(), 0);
guiNode.attachChild(helloText);
// Load a model from test_data (OgreXML + material + texture)
Spatial ninja = assetManager.loadModel("Models/Ninja/Ninja.mesh.xml");
ninja.scale(0.05f, 0.05f, 0.05f);
ninja.rotate(0.0f, -3.0f, 0.0f);
ninja.setLocalTranslation(0.0f, -5.0f, -2.0f);
rootNode.attachChild(ninja);
// You must add a light to make the model visible
DirectionalLight sun = new DirectionalLight();
sun.setDirection(new Vector3f(-0.1f, -0.7f, -1.0f));
rootNode.addLight(sun);
}
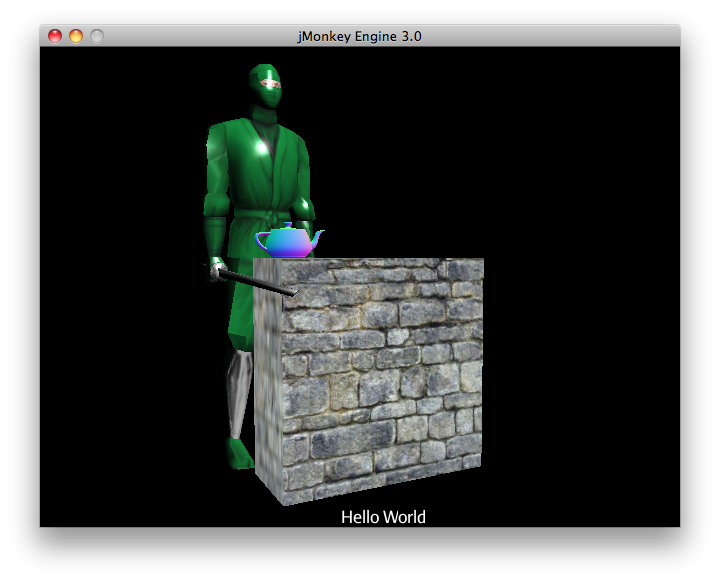
}Build and run the code sample. You should see a green Ninja with a colorful teapot standing behind a wall. The text on the screen should say “Hello World”.
The Asset Manager
By game assets we mean all multi-media files, such as models, materials, textures, whole scenes, custom shaders, music and sound files, and custom fonts. JME3 comes with a handy AssetManager object that helps you access your assets. The AssetManager can load files from:
-
The current classpath (the top level of your project directory).
-
The sub-folders of the
assetsdirectory of your project. -
Optionally, custom paths that you register.
The following is the recommended directory structure for storing assets in your project directoy:
MyGame/assets/
MyGame/assets/Interface/
MyGame/assets/MatDefs/
MyGame/assets/Materials/
MyGame/assets/Models/       <-- your .j3o models go here
MyGame/assets/Scenes/
MyGame/assets/Shaders/
MyGame/assets/Sounds/       <-- your audio files go here
MyGame/assets/Textures/     <-- your textures go here
MyGame/build.xml            <-- Default Ant build script
MyGame/src/...              <-- your Java sources go here
MyGame/...
This is just a suggested best practice, and it’s what you get by default when creating a new Java project in the jMokeyEngine SDK. You can create an assets directory and technically name the subdirectories whatever you like.
When you build your project for distribution, there will be no assets directory. Instead, you will generate an assets.jar file, located in the dist/lib folder of your project that will contain the sub-folders of the assets directory and all the assets in those folders.
|
Loading Textures
Place your textures in a subdirectory of assets/Textures/. Load the texture into the material before you set the Material. The following code sample is from the simpleInitApp() method and loads a simple wall model:
// Create a wall with a simple texture from test_data
Box box = new Box(2.5f,2.5f,1.0f);
Spatial wall = new Geometry("Box", box );
Material mat_brick = new Material(
    assetManager, "Common/MatDefs/Misc/Unshaded.j3md");
mat_brick.setTexture("ColorMap",
    assetManager.loadTexture("Textures/Terrain/BrickWall/BrickWall.jpg"));
wall.setMaterial(mat_brick);
wall.setLocalTranslation(2.0f,-2.5f,0.0f);
rootNode.attachChild(wall);
In this case, you create your own Material and apply it to a Geometry. You base Materials on default material descriptions (such as “Unshaded.j3md”), as shown in this example.
Loading Text and Fonts
This example displays the text “Hello World” in the default font at the bottom edge of the window. You attach text to the guiNode – this is a special node for flat (orthogonal) display elements. You display text to show the game score, player health, etc.
The following code sample goes into the simpleInitApp() method.
// Display a line of text with a default font
guiNode.detachAllChildren();
guiFont = assetManager.loadFont("Interface/Fonts/Default.fnt");
BitmapText helloText = new BitmapText(guiFont, false);
helloText.setSize(guiFont.getCharSet().getRenderedSize());
helloText.setText("Hello World");
helloText.setLocalTranslation(300, helloText.getLineHeight(), 0);
guiNode.attachChild(helloText);|
Clear existing text in the guiNode by detaching all its children. |
Loading a Model
Export your 3D model in a Supported External File Type (.mesh.xml, .scene, .material, .skeleton.xml, .gltf) and place it in a subdirectory of assets/Models/. The following code sample goes into the simpleInitApp() method.
// Load a model from test_data (OgreXML + material + texture)
Spatial ninja = assetManager.loadModel("Models/Ninja/Ninja.mesh.xml");
ninja.scale(0.05f, 0.05f, 0.05f);
ninja.rotate(0.0f, -3.0f, 0.0f);
ninja.setLocalTranslation(0.0f, -5.0f, -2.0f);
rootNode.attachChild(ninja);
// You must add a directional light to make the model visible!
DirectionalLight sun = new DirectionalLight();
sun.setDirection(new Vector3f(-0.1f, -0.7f, -1.0f).normalizeLocal());
rootNode.addLight(sun);| You do not need to create a Material if you exported the model with a material. Remember to add a light source, as shown, otherwise the material (and the whole model) is not visible! |
Loading Assets From Custom Paths
What if your game relies on user supplied model files, that are not included in the distribution? If a file is not located in the default location (e.g. assets directory), you can register a custom Locator and load it from any path.
Here is a usage example of a ZipLocator that is registered to a file town.zip in the top level of your project directory:
    assetManager.registerLocator("town.zip", ZipLocator.class);
    Spatial scene = assetManager.loadModel("main.scene");
    rootNode.attachChild(scene);
Here is a HttpZipLocator that can download zipped models and load them:
    assetManager.registerLocator("https://storage.googleapis.com/"
            + "google-code-archive-downloads/v2/code.google.com/"
            + "jmonkeyengine/wildhouse.zip", HttpZipLocator.class);
    Spatial scene = assetManager.loadModel("main.scene");
    rootNode.attachChild(scene);
JME3 offers ClasspathLocator, ZipLocator, FileLocator, HttpZipLocator, and UrlLocator (see com.jme3.asset.plugins).
Creating Models and Scenes
To create 3D models and scenes, you need a 3D Mesh Editor. If you don’t have any tools, install Blender.
Then you create fully textured models (e.g. with Blender), export them to your project using a Supported External File Type, convert models to .j3o using the recommended method for your chosen file type, load models, and create 3D scenes from them.
Model File Formats
JME3 can convert and load
-
Ogre XML models + materials.
-
Ogre DotScenes.
-
Wavefront OBJ + MTL models.
-
.gltf
The loadModel() method loads these original file formats when you run your code directly from the SDK. If you however build the executables using the default build script, then the original model files (XML, OBJ, etc) are not included. This means, when you run the executable outside the SDK, and load any original models directly, you get the following error message:
com.jme3.asset.DesktopAssetManager loadAsset
WARNING: Cannot locate resource: Models/Ninja/Ninja.mesh.xml
com.jme3.app.Application handleError
SEVERE: Uncaught exception thrown in Thread[LWJGL Renderer Thread,5,main]
java.lang.NullPointerException
You see that loading the XML/OBJ/GLTF directly is only acceptable during the development phase in the SDK. For example, every time your graphic designer pushes updated files to the asset directory, you can quickly review the latest version in your development environment.
But for QA test builds and for the final release build, you use .j3o files exclusively. J3o is an optimized binary format for jME3 applications. When you do QA test builds, or are ready to release, use the SDK to convert all .obj/.scene/.xml/.gltf files to .j3o files, and update all code to load the .j3o files. The default build script automatically packages .j3o files in the executables.
Open your JME3 Project in the jMonkeyEngine SDK.
-
Right-click a .OBJ, GLTF, or .mesh.xml file in the Projects window, and choose “Convert to j3o Binary”.
-
The .j3o file appears next to the .mesh.xml file and has the same name.
-
Update all your
loadModel()lines accordingly. For example:Spatial ninja = assetManager.loadModel("Models/Ninja/Ninja.j3o");
|
If your executable throws a “Cannot locate resource” runtime exception, check all load paths and make sure you have converted all models to .j3o files! |
Loading Models and Scenes
| Task? | Solution! |
|---|---|
Load model W/ materials. |
Use the asset manager’s |
Load model W/O materials. |
If you have a model without materials, you have to give it a material to make it visible. |
Load a scene. |
You load scenes just like you load models: |
Excercise - How to Load Assets
As an exercise, let’s try different ways of loading a scene. You will learn how to load the scene directly, or from a zip file.
Remember that there will be no assets folder in a final deployment. If you are going to use a zip, do not put it in the assets folder. Otherwise, you will likely get errors about a missing file. For final distribution, add it to your dist folder.
-
Download the town.zip sample scene.
-
Place the town.zip file in the top level directory of your JME3 project, like so:
jMonkeyProjects/MyGameProject/assets/
jMonkeyProjects/MyGameProject/build.xml
jMonkeyProjects/MyGameProject/src/
jMonkeyProjects/MyGameProject/town.zip
...
Use the following method to load models from a zip file:
-
Verify
town.zipis in the project directory. -
Register a zip file locator to the project directory: Add the following code under
simpleInitApp().assetManager.registerLocator("town.zip", ZipLocator.class); Spatial gameLevel = assetManager.loadModel("main.scene"); gameLevel.setLocalTranslation(0, -5.2f, 0); gameLevel.setLocalScale(2); rootNode.attachChild(gameLevel);The loadModel() method now searches this zip directly for the files to load.
(This means, do not writeloadModel(town.zip/main.scene)or similar!) -
Clean, build and run the project.
You should now see the Ninja+wall+teapot standing in a town.
|
If you register new locators, make sure you do not get any file name conflicts: Don’t name all scenes |
Earlier in this tutorial, you loaded scenes and models from the asset directory. This is the most common way you will be loading scenes and models. Here is the typical procedure:
-
Remove the code that you added for the previous exercise.
-
Unzip the town.zip to see the structure of the contained Ogre dotScene: You will get a directory named
town. It contains XML, texture files, and a file called main.scene. -
Move the unzipped
town/directory into theassets/Scenes/directory of your project. -
Add the following code under
simpleInitApp().Spatial gameLevel = assetManager.loadModel("Scenes/town/main.scene"); gameLevel.setLocalTranslation(0, -5.2f, 0); gameLevel.setLocalScale(2); rootNode.attachChild(gameLevel);Note that the path is relative to the
assets/…directory. -
Clean, build and run the project.
Again, you should see the Ninja+wall+teapot standing in a town.
Here is a third method you must know, loading a scene/model from a .j3o file:
-
Remove the code from the previous exercise.
-
If you haven’t already, open the SDK and open the project that contains the HelloAsset class.
-
In the projects window, browse to the
assets/Scenes/towndirectory. -
Right-click the
main.sceneand convert the scene to binary: The jMonkeyPlatform generates a main.j3o file. -
Add the following code under
simpleInitApp() {Spatial gameLevel = assetManager.loadModel("Scenes/town/main.j3o"); gameLevel.setLocalTranslation(0, -5.2f, 0); gameLevel.setLocalScale(2); rootNode.attachChild(gameLevel);Again, note that the path is relative to the
assets/…directory. -
Clean, Build and run the project.
Again, you should see the Ninja+wall+teapot standing in a town.
Conclusion
Now you know how to populate the scenegraph with static shapes and models, and how to build scenes. You have learned how to load assets using the assetManager and you have seen that the paths start relative to your project directory. Another important thing you have learned is to convert models to .j3o format for the executable JARs etc.
See also:
-
If you want to learn how to load sounds, see Hello Audio
-
If you want to learn more about loading textures and materials, see Hello Material