Controlling a Physical Vehicle
For physical vehicles, jME’s uses the jBullet ray-cast vehicle. In this vehicle implementation, the physical chassis 'floats' along on four non-physical vertical rays.
Internally, each wheel casts a ray down, and using the ray’s intersection point, jBullet calculates the suspension length, and the suspension force. The suspension force is applied to the chassis, keeping it from hitting the ground. The friction force is calculated for each wheel where the ray intersects with the ground. Friction is applied as a sideways and forwards force. [1]
This article shows how you use this vehicle implementation in a jME3 application.
Overview of this Physics Application
The goal is to create a physical vehicle with wheels that can be steered and that interacts (collides with) with the floor and obstacles.
-
Create a SimpleApplication with a BulletAppState
-
This gives us a PhysicsSpace for PhysicsNodes
-
-
Create a VehicleControl + CompoundCollisionShape for the physical vehicle behaviour
-
Set physical properties of the vehicle, such as suspension.
-
-
Create a VehicleNode for the car model
-
Create a box plus 4 cylinders as wheels (using
vehicle.addWheel()). -
Add the VehicleControl behaviour to the VehicleNode geometry.
-
-
Create a RigidBodyControl and CollisionShape for the floor
-
Map key triggers and add input listeners
-
Navigational commands Left, Right, Foward, Brake.
-
-
Define the steering actions to be triggered by the key events.
-
vehicle.steer() -
vehicle.accelerate() -
vehicle.brake()
-
Creating the Vehicle Chassis
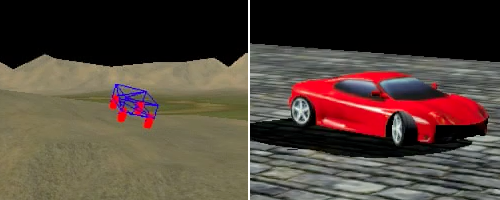
The vehicle that we create here in the TestPhysicsCar.java example is just a “box” on wheels, a basic vehicle shape that you can replace with a fancy car model, as demonstrated in TestFancyCar.java.
Every physical object must have a collision shape, that we prepare first. For the vehicle, we choose a compound collision shape that is made up of a box-shaped body of the right size for the vehicle. We will add the wheels later.
CompoundCollisionShape compoundShape = new CompoundCollisionShape();
BoxCollisionShape box = new BoxCollisionShape(new Vector3f(1.2f, 0.5f, 2.4f));
Best Practice: We attach the BoxCollisionShape (the vehicle body) to the CompoundCollisionShape at a Vector of (0,1,0): This shifts the effective center of mass of the BoxCollisionShape downwards to 0,-1,0 and makes a moving vehicle more stable!
compoundShape.addChildShape(box, new Vector3f(0, 1, 0));Any kind of geometry can make up the visible part of the vehicle, here we use a wireframe box. We create a node that we use to group the geometry.
Node vehicleNode=new Node("vehicleNode");
vehicle = new VehicleControl(compoundShape, 400);
vehicleNode.addControl(vehicle);
We initialize the Vehicle Control with the compound shape, and set its mass to a heavy value, 400f. The Vehicle Control represents the car’s physical behaviour.
vehicle = new VehicleControl(compoundShape, 400);Finally we add the behaviour (VehicleControl) to the visible Geometry (node).
vehicleNode.addControl(vehicle);We configure the physical properties of the vehicle’s suspension: Compresion, Damping, Stiffness, and MaxSuspenionForce. Picking workable values for the wheel suspension can be tricky – for background info have a look at these Suspension Settings Tips. For now, let’s work with the following values:
float stiffness = 60.0f;//200=f1 car
float compValue = .3f; //(should be lower than damp)
float dampValue = .4f;
vehicle.setSuspensionCompression(compValue * 2.0f * FastMath.sqrt(stiffness));
vehicle.setSuspensionDamping(dampValue * 2.0f * FastMath.sqrt(stiffness));
vehicle.setSuspensionStiffness(stiffness);
vehicle.setMaxSuspensionForce(10000.0f);
We now have a node vehicleNode with a visible “car” geometry, which acts like a vehicle. One thing that’s missing are wheels.
Adding the Wheels
We create four wheel Geometries and add them to the vehicle. Our wheel geometries are simple, non-physical discs (flat Cylinders), they are just visual decorations. Note that the physical wheel behaviour (the com.jme3.bullet.objects.VehicleWheel objects) is created internally by the vehicle.addWheel() method.
The addWheel() method sets following properties:
-
Vector3f connectionPoint – Coordinate where the suspension connects to the chassis (internally, this is where the Ray is casted downwards).
-
Vector3f direction – Wheel direction is typically a (0,-1,0) vector.
-
Vector3f axle – Axle direction is typically a (-1,0,0) vector.
-
float suspensionRestLength – Suspension rest length in world units
-
float wheelRadius – Wheel radius in world units
-
boolean isFrontWheel – Whether this wheel is one of the steering wheels.
Front wheels are the ones that rotate visibly when the vehicle turns.
We initialize a few variables that we will reuse when we add the four wheels. yOff, etc, are the particular wheel offsets for our small vehicle model.
Vector3f wheelDirection = new Vector3f(0, -1, 0);
Vector3f wheelAxle = new Vector3f(-1, 0, 0);
float radius = 0.5f;
float restLength = 0.3f;
float yOff = 0.5f;
float xOff = 1f;
float zOff = 2f;
We create a Cylinder mesh shape that we use to create the four visible wheel geometries.
Cylinder wheelMesh = new Cylinder(16, 16, radius, radius * 0.6f, true);For each wheel, we create a Node and a Geometry. We attach the Cylinder Geometry to the Node. We rotate the wheel by 90° around the Y axis. We set a material to make it visible. Finally we add the wheel (plus its properties) to the vehicle.
Node node1 = new Node("wheel 1 node");
Geometry wheels1 = new Geometry("wheel 1", wheelMesh);
node1.attachChild(wheels1);
wheels1.rotate(0, FastMath.HALF_PI, 0);
wheels1.setMaterial(mat);

vehicle.addWheel(node1, new Vector3f(-xOff, yOff, zOff),
    wheelDirection, wheelAxle, restLength, radius, true);
The three next wheels are created in the same fashion, only the offsets are different. Remember to set the Boolean parameter correctly to indicate whether it’s a front wheel.
...
vehicle.addWheel(node2, new Vector3f(xOff, yOff, zOff),
  wheelDirection, wheelAxle, restLength, radius, true);
...
vehicle.addWheel(node3, new Vector3f(-xOff, yOff, -zOff),
  wheelDirection, wheelAxle, restLength, radius, false);
...
vehicle.addWheel(node4, new Vector3f(xOff, yOff, -zOff),
  wheelDirection, wheelAxle, restLength, radius, false);
Attach the wheel Nodes to the vehicle Node to group them, so they move together.
vehicleNode.attachChild(node1);
vehicleNode.attachChild(node2);
vehicleNode.attachChild(node3);
vehicleNode.attachChild(node4);
As always, attach the vehicle Node to the rootNode to make it visible, and add the Vehicle Control to the PhysicsSpace to make the car physical.
rootNode.attachChild(vehicleNode);
getPhysicsSpace().add(vehicle);
Not shown here is that we also created a Material mat.
Steering the Vehicle
Not shown here is the standard way how we map the input keys to actions (see full code sample). Also refer to Input Handling).
In the ActionListener, we implement the actions that control the vehicle’s direction and speed. For the four directions (accelerate=up, brake=down, left, right), we specify how we want the vehicle to move.
-
The braking action is pretty straightforward:
vehicle.brake(brakeForce) -
For left and right turns, we add a constant to
steeringValuewhen the key is pressed, and subtract it when the key is released.
vehicle.steer(steeringValue); -
For acceleration we add a constant to
accelerationValuewhen the key is pressed, and substract it when the key is released.
vehicle.accelerate(accelerationValue); -
Because we can and it’s fun, we also add a turbo booster that makes the vehicle jump when you press the assigned key (spacebar).
vehicle.applyImpulse(jumpForce, Vector3f.ZERO);
public void onAction(String binding, boolean value, float tpf) {
  if (binding.equals("Lefts")) {
      if (value) { steeringValue += .5f; } else { steeringValue += -.5f; }
      vehicle.steer(steeringValue);
  } else if (binding.equals("Rights")) {
      if (value) { steeringValue += -.5f; } else { steeringValue += .5f; }
      vehicle.steer(steeringValue);
  } else if (binding.equals("Ups")) {
      if (value) {
        accelerationValue += accelerationForce;
      } else {
        accelerationValue -= accelerationForce;
      }
      vehicle.accelerate(accelerationValue);
  } else if (binding.equals("Downs")) {
      if (value) { vehicle.brake(brakeForce); } else { vehicle.brake(0f); }
  } else if (binding.equals("Space")) {
      if (value) {
        vehicle.applyImpulse(jumpForce, Vector3f.ZERO);
      }
  } else if (binding.equals("Reset")) {
      if (value) {
        System.out.println("Reset");
        vehicle.setPhysicsLocation(Vector3f.ZERO);
        vehicle.setPhysicsRotation(new Matrix3f());
        vehicle.setLinearVelocity(Vector3f.ZERO);
        vehicle.setAngularVelocity(Vector3f.ZERO);
        vehicle.resetSuspension();
      } else {
    }
  }
}
For your reference, this is how we initialized the constants for this example:
private final float accelerationForce = 1000.0f;
private final float brakeForce = 100.0f;
private float steeringValue = 0;
private float accelerationValue = 0;
private Vector3f jumpForce = new Vector3f(0, 3000, 0);
Remember, the standard input listener code that maps the actions to keys can be found in the code samples.
Detecting Collisions
Read the Physics Listeners documentation on how to detect collisions. You would do this if you want to react to collisions with custom events, such as adding points or substracting health.
Best Practices
This example shows a very simple but functional vehicle. For a game you would implement steering behaviour and acceleration with values that are typical for the type of vehicle that you want to simulate. Instead of a box, you load a chassis model. You can consider using an AnalogListener to respond to key events in a more sophisticated way.
For a more advanced example, look at TestFancyCar.java.