3ds Max Bone Animation to JME3 using OgreMax plugin
Asset Management
For the managing of assets in general, be sure to read the Asset Pipeline Documentation. It contains vital information on how to manage your asset files.
Creating models in 3dsMax
For this tutorial I used 3D Studio Max 2012 and OgreMax 2.4.3 free edition
Create Model and Bones
-
Create a new file
-
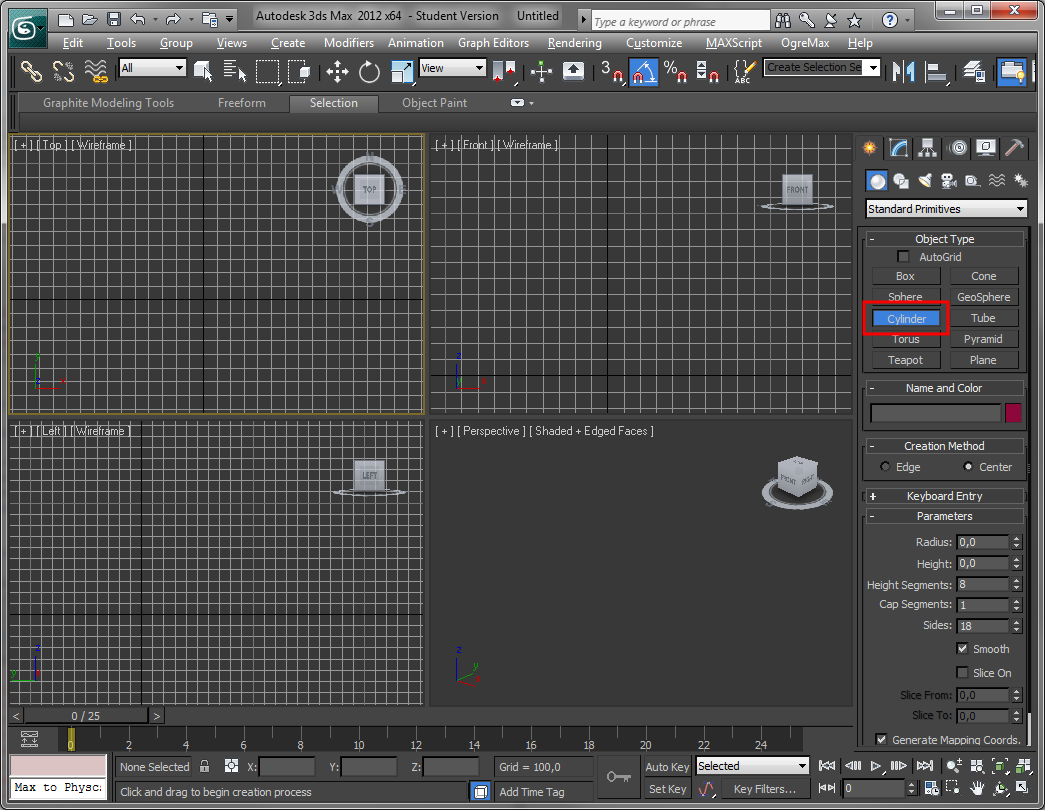
Select the “Create” tab > “Geometry” > “Cylinder”
-
Draw a cylinder, lets say with 8 height segments (must be enough for a smooth deformation)
-
Also check “Generate Mapping Coords”.

-
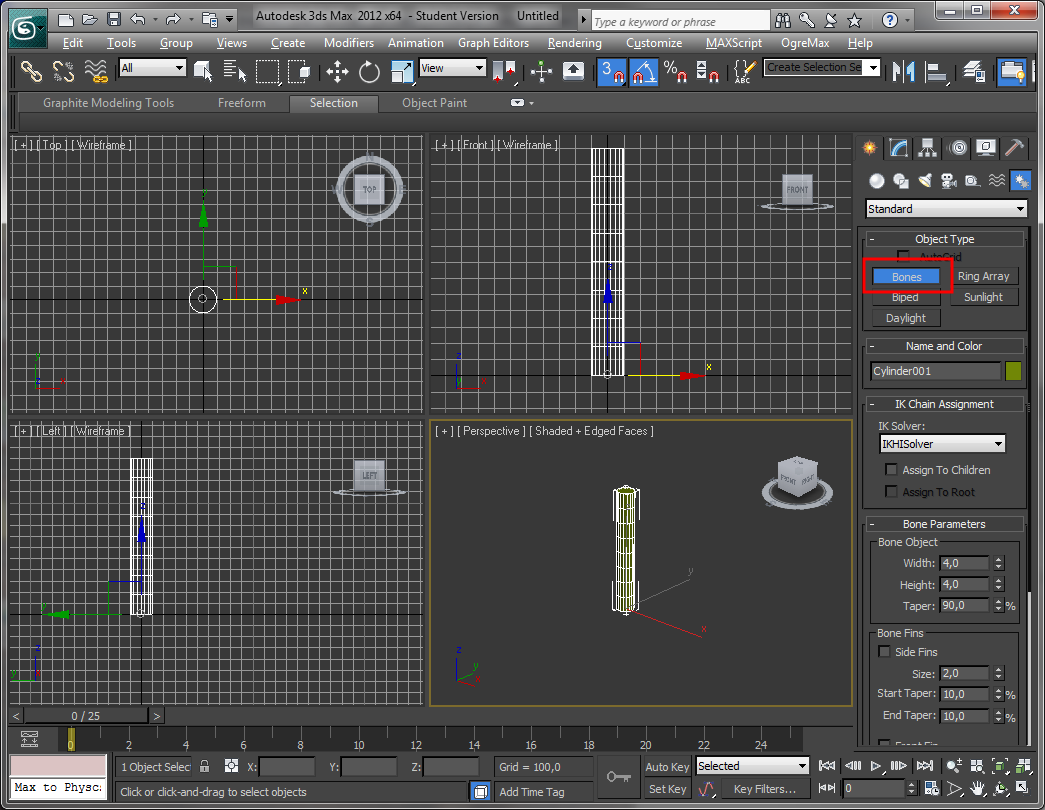
Click “Create” tab > “Systems” > “Bones”
-
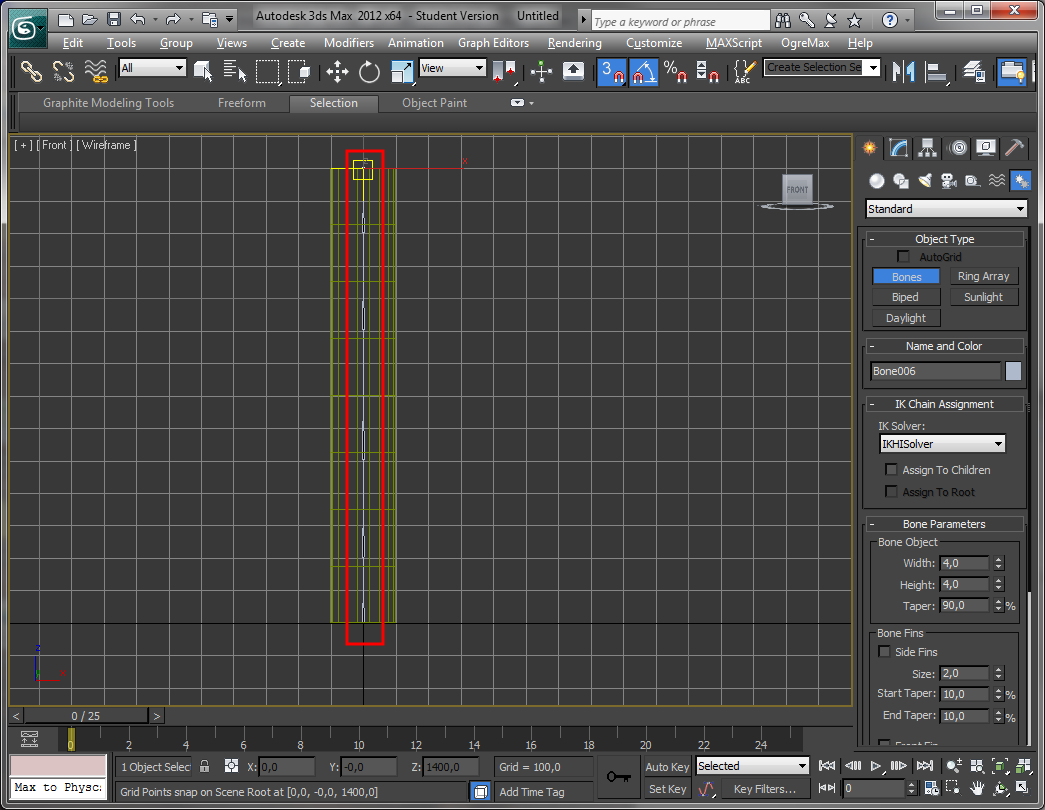
Add some bones in the center of the cylinder
-
Select the cylinder, right click it and click “Convert To”: > “Convert to Editable Mesh” to prevent issues with OgreMax
-
Click the “Modify” tab > “Modifier List” and add the “Skin” modifier
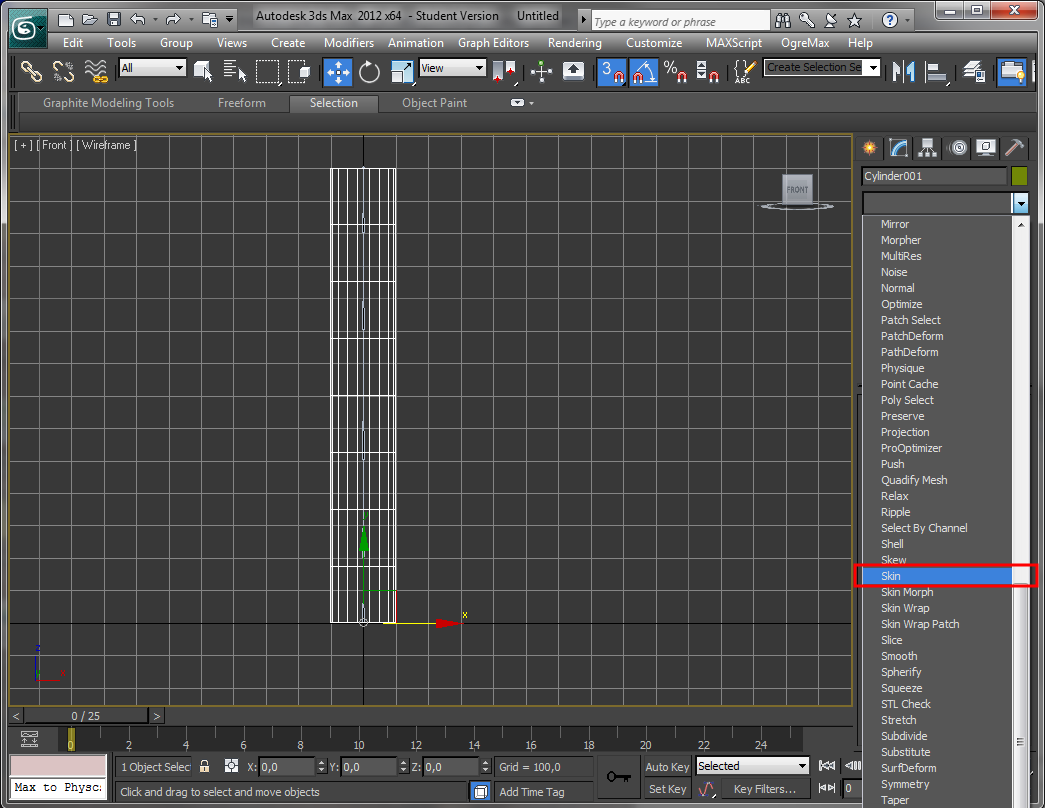
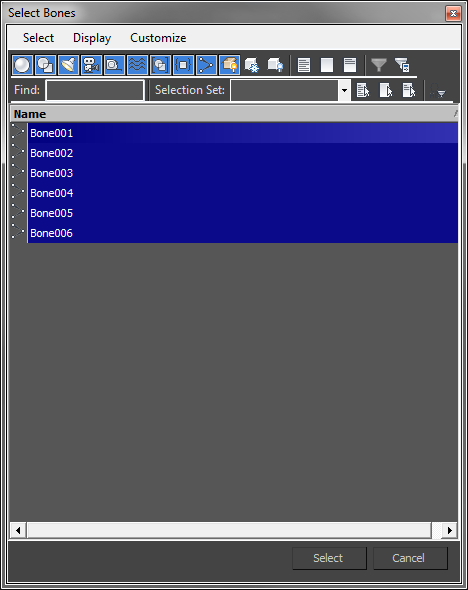
-
Beneath “Bones:” click “Add” and select all of your bones
-
You may also edit the envelopes, but for a small test the default settings are ok
Create the animation
-
Select the cylinder, and click “Display” tab > “Freeze Selected” so it is easier to select the bones during animation
-
Select the two top bones and enable the “Auto Key” mode
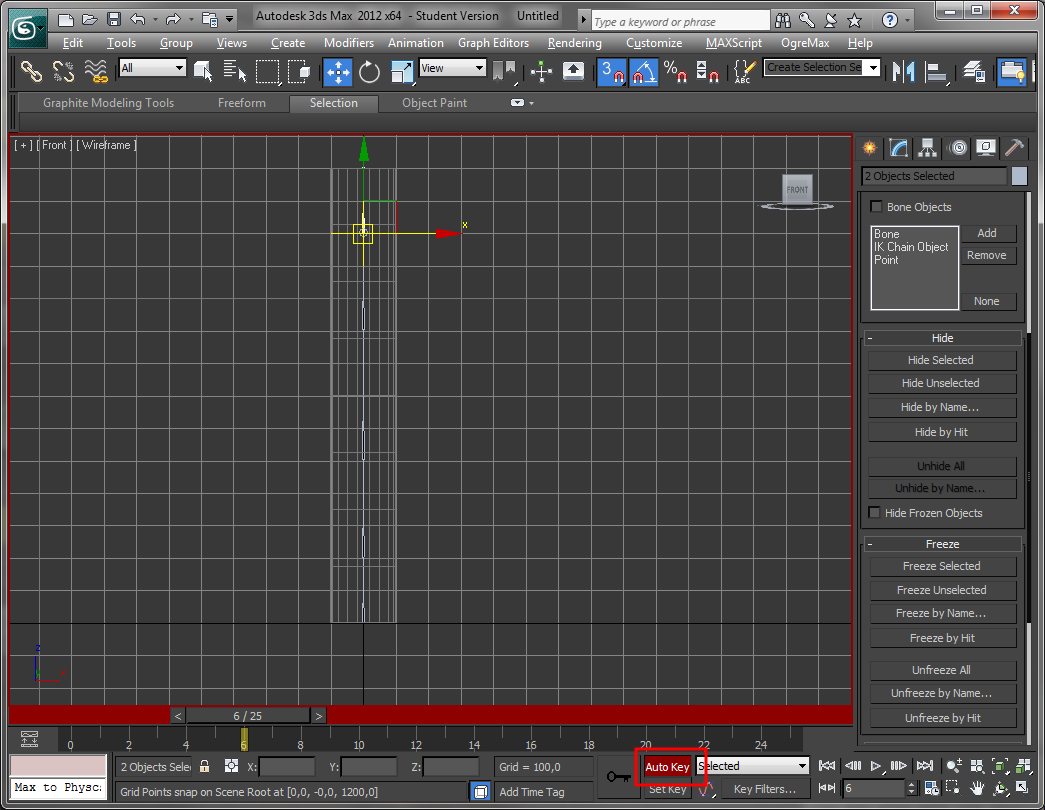
-
The first key frame will be created automatically. Move the animation track slider to frame 5
-
Move the selected bones a bit. The cylinder mesh will be deformed. Because you are in the “Auto Key” mode, a key frame will be created
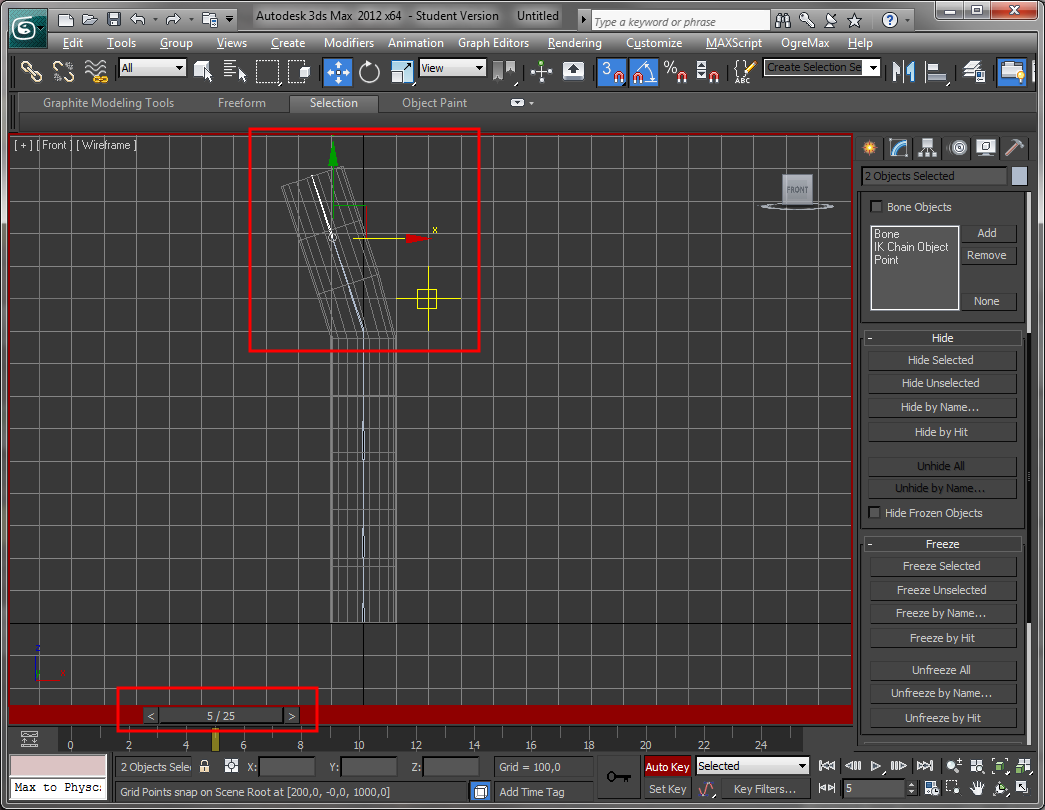
-
Create some additional key frames. You may also select more bones and move or rotate them. I’ve created 25 frames and the last key frame equals the first, so the animation is loopable
-
After creating the animation, disable the “Auto Key” mode
OgreMax settings
-
Open the “OgreMax Scene Settings” dialog from the menu
-
In the “Meshes” tab, enable “Export XML Files” and disable “Export Binary Files” as well as “Export Vertex Colors”
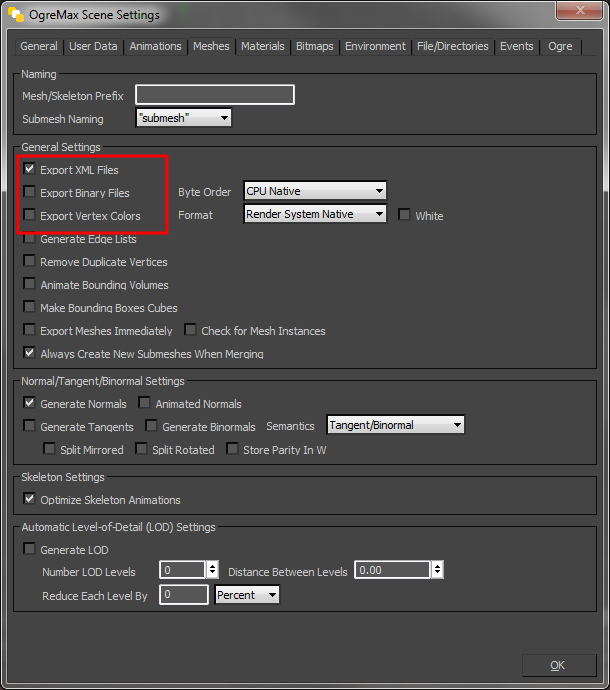
-
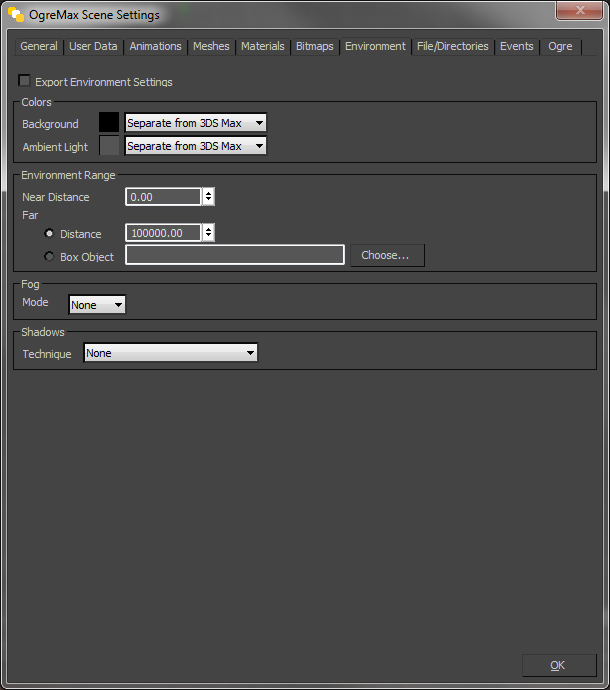
Click the “Environment” tab and uncheck “Export Environment Settings”. Otherwise the JME importer will throw a NullPointerException
-
If you have textured your model, you may also check “Copy Bitmaps to Export Directory” in the “Bitmaps” tab
-
Unfreeze the cylinder by clicking “Display” tab > “Unfreeze All” and select it
-
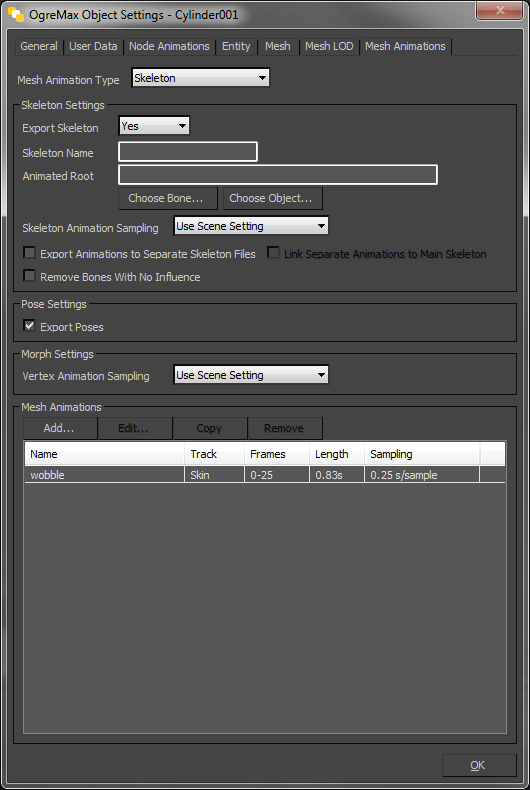
While having the cylinder selected, open the “OgreMax Object Settings” dialog from the menu
-
Open the “Mesh Animations” tab and select type “Skeleton”, “Export Skeleton” : “Yes”
-
Below “Mesh Animations” hit the “Add…” button
-
Assign a name to the track, maybe “wobble”. The track type must be “Skin”. Set the right “Start/End Frames” for your animation
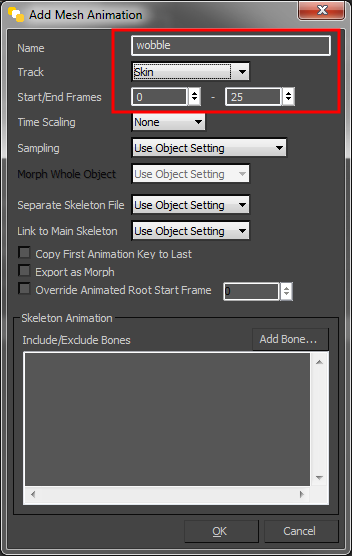
-
Hit ok and you will see the animation in the table. You may add additional animations by selecting other frame ranges, if desired
Export and Import
-
When all animations are in the list, select “OgreMax” > “Export” > “Export Scene” and name the file “worm.scene”
-
Create a JME test class that imports the file, get the animation controller and start the “wobble” animation
import com.jme3.animation.AnimChannel;
import com.jme3.animation.AnimControl;
import com.jme3.animation.Skeleton;
import com.jme3.app.SimpleApplication;
import com.jme3.asset.plugins.FileLocator;
import com.jme3.light.AmbientLight;
import com.jme3.light.PointLight;
import com.jme3.material.Material;
import com.jme3.math.ColorRGBA;
import com.jme3.scene.Geometry;
import com.jme3.scene.Node;
import com.jme3.scene.Spatial;
import com.jme3.scene.control.LodControl;
import com.jme3.scene.debug.SkeletonDebugger;
/**
* This is a test class for loading a Ogre XML scene exported by OgreMax.
*
* @author Stephan Dreyer
*
*/
public class TestOgreMaxImport extends SimpleApplication {
@Override
public void simpleInitApp() {
assetManager.registerLocator("Assets/model/ogre/test/", FileLocator.class);
// create the geometry and attach it
final Node model = (Node) assetManager.loadModel("worm.scene");
// resize it, because of the large 3dsmax scales
model.setLocalScale(.001f);
// attach to root node
rootNode.attachChild(model);
addLodControl(model);
final AnimControl ac = findAnimControl(model);
try {
// add a skeleton debugger to make bones visible
final Skeleton skel = ac.getSkeleton();
final SkeletonDebugger skeletonDebug = new SkeletonDebugger("skeleton",
skel);
final Material mat = new Material(assetManager,
"Common/MatDefs/Misc/Unshaded.j3md");
mat.setColor("Color", ColorRGBA.Green);
mat.getAdditionalRenderState().setDepthTest(false);
skeletonDebug.setMaterial(mat);
((Node) ac.getSpatial()).attachChild(skeletonDebug);
// create a channel and start the wobble animation
final AnimChannel channel = ac.createChannel();
channel.setAnim("wobble");
} catch (final Exception e) {
e.printStackTrace();
}
// add some lights
rootNode.addLight(new AmbientLight());
rootNode.addLight(new PointLight());
}
public void addLodControl(final Spatial parent) {
if (parent instanceof Node) {
for (final Spatial s : ((Node) parent).getChildren()) {
addLodControl(s);
}
} else if (parent instanceof Geometry) {
final LodControl lc = new LodControl();
lc.setDistTolerance(1f);
parent.addControl(lc);
}
}
/**
* Method to find the animation control, because it is not on the models root
* node.
*
* @param parent
* The spatial to search.
* @return The {@link AnimControl} or null if it does not exist.
*/
public AnimControl findAnimControl(final Spatial parent) {
final AnimControl animControl = parent.getControl(AnimControl.class);
if (animControl != null) {
return animControl;
}
if (parent instanceof Node) {
for (final Spatial s : ((Node) parent).getChildren()) {
final AnimControl animControl2 = findAnimControl(s);
if (animControl2 != null) {
return animControl2;
}
}
}
return null;
}
public static void main(final String[] args) {
new TestOgreMaxImport().start();
}
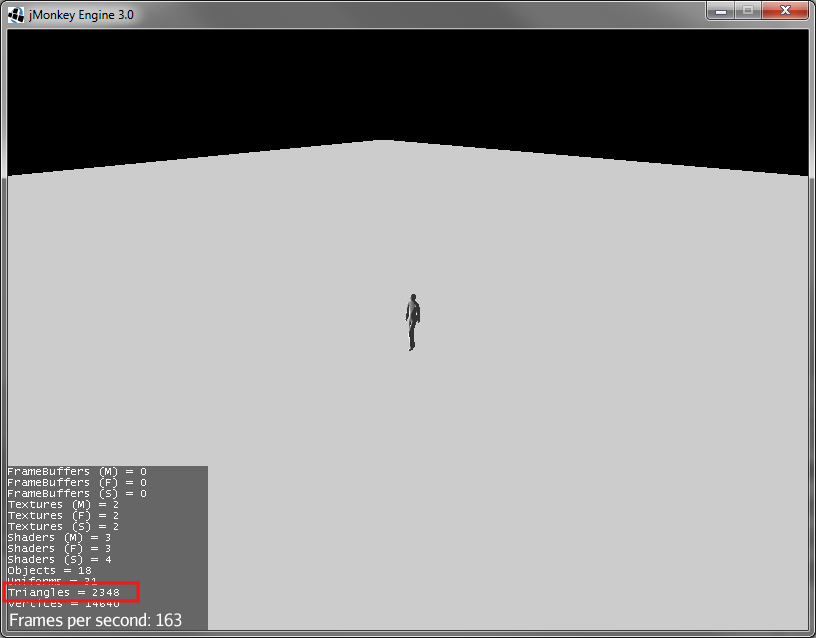
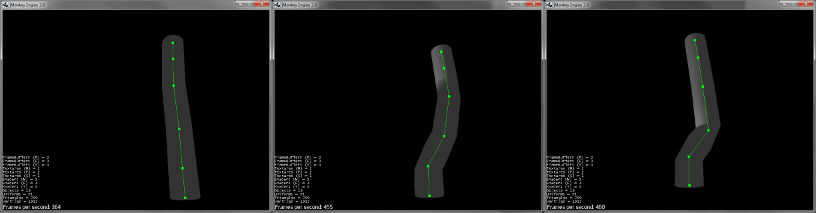
}You will see your worms strange movements. Have fun!
Creating a character in 3dsMax
I will not tell you in detail how to model a character. There I many good tutorials on the web, I used that one.
-
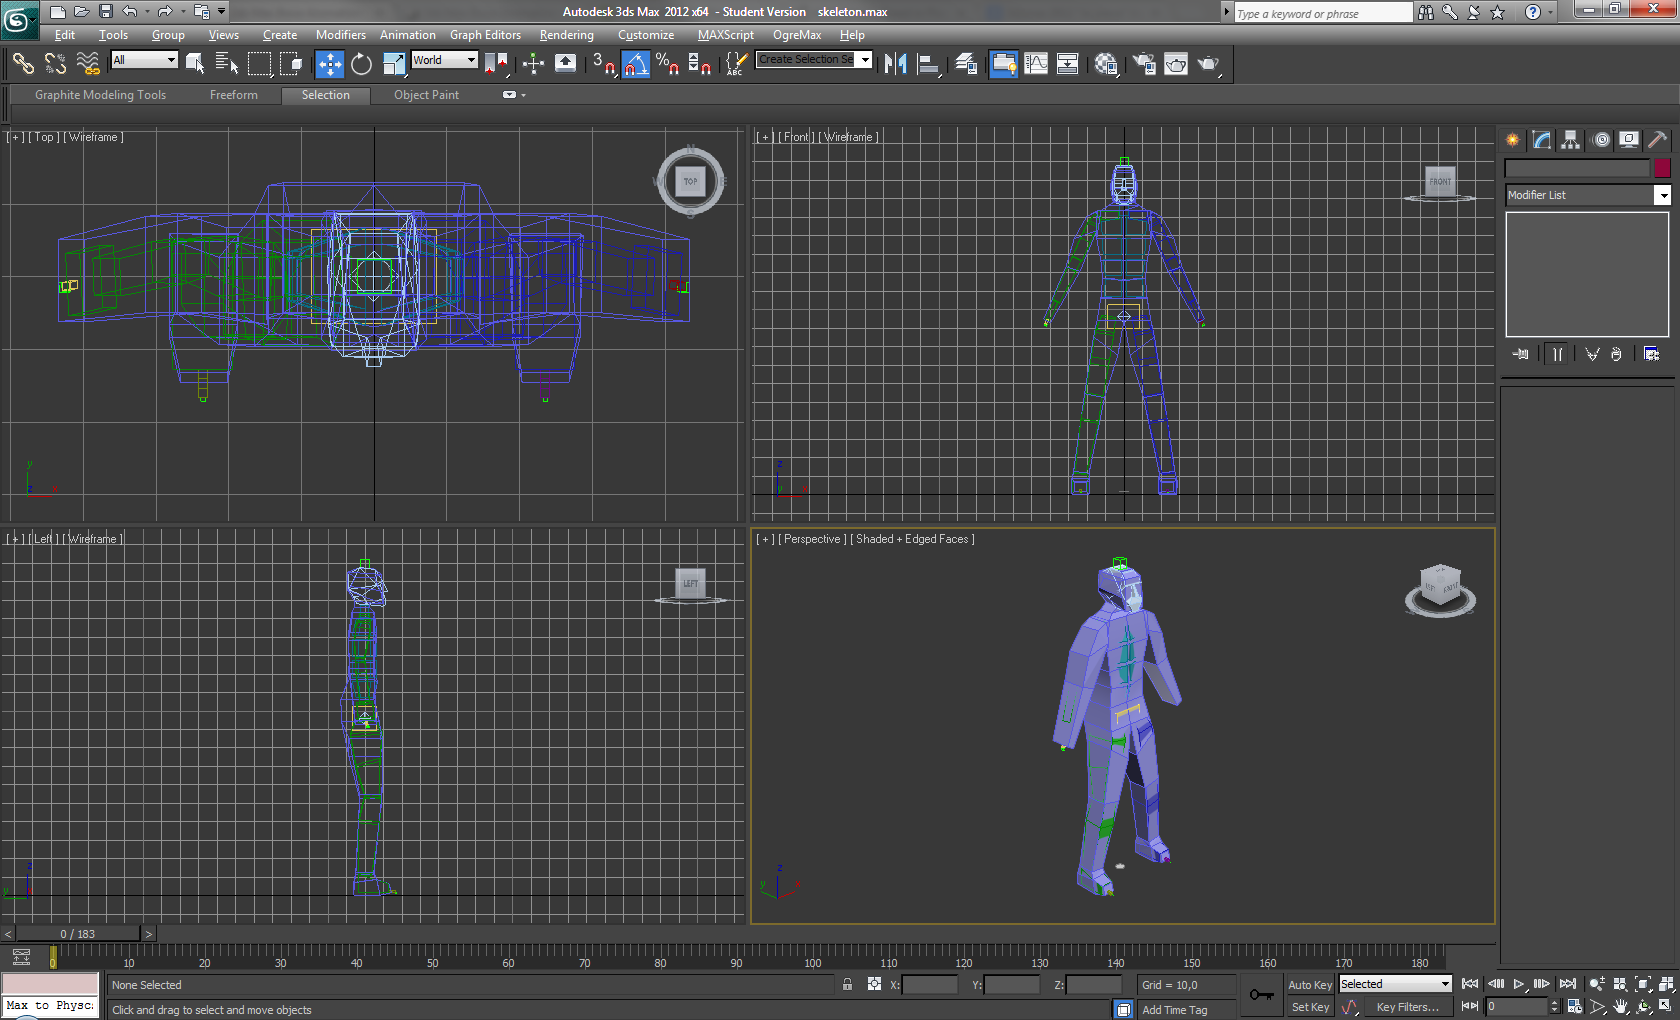
You may create a biped before you start modeling, so it is quite easier to fit the proportions of the biped.
-
After creating a model and a biped I got something like that:
-
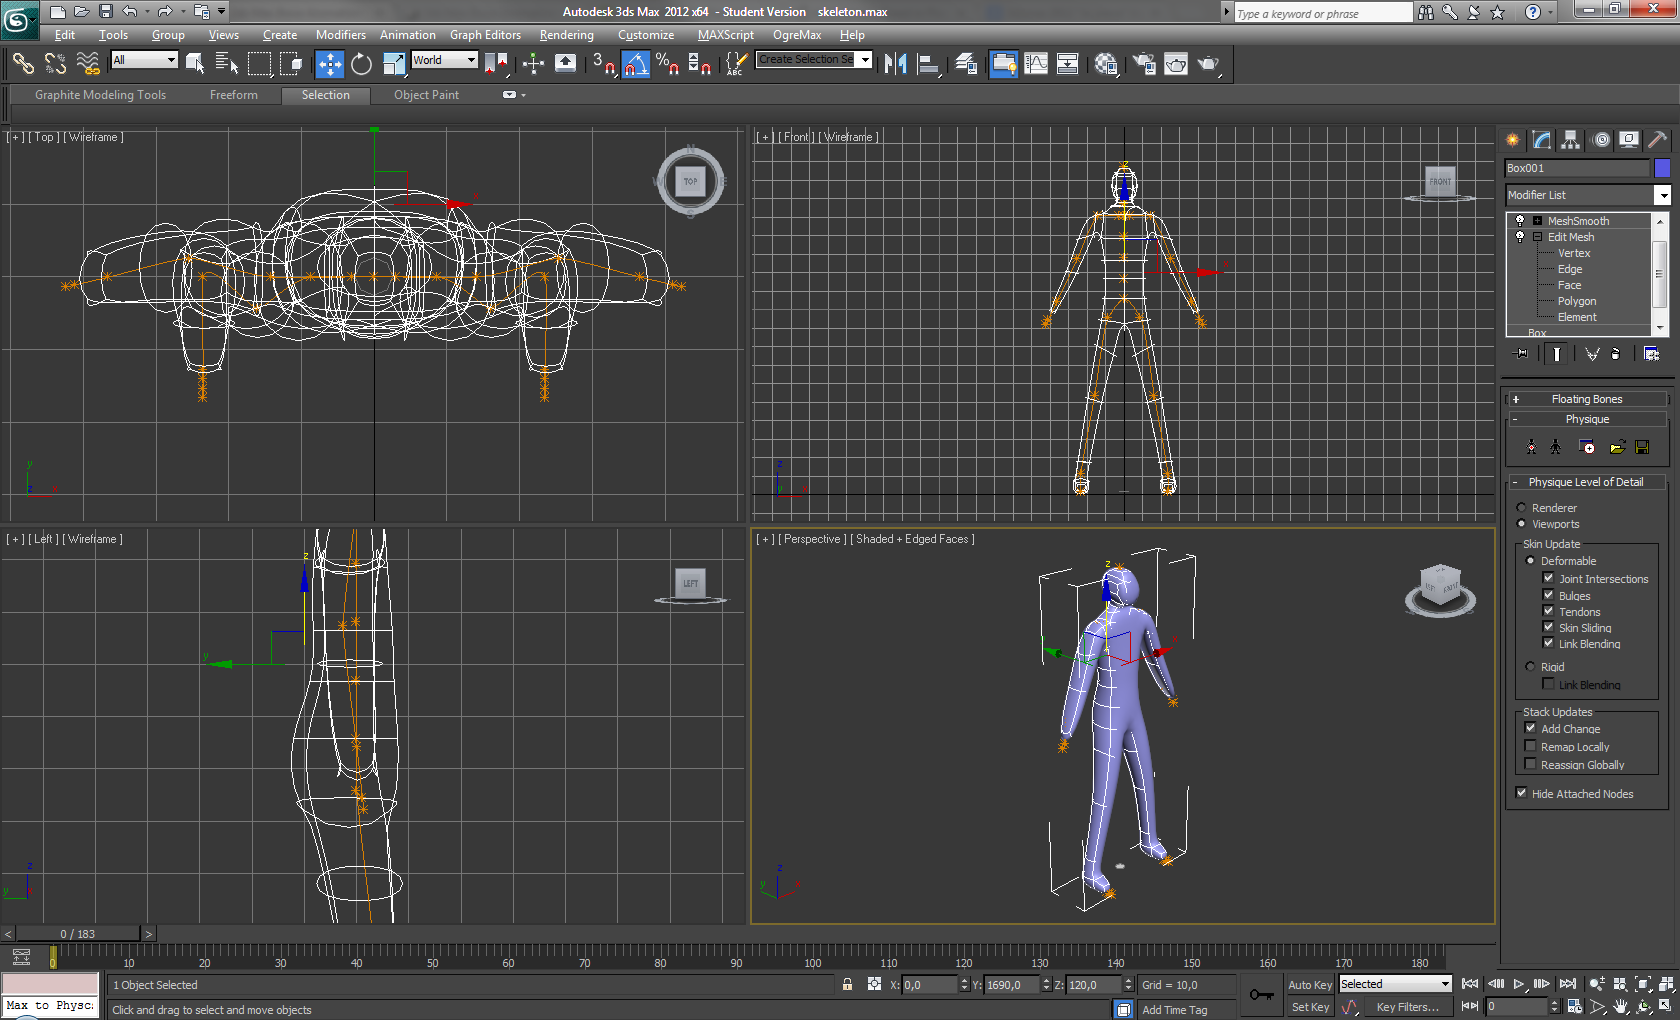
I added the “Meshmooth” modifier with 2 iterations and got this result:
-
After smoothing your mesh you could correct vertices with the “Edit Mesh” modifier. Finally you add the “Physique” modifier.
-
Now you can edit your envelopes to fit your model.
Creating a simple walk animation
-
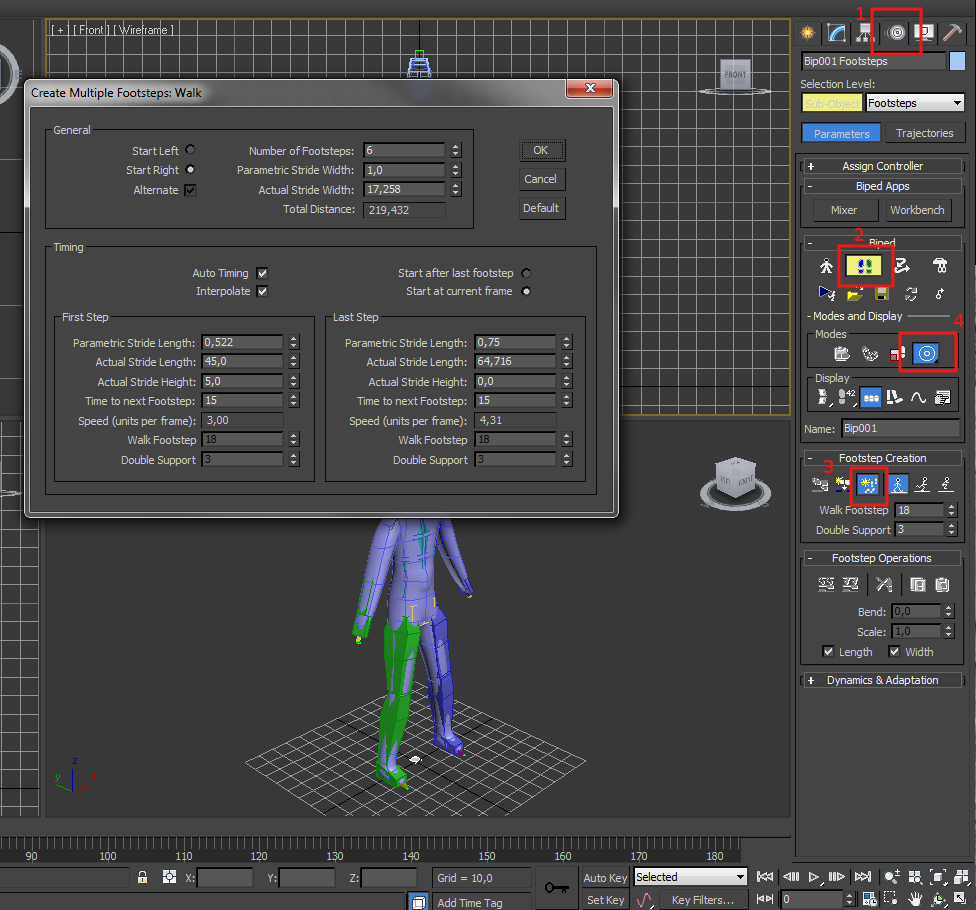
Select the chest of your biped, choose “Motion” (1) tab > “Foot Step Mode” (2) > “Create Multiple Footsteps” (3)
-
You need to select the “In Place Mode” (4), so the character moves in place without changing its location.
-
You can now play a bit with the settings, I adjusted “Actual Stride Length” and “Actual Stride Height”.
-
For the “Number” of Footsteps 6 will be sufficient because the animation is cycled later.
-
Note: You can also create or edit footsteps by hand and move or rotate them.
-
After all footsteps are created, hit the “Create Keys” for Inactive Footsteps button in the “Footstep Operations” panel
-
You can now check your animation by pressing the “Play” button in the timeline.
Preparing the export and setting up OgreMax
-
The “OgreMax” Scene Settings should be the same as shown above.
-
Because you want your animation to be looped, you’ve got to find two key frames where the legs are nearly in the same position. For my settings I’ve chosen the frames 48-78 for the walk animation.
-
Select the character mesh and open the “OgreMax Scene Settings” dialog.
-
Open the “Mesh Animations” tab and select type “Skeleton”, “Export Skeleton” : “Yes”
-
Below “Mesh Animations” hit the “Add…” button
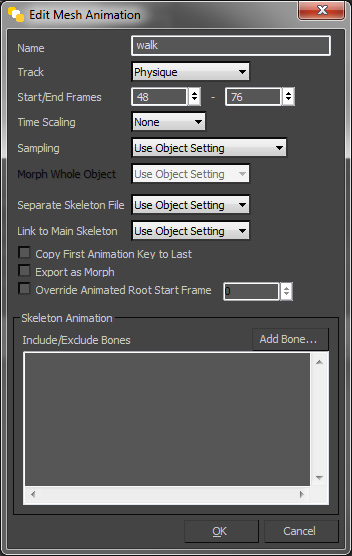
-
Enter a name for the track, e.g. “walk”.
-
Assure the track type is set to “Physique”.
-
Set the start and end frames, for me it is 48-78.
-
Close the dialog by pushing “Ok”.
-
Note: It could be useful to create also a track “start_run”, that blends between the stand and walk animation. I would use frame 0-47 for that.
-
Because you have a smooth model with a lot of polygons, it may be useful to create levels of detail (LOD). When the camera is farther away, a low-poly mesh of your character will be rendered.
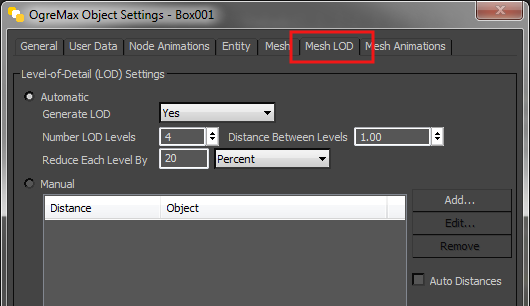
-
Open the “Mesh LOD” tab in object settings.
-
It will suffice to select the “Automatic” setting, but if your animation starts to look weird, you can create them by hand.
-
I used 4 levels of LOD with a distance of 1. Don’t worry about the distance setting, you can change it later in JME.
-
For the level reduction, I used 20 percent, which produce good results. You may adjust all the settings depending on your needs.
-
Close the dialoque by clicking “Ok”.
Fixing the location
-
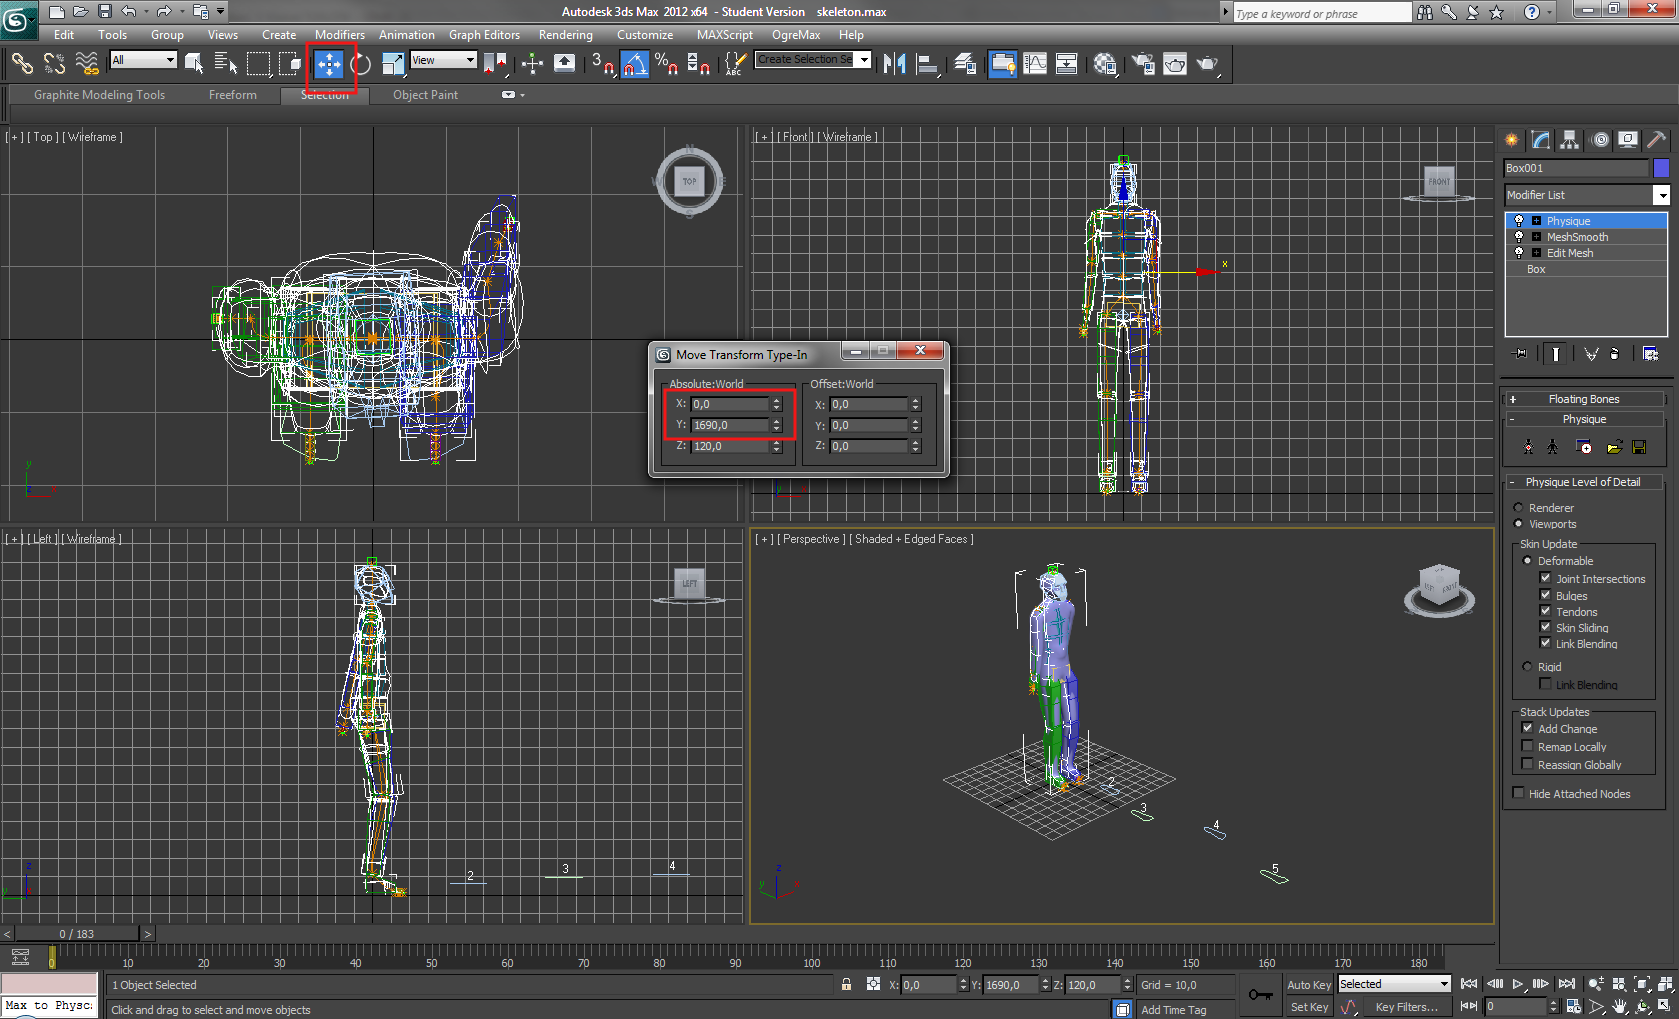
Before you export you need to do a little fix, because your model is not really located where you see it. JME will get into a lot of trouble, if you don’t change that.
-
Assure to save the max file. Sometimes OgreMax crashes the whole application during export. If you want to change the animation after export, you should reload this file because fixing the location changes something I can’t really figure out.
-
Right click the “Select” and Move tool in the upper toolbar. A dialog will pop up.
-
Set the X and Y location to 0 and close the dialog.
-
There is another way to achieve this. If you have scaled, moved or rotated your model, just open the “Hierarchy” tab and click “Transform” and “Scale” on the “Reset” panel.
Export and Import
-
Now you can export your scene. Select only the mesh and use “Export” selected objects. You will not need the whole scene including the biped object, but the bones are created automatically during export.
-
Create a JME test class for the scene import.
For that, I extended the first class:
import com.jme3.animation.AnimChannel;
import com.jme3.animation.AnimControl;
import com.jme3.animation.Skeleton;
import com.jme3.app.SimpleApplication;
import com.jme3.asset.plugins.FileLocator;
import com.jme3.light.AmbientLight;
import com.jme3.light.PointLight;
import com.jme3.material.Material;
import com.jme3.math.ColorRGBA;
import com.jme3.math.Vector3f;
import com.jme3.scene.Geometry;
import com.jme3.scene.Node;
import com.jme3.scene.Spatial;
import com.jme3.scene.control.LodControl;
import com.jme3.scene.debug.SkeletonDebugger;
import com.jme3.scene.shape.Box;

/**
 * This is a test class for loading a Ogre XML scene exported by OgreMax.
 *
 * @author Stephan Dreyer
 *
 */
public class TestOgreMaxImport extends SimpleApplication {

  @Override
  public void simpleInitApp() {
    assetManager.registerLocator("Assets/model/ogre/test/", FileLocator.class);

    // create the geometry and attach it
    final Node model = (Node) assetManager.loadModel("guy.scene");
    // resize it, because of the large 3dsmax scales
    model.setLocalScale(.02f);

    // attach to root node
    rootNode.attachChild(model);
    addLodControl(model);

    final AnimControl ac = findAnimControl(model);

    try {
      // add a skeleton debugger to make bones visible
      final Skeleton skel = ac.getSkeleton();
      final SkeletonDebugger skeletonDebug = new SkeletonDebugger("skeleton",
          skel);
      final Material mat = new Material(assetManager,
          "Common/MatDefs/Misc/Unshaded.j3md");
      mat.setColor("Color", ColorRGBA.Green);
      mat.getAdditionalRenderState().setDepthTest(false);
      skeletonDebug.setMaterial(mat);
      ((Node) ac.getSpatial()).attachChild(skeletonDebug);

      // create a channel and start the walk animation
      final AnimChannel channel = ac.createChannel();
      channel.setAnim("walk");
    } catch (final Exception e) {
      e.printStackTrace();
    }

    flyCam.setMoveSpeed(40f);
    cam.setLocation(new Vector3f(15, 10, 15));
    cam.lookAt(Vector3f.ZERO, Vector3f.UNIT_Y);
    cam.setFrustumNear(1f);

    // add some lights
    rootNode.addLight(new AmbientLight());

    final PointLight pl = new PointLight();
    pl.setPosition(new Vector3f(-3f, 3f, 1f));
    rootNode.addLight(pl);

    // add a box as floor
    final Box b = new Box(100f, 0.1f, 100f);
    final Geometry geo = new Geometry("floor", b);

    final Material mat = new Material(assetManager,
        "Common/MatDefs/Misc/Unshaded.j3md");
    mat.setColor("Color", ColorRGBA.LightGray);
    geo.setMaterial(mat);

    rootNode.attachChild(geo);
  }

  /**
   * Method to traverse through the scene graph and add a {@link LodControl} to
   * the mesh.
   *
   * @param parent
   *          The Node to add the control to.
   */
  public void addLodControl(final Spatial parent) {
    if (parent instanceof Node) {
      for (final Spatial s : ((Node) parent).getChildren()) {
        addLodControl(s);
      }
    } else if (parent instanceof Geometry) {
      final LodControl lc = new LodControl();

      // the distance for LOD changes is set here, you may adjust this
      lc.setDistTolerance(1f);
      parent.addControl(lc);
    }
  }

  /**
   * Method to find the animation control, because it is not on the models root
   * node.
   *
   * @param parent
   *          The spatial to search.
   * @return The {@link AnimControl} or null if it does not exist.
   */
  public AnimControl findAnimControl(final Spatial parent) {
    final AnimControl animControl = parent.getControl(AnimControl.class);
    if (animControl != null) {
      return animControl;
    }

    if (parent instanceof Node) {
      for (final Spatial s : ((Node) parent).getChildren()) {
        final AnimControl animControl2 = findAnimControl(s);
        if (animControl2 != null) {
          return animControl2;
        }
      }
    }

    return null;
  }

  public static void main(final String[] args) {
    new TestOgreMaxImport().start();
  }
}
After starting the class, you can see a nice smooth walk animation (if it’s not smooth, you need to adjust your track frames):

As you can see, the LOD is working: