jMonkeyEngine SDK: Creating Projects
The jMonkeyEngine SDK makes it easy to get started with developing 3-D games based on the jMonkeyEngine.
Creating a New jMonkeyEngine Project
-
Choose
from the main menu. -
In the New Project Wizard, select the template
. -
Click next to specify a project name, and the path where to store your new project.
-
Click Finish. A skeleton application is created and opens in the Project Explorer.
-
This basic jme3 application is based on the SimpleApplication class to allow an easy start with jme3.
-
You can click the run button to run it: You will see a blue cube.
-
Project Structure
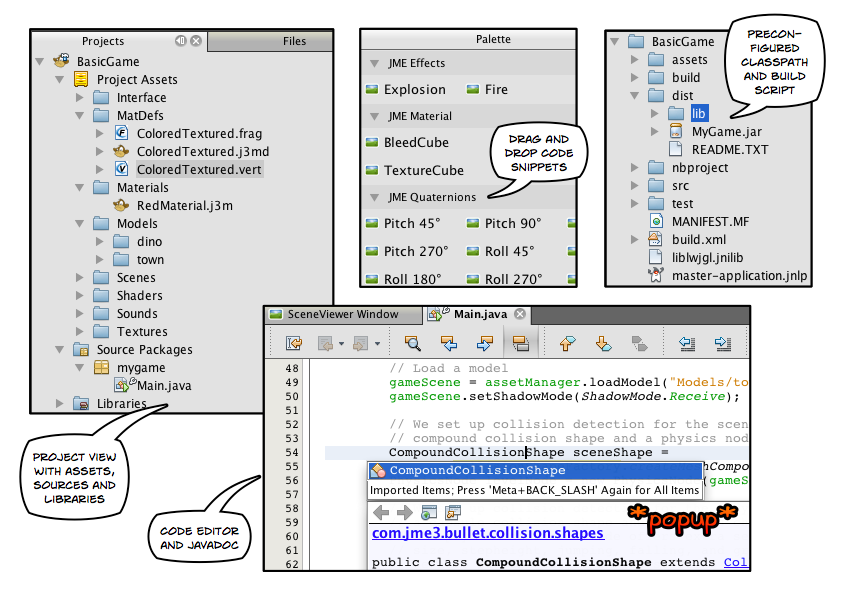
Let’s have a look at the abstract project structure in the Project Explorer. (Ctrl+1).
-
Project Assets node: These directories have been created for you to store your games assets, such as fonts, materials, models, shaders, sounds, and textures. For a newly created project, these directories are empty.
-
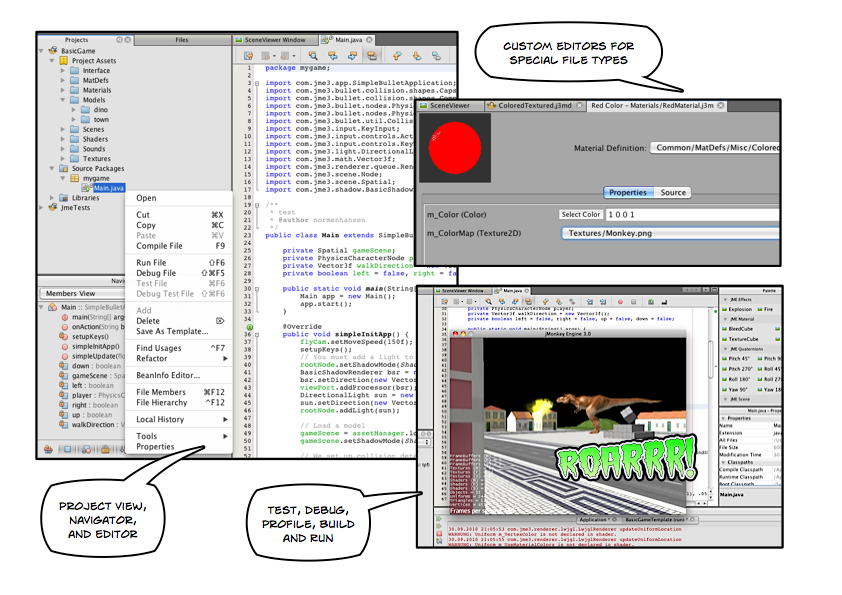
Source Packages node: This is where you manage your packages and classes. For a newly created project, it contains one package and one class,
Main.java. Double clickMain.javato open it in the editor. -
Libraries node: An overview of all libraies on your game’s classpath. The classpath is already set-up for the jme3 framework (including LWJGL, Bullet, Nifty GUI, etc).
Directory Structure
Now let’s have a look at the project’s file structure in the File Explorer (Ctrl+2). This explorer shows the physical directory structure on your hard drive.
-
assets – This directory corresponds to the Project Assets node. It is needed for the assetManager.
This is the recommended internal structure:
-
assets/Interface -
assets/MatDefs -
assets/Materials -
assets/Models -
assets/Scenes -
assets/Shaders -
assets/Sounds -
assets/Textures
-
-
src – This directory corresponds to the Source Packages node. Your sources code goes here.
-
nbproject – This is meta data used by the jMonkeyEngine SDK (don’t edit).
-
build.xml – This is an Ant build script that is hooked up to the clean/build/run/test actions in the jMonkeyEngine SDK. It loads a default build script, and allows you to further customize the build process. The Ant script also assures that you are able to clean/build/run/test your application outside of the jMonkeyEngine SDK – e.g. from the command line.
-
build – This directory contains the compiled classes. (Will be generated by the jMonkeyEngine SDK when you build the project.)
-
dist – This directory contains the executable JAR files. (Will be generated by the jMonkeyEngine SDK when you build the project.)
-
test – The jMonkeyEngine SDK will store JUnit tests here if you create any. (Optional.)
Project Configuration
[RMB] select the project and from the menu open the project Properties.
-
In the
Runsection:-
Specify the main class of your project. (Pressing F6 runs this main class.)
-
You can optionally configure JVM options and command line parameters. In most cases, set the
-Xms VMOption [NUMBER] mfor the memory usage.-
For example (-Xms500m).
-
-
-
In the Application section:
-
Specify the game title (by default the game will be named
BasicGame). -
Specify the vendor name (your name), a short description, your project’s homepage, and a splash screen.
-
Clean, Build and Run Cycle
|
Pressing F6 builds & runs the main class of the main project. If there are several classes, or several projects, you have to specify which one you want F6 to run. RMB select a project and choose To build and run the main() of any file that is open in the editor, press Shift+F6! |
-
RMB select the project and use the context-menu to clean all generated classes and JARs.
-
RMB select individual files with a main method to build and run them. (Shift+F6)
-
Press the Run button (green arrow in the toolbar) to build and run the project. (F6)
More than one project open? The toolbar buttons and the F-keys are bound to the main project, which is shown in bold in the Project Explorer. RMB select a project and select Set As Main Project to make it respond to the toolbar buttons and F-keys.
Worried About Proprietary Lock-in? You are never locked into the jMonkeyEngine SDK: At any time, you can change into your project directory on the command line, and clean, build, and run your project, using non-proprietary Apache Ant commands:
ant clean; ant jar; ant run;Development Process
-
Creating new files and packages: Select the Source Packages node (or any of its subnodes), and press Ctrl+N (
): Use theNew Filewizard to create new Java classes, Java packages, Java beans, Swing forms, JUnit files, j3m Materials, j3o scenes, j3f filters, and many more. -
Editing files: Open the Projects Explorer and double-click a Java file from the Source Packages to open it in the Editor. The jMonkeyEngine SDK Code Editor assists you in many ways, including syntactic and semantic code coloring, code completion, and javadoc.
-
Adding Assets:
-
You can import models, scenes, and materials as assets into your project.
-
To add sound files and images, use your operating system’s file explorer and copy the files into your project’s asset directory.
-
-
ToDo List: The tasks window automatically lists all lines containing errors and warnings, and all lines that you have marked with the comment keywords
FIXME, @todo, or TODO.
-
Integrated tools: Debugging, Testing, Profiling.
Adding external jar libraries
You may want to use external Java libraries in your jME project, for example content generators or artificial intelligence implementations.
Add the library to the global library list:
-
Select in the main menu.
-
Click “New Library”, enter a name for the library, and press OK.
-
In the “Classpath” tab, press “Add JAR/Folder” and select the jar file(s) needed for the library.
-
(Optional) In the “JavaDoc” tab, press “Add ZIP/Folder” and select the javadoc for the library, as zip file or folder.
-
(Optional) In the “Sources” tab you can select a folder or jar file containing the source files of the library.
-
Press OK.
Add the library to a project:
-
RMB select your project and select “Properties”.
-
Select “Libaries” on the left and then press “Add Library”.
-
Select the library from the list and press OK.
That’s it, your project can now use the external library. If you also linked the javadoc and sources, the SDK will assist you with javadoc popups, code completion (Ctrl+Space) and source navigation (Ctrl+LMB ).
Application Deployment
-
You can deploy your game as desktop application (JAR), browser applet, WebStart (JNLP), or on the Android platform.
Running Sample Projects
The SDK contains Sample Code (read more).
Open the Source Packages node of the JmeTests project.
-
RMB select the
JME3Testsproject and choose Run.
Choose samples from the TestChooser and try out the included demos. -
Browse a demo’s source code in the SDK’s Project window to learn how a feature is implemented and used.
-
Feel free to modify the code samples and experiment! If you break something, you can always recreate the packaged samples from the
JME3 Teststemplate.