jMonkeyEngine 3 Tutorial (13) - Hello Physics
Do you remember the Hello Collision tutorial where you made the model of a town solid and walked through it in a first-person perspective? Then you may remember that, for the simulation of physical forces, jME3 integrates the jBullet library.
Apart from making models “solid”, the most common use cases for physics in 3D games are:
-
Driving vehicles with suspensions, tyre friction, ramp jumping, drifting – Example: car racers
-
Rolling and bouncing balls – Example: pong, pool billiard, bowling
-
Sliding and falling boxes – Example: Breakout, Arkanoid
-
Exposing objects to forces and gravity – Example: spaceships or zero-g flight
-
Animating ragdolls – Example: “realistic” character simulations
-
Swinging pendulums, rope bridges, flexible chains, and much more…
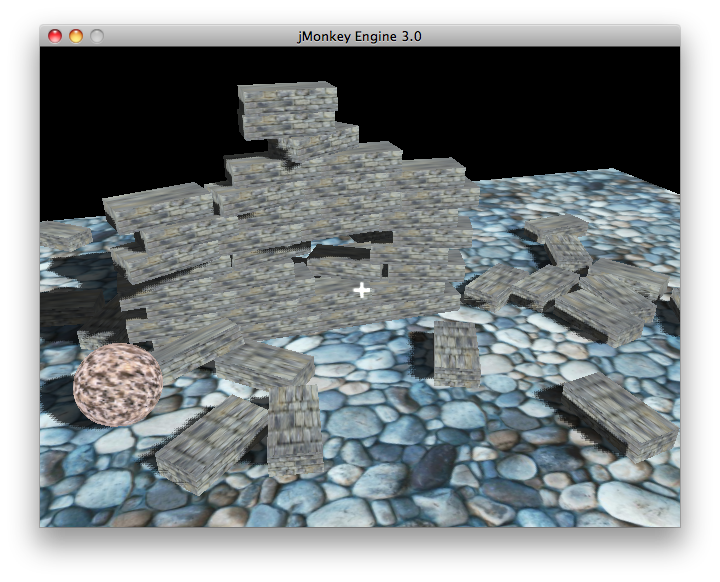
All these physical properties can be simulated in JME3. Let’s have a look at a simulation of physical forces in this example where you shoot cannon balls at a brick wall.
|
To use the example assets in a new jMonkeyEngine SDK project, right-click your project, select , and add the “jme3-test-data” library. |
Sample Code
package jme3test.helloworld;

import com.jme3.app.SimpleApplication;
import com.jme3.asset.TextureKey;
import com.jme3.bullet.BulletAppState;
import com.jme3.bullet.control.RigidBodyControl;
import com.jme3.font.BitmapText;
import com.jme3.input.MouseInput;
import com.jme3.input.controls.ActionListener;
import com.jme3.input.controls.MouseButtonTrigger;
import com.jme3.material.Material;
import com.jme3.math.Vector2f;
import com.jme3.math.Vector3f;
import com.jme3.scene.Geometry;
import com.jme3.scene.shape.Box;
import com.jme3.scene.shape.Sphere;
import com.jme3.scene.shape.Sphere.TextureMode;
import com.jme3.texture.Texture;
import com.jme3.texture.Texture.WrapMode;

/**
 * Example 12 - how to give objects physical properties so they bounce and fall.
 * @author base code by double1984, updated by zathras
 */
public class HelloPhysics extends SimpleApplication {

  public static void main(String args[]) {
    HelloPhysics app = new HelloPhysics();
    app.start();
  }

  /** Prepare the Physics Application State (jBullet) */
  private BulletAppState bulletAppState;

  /** Prepare Materials */
  Material wall_mat;
  Material stone_mat;
  Material floor_mat;

  /** Prepare geometries and physical nodes for bricks and cannon balls. */
  private RigidBodyControl    brick_phy;
  private static final Box    box;
  private RigidBodyControl    ball_phy;
  private static final Sphere sphere;
  private RigidBodyControl    floor_phy;
  private static final Box    floor;

  /** dimensions used for bricks and wall */
  private static final float brickLength = 0.48f;
  private static final float brickWidth  = 0.24f;
  private static final float brickHeight = 0.12f;

  static {
    /** Initialize the cannon ball geometry */
    sphere = new Sphere(32, 32, 0.4f, true, false);
    sphere.setTextureMode(TextureMode.Projected);
    /** Initialize the brick geometry */
    box = new Box(brickLength, brickHeight, brickWidth);
    box.scaleTextureCoordinates(new Vector2f(1f, .5f));
    /** Initialize the floor geometry */
    floor = new Box(10f, 0.1f, 5f);
    floor.scaleTextureCoordinates(new Vector2f(3, 6));
  }

  @Override
  public void simpleInitApp() {
    /** Set up Physics Game */
    bulletAppState = new BulletAppState();
    stateManager.attach(bulletAppState);
    //bulletAppState.getPhysicsSpace().enableDebug(assetManager);

    /** Configure cam to look at scene */
    cam.setLocation(new Vector3f(0, 4f, 6f));
    cam.lookAt(new Vector3f(2, 2, 0), Vector3f.UNIT_Y);
    /** Add InputManager action: Left click triggers shooting. */
    inputManager.addMapping("shoot",
            new MouseButtonTrigger(MouseInput.BUTTON_LEFT));
    inputManager.addListener(actionListener, "shoot");
    /** Initialize the scene, materials, and physics space */
    initMaterials();
    initWall();
    initFloor();
    initCrossHairs();
  }

  /**
   * Every time the shoot action is triggered, a new cannon ball is produced.
   * The ball is set up to fly from the camera position in the camera direction.
   */
  private ActionListener actionListener = new ActionListener() {
    public void onAction(String name, boolean keyPressed, float tpf) {
      if (name.equals("shoot") && !keyPressed) {
        makeCannonBall();
      }
    }
  };

  /** Initialize the materials used in this scene. */
  public void initMaterials() {
    wall_mat = new Material(assetManager, "Common/MatDefs/Misc/Unshaded.j3md");
    TextureKey key = new TextureKey("Textures/Terrain/BrickWall/BrickWall.jpg");
    key.setGenerateMips(true);
    Texture tex = assetManager.loadTexture(key);
    wall_mat.setTexture("ColorMap", tex);

    stone_mat = new Material(assetManager, "Common/MatDefs/Misc/Unshaded.j3md");
    TextureKey key2 = new TextureKey("Textures/Terrain/Rock/Rock.PNG");
    key2.setGenerateMips(true);
    Texture tex2 = assetManager.loadTexture(key2);
    stone_mat.setTexture("ColorMap", tex2);

    floor_mat = new Material(assetManager, "Common/MatDefs/Misc/Unshaded.j3md");
    TextureKey key3 = new TextureKey("Textures/Terrain/Pond/Pond.jpg");
    key3.setGenerateMips(true);
    Texture tex3 = assetManager.loadTexture(key3);
    tex3.setWrap(WrapMode.Repeat);
    floor_mat.setTexture("ColorMap", tex3);
  }

  /** Make a solid floor and add it to the scene. */
  public void initFloor() {
    Geometry floor_geo = new Geometry("Floor", floor);
    floor_geo.setMaterial(floor_mat);
    floor_geo.setLocalTranslation(0, -0.1f, 0);
    this.rootNode.attachChild(floor_geo);
    /* Make the floor physical with mass 0.0f! */
    floor_phy = new RigidBodyControl(0.0f);
    floor_geo.addControl(floor_phy);
    bulletAppState.getPhysicsSpace().add(floor_phy);
  }

  /** This loop builds a wall out of individual bricks. */
  public void initWall() {
    float startpt = brickLength / 4;
    float height = 0;
    for (int j = 0; j < 15; j++) {
      for (int i = 0; i < 6; i++) {
        Vector3f vt =
         new Vector3f(i * brickLength * 2 + startpt, brickHeight + height, 0);
        makeBrick(vt);
      }
      startpt = -startpt;
      height += 2 * brickHeight;
    }
  }

  /** This method creates one individual physical brick. */
  public void makeBrick(Vector3f loc) {
    /** Create a brick geometry and attach to scene graph. */
    Geometry brick_geo = new Geometry("brick", box);
    brick_geo.setMaterial(wall_mat);
    rootNode.attachChild(brick_geo);
    /** Position the brick geometry  */
    brick_geo.setLocalTranslation(loc);
    /** Make brick physical with a mass > 0.0f. */
    brick_phy = new RigidBodyControl(2f);
    /** Add physical brick to physics space. */
    brick_geo.addControl(brick_phy);
    bulletAppState.getPhysicsSpace().add(brick_phy);
  }

  /** This method creates one individual physical cannon ball.
   * By defaul, the ball is accelerated and flies
   * from the camera position in the camera direction.*/
   public void makeCannonBall() {
    /** Create a cannon ball geometry and attach to scene graph. */
    Geometry ball_geo = new Geometry("cannon ball", sphere);
    ball_geo.setMaterial(stone_mat);
    rootNode.attachChild(ball_geo);
    /** Position the cannon ball  */
    ball_geo.setLocalTranslation(cam.getLocation());
    /** Make the ball physcial with a mass > 0.0f */
    ball_phy = new RigidBodyControl(1f);
    /** Add physical ball to physics space. */
    ball_geo.addControl(ball_phy);
    bulletAppState.getPhysicsSpace().add(ball_phy);
    /** Accelerate the physcial ball to shoot it. */
    ball_phy.setLinearVelocity(cam.getDirection().mult(25));
  }

  /** A plus sign used as crosshairs to help the player with aiming.*/
  protected void initCrossHairs() {
    guiNode.detachAllChildren();
    guiFont = assetManager.loadFont("Interface/Fonts/Default.fnt");
    BitmapText ch = new BitmapText(guiFont, false);
    ch.setSize(guiFont.getCharSet().getRenderedSize() * 2);
    ch.setText("+");        // fake crosshairs :)
    ch.setLocalTranslation( // center
      settings.getWidth() / 2 - guiFont.getCharSet().getRenderedSize() / 3 * 2,
      settings.getHeight() / 2 + ch.getLineHeight() / 2, 0);
    guiNode.attachChild(ch);
  }
}
You should see a brick wall. Click to shoot cannon balls. Watch the bricks fall and bounce off one another!
A Basic Physics Application
In the previous tutorials, you used static Geometries (boxes, spheres, and models) that you placed in the scene. Depending on their translation, Geometries can “float” in mid-air and even overlap – they are not affected by “gravity” and have no physical mass. This tutorial shows how to add physical properties to Geometries.
As always, start with a standard com.jme3.app.SimpleApplication. To activate physics, create a com.jme3.bullet.BulletAppState, and and attach it to the SimpleApplication’s AppState manager.
public class HelloPhysics extends SimpleApplication {
  private BulletAppState bulletAppState;

  public void simpleInitApp() {
    bulletAppState = new BulletAppState();
    stateManager.attach(bulletAppState);
    ...
  }
  ...
}
The BulletAppState gives the game access to a PhysicsSpace. The PhysicsSpace lets you use com.jme3.bullet.control.PhysicsControls that add physical properties to Nodes.
Creating Bricks and Cannon Balls
Geometries
In this “shoot” at the wall example, you use Geometries such as cannon balls and bricks. Geometries contain meshes, such as Shapes. Let’s create and initialize some Shapes: Boxes and Spheres.
  /** Prepare geometries and physical nodes for bricks and cannon balls. */
  private static final Box    box;
  private static final Sphere sphere;
  private static final Box    floor;
  /** dimensions used for bricks and wall */
  private static final float brickLength = 0.48f;
  private static final float brickWidth  = 0.24f;
  private static final float brickHeight = 0.12f;
  static {
    /** Initialize the cannon ball geometry */
    sphere = new Sphere(32, 32, 0.4f, true, false);
    sphere.setTextureMode(TextureMode.Projected);
    /** Initialize the brick geometry */
    box = new Box(brickLength, brickHeight, brickWidth);
    box.scaleTextureCoordinates(new Vector2f(1f, .5f));
    /** Initialize the floor geometry */
    floor = new Box(10f, 0.1f, 5f);
    floor.scaleTextureCoordinates(new Vector2f(3, 6));
  }
RigidBodyControl: Brick
We want to create brick Geometries from those boxes. For each Geometry with physical properties, you create a RigidBodyControl.
private RigidBodyControl brick_phy;The custom makeBrick(loc) methods creates individual bricks at the location loc. A brick has the following properties:
-
It has a visible Geometry
brick_geo(Box Shape Geometry). -
It has physical properties
brick_phy(RigidBodyControl)
  public void makeBrick(Vector3f loc) {
    /** Create a brick geometry and attach to scene graph. */
    Geometry brick_geo = new Geometry("brick", box);
    brick_geo.setMaterial(wall_mat);
    rootNode.attachChild(brick_geo);
    /** Position the brick geometry  */
    brick_geo.setLocalTranslation(loc);
    /** Make brick physical with a mass > 0.0f. */
    brick_phy = new RigidBodyControl(2f);
    /** Add physical brick to physics space. */
    brick_geo.addControl(brick_phy);
    bulletAppState.getPhysicsSpace().add(brick_phy);
  }
This code sample does the following:
-
You create a brick Geometry brick_geo. A Geometry describes the shape and look of an object.
-
brick_geo has a box shape
-
brick_geo has a brick-colored material.
-
-
You attach brick_geo to the rootNode
-
You position brick_geo at
loc. -
You create a RigidBodyControl brick_phy for brick_geo.
-
brick_phy has a mass of 2f.
-
You add brick_phy to brick_geo.
-
You register brick_phy to the PhysicsSpace.
-
RigidBodyControl: Cannonball
You notice that the cannon ball is created in the same way, using the custom makeCannonBall() method. The cannon ball has the following properties:
-
It has a visible Geometry
ball_geo(Sphere Shape Geometry) -
It has physical properties
ball_phy(RigidBodyControl)
    /** Create a cannon ball geometry and attach to scene graph. */
    Geometry ball_geo = new Geometry("cannon ball", sphere);
    ball_geo.setMaterial(stone_mat);
    rootNode.attachChild(ball_geo);
    /** Position the cannon ball  */
    ball_geo.setLocalTranslation(cam.getLocation());
    /** Make the ball physcial with a mass > 0.0f */
    ball_phy = new RigidBodyControl(1f);
    /** Add physical ball to physics space. */
    ball_geo.addControl(ball_phy);
    bulletAppState.getPhysicsSpace().add(ball_phy);
    /** Accelerate the physcial ball to shoot it. */
    ball_phy.setLinearVelocity(cam.getDirection().mult(25));
This code sample does the following:
-
You create a ball Geometry ball_geo. A Geometry describes the shape and look of an object.
-
ball_geo has a sphere shape
-
ball_geo has a stone-colored material.
-
-
You attach ball_geo to the rootNode
-
You position ball_geo at the camera location.
-
You create a RigidBodyControl ball_phy for ball_geo.
-
ball_phy has a mass of 1f.
-
You add ball_phy to ball_geo.
-
You register ball_phy to the PhysicsSpace.
-
Since you are shooting cannon balls, the last line accelerates the ball in the direction the camera is looking, with a speed of 25f.
RigidBodyControl: Floor
The (static) floor has one important difference compared to the (dynamic) bricks and cannonballs: Static objects have a mass of zero.
As before, you write a custom initFloor() method that creates a flat box with a rock texture that you use as floor. The floor has the following properties:
-
It has a visible Geometry
floor_geo(Box Shape Geometry) -
It has physical properties
floor_phy(RigidBodyControl)
  public void initFloor() {
    Geometry floor_geo = new Geometry("Floor", floor);
    floor_geo.setMaterial(floor_mat);
    floor_geo.setLocalTranslation(0, -0.1f, 0);
    this.rootNode.attachChild(floor_geo);
    /* Make the floor physical with mass 0.0f! */
    floor_phy = new RigidBodyControl(0.0f);
    floor_geo.addControl(floor_phy);
    bulletAppState.getPhysicsSpace().add(floor_phy);
  }
This code sample does the following:
-
You create a floor Geometry floor_geo. A Geometry describes the shape and look of an object.
-
floor_geo has a box shape
-
floor_geo has a pebble-colored material.
-
-
You attach floor_geo to the rootNode
-
You position floor_geo a bit below y=0 (to prevent overlap with other PhysicControl’ed Spatials).
-
You create a RigidBodyControl floor_phy for floor_geo.
-
floor_phy has a mass of 0f
-
You add floor_phy to floor_geo.
-
You register floor_phy to the PhysicsSpace.
-
Creating the Scene
Let’s have a quick look at the custom helper methods:
-
initMaterial()– This method initializes all the materials we use in this demo. -
initWall()– A double loop that generates a wall by positioning brick objects: 15 rows high with 6 bricks per row. It’s important to space the physical bricks so they do not overlap. -
initCrossHairs()– This method simply displays a plus sign that you use as crosshairs for aiming. Note that screen elements such as crosshairs are attached to theguiNode, not therootNode! -
initInputs()– This method sets up the click-to-shoot action.
These methods are each called once from the simpleInitApp() method at the start of the game. As you see, you can write any number of custom methods to set up your game’s scene.
The Cannon Ball Shooting Action
In the initInputs() method, you add an input mapping that triggers a shoot action when the left mouse button is pressed.
  private void initInputs() {
    inputManager.addMapping("shoot",
            new MouseButtonTrigger(MouseInput.BUTTON_LEFT));
    inputManager.addListener(actionListener, "shoot");
  }
You define the actual action of shooting a new cannon ball as follows:
    private ActionListener actionListener = new ActionListener() {
        public void onAction(String name, boolean keyPressed, float tpf) {
            if (name.equals("shoot") && !keyPressed) {
                makeCannonBall();
            }
        }
    };
In the moment the cannonball appears in the scene, it flies off with the velocity (and in the direction) that you specified using setLinearVelocity() inside makeCannonBall(). The newly created cannon ball flies off, hits the wall, and exerts a physical force that impacts individual bricks.
Moving a Physical Spatial
The location of the dynamic Spatial is controlled by its RigidBodyControl. Move the RigidBodyControl to move the Spatial. If it’s a dynamic PhysicsControl, you can use setLinearVelocity() and apply forces and torques to it. Other RigidBodyControl’led objects can push the dynamic Spatial around (like pool/billiard balls).
You can make Spatials that are not dynamic: Switch the RigidBodyControl to setKinematic(true) to have it move along with its Spatial.
-
A kinematic is unaffected by forces or gravity, which means it can float in mid-air and cannot be pushed away by dynamic “cannon” balls etc.
-
A kinematic RigidBody has a mass.
-
A kinematic can be moved and can exert forces on dynamic RigidBodys. This means you can use a kinematic node as a billiard cue or a remote-controlled battering ram.
Learn more about static versus kinematic versus dynamic in the advanced physics doc.
Excercises
Exercise 1: Debug Shapes
Add the following line after the bulletAppState initialization.
// For older versions up to JME sdk 3.0.10
bulletAppState.getPhysicsSpace().enableDebug(assetManager);
or
// For new versions thereafter
bulletAppState.setDebugEnabled(true);
Now you see the collisionShapes of the bricks and spheres, and the floor highlighted.
Exercise 2: No Mo' Static
What happens if you give a static node, such as the floor, a mass of more than 0.0f?
Exercise 3: Behind the Curtain
Fill your scene with walls, bricks, and cannon balls. When do you begin to see a performance impact?
Popular AAA games use a clever mix of physics, animation and prerendered graphics to give you the illusion of a real, “physical” world. Think of your favorite video games and try to spot where and how the game designers trick you into believing that the whole scene is physical. For example, think of a building “breaking” into 4-8 parts after an explosion. The pieces most likely fly on predefined (so called kinematic) paths and are only replaced by dynamic Spatials after they touch the ground… Now that you start to implement game physics yourself, look behind the curtain!
Using physics everywhere in a game sounds like a cool idea, but it is easily overused. Although the physics nodes are put to “sleep” when they are not moving, creating a world solely out of dynamic physics nodes will quickly bring you to the limits of your computer’s capabilities.
Conclusion
You have learned how to activate the jBullet PhysicsSpace in an application by adding a BulletAppState. You have created PhysicsControls for simple Shape-based Geometries (for more complex shapes, read up on CollisionShapes). You have learned that physical objects are not only attached to the rootNode, but also registered to the PhysicsSpace. You know that it makes a difference whether a physical object has a mass (dynamic) or not (static). You are aware that overusing physics has a huge performance impact.
|
Congratulations! – You have completed the last beginner tutorial. Now you are ready to start combining what you have learned, to create a cool 3D game of your own. Show us what you can do, and feel free to share your demos, game videos, and screenshots on the User Code & Projects Forum! |