Laying out the GUI in XML
You can “draw” the GUI to the screen by writing XML code (alternatively you can also use Java).
Plan Your GUI Layout
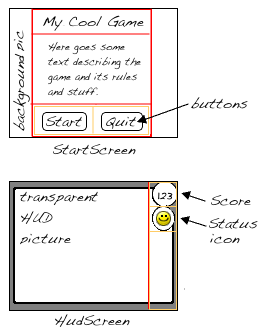
In this tutorial, you want to create two game screens: An out-of-game StartScreen that the players see before the game starts; and an in-game HUD that displays info during the game. Before writing code, you plan the GUI layout, either on paper or in a graphic application.
The StartScreen contains:
-
The background layer has a centered layout and contains an image.
-
The top layer has a vertical layout, containing 3 panels:
-
The top panel contains a label with the game title,
-
The middle panel contains a text field with the game description.
-
The bottom panel has a horizontal layout and contains two more panels:
-
The left panel contains a Start button.
-
The right panel contains a Quit button.
-
-
The HUD contains:
-
The background layer has a centered layout, and contains the partially transparent HUD image.
-
The top layer has a horizontal layout, containing 2 panels:
-
The left panel as transparent spacer.
-
The right panel has a vertical layout containing 2 panels, a label and an image.
-
Implement Your GUI Layout
Create an empty screen.xml file in the assets/Interface/ directory of your project.
| Do not use the SDK built in Nifty file editor. It does not work and is full of bugs that will lead to significant hair loss. Instead, create an empty XML file. |
-
RMB click on
followed by the Next > button. -
Name the file “screen” and when ready select Finish.
Afterwards create the directory assets/Interface/Fonts and add a new font, e.g. Arial.
-
RMB click on
Interfaceand selectfollowed by the Next > button. -
Name the folder “Fonts” and when ready select Finish.
-
RMB click the newly created
Fontsfolder and select. -
In the
New Fontdialog, select font “Arial”. -
Click the Next > button when ready.
-
Accept the defaults by selecting Finish.
Lastly, see: Nifty Gui Overlay on how to setup your game to display your GUI.
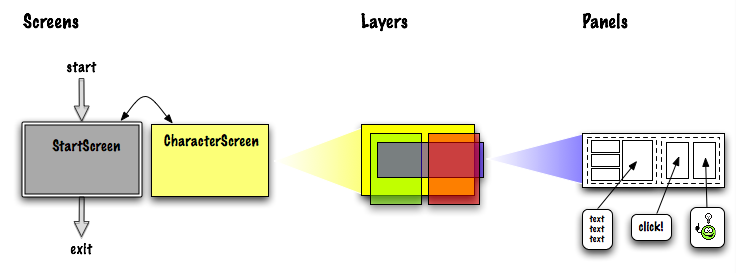
One XML file can contain several, or even all screens. As a reminder: Nifty displays one screen at a time; a screen contains several layers on top of one another; each layer contains panels that are embedded into another; the panels contain the actual content (text, images, or controls).
Make Screens
The following minimal XML file contains a start screen and a HUD screen. (Neither has been defined yet.) Copy and paste the following code into your scene.xml file.
<?xml version="1.0" encoding="UTF-8"?>
<nifty xmlns="http://nifty-gui.lessvoid.com/nifty-gui" xmlns:xsi="http://www.w3.org/2001/XMLSchema-instance" xsi:schemaLocation="https://raw.githubusercontent.com/void256/nifty-gui/1.4/nifty-core/src/main/resources/nifty.xsd https://raw.githubusercontent.com/void256/nifty-gui/1.4/nifty-core/src/main/resources/nifty.xsd">
  <screen id="start">
    <!-- ... -->
  </screen>
  <screen id="hud">
    <!-- ... -->
  </screen>
</nifty>
Every Nifty GUI must have a start screen. The others (in this example, the HUD screen) are optional.
In the following examples, the XML schema header is abbreviated to just <nifty>.
|
Make Layers
The following minimal XML file shows how we added layers to the start screen and HUD screen. Delete all from the file and add following code.
<nifty>
  <screen id="start" controller="de.lessvoid.nifty.screen.DefaultScreenController">
    <layer id="background" backgroundColor="#000f">
      <!-- ... -->
    </layer>
    <layer id="foreground" backgroundColor="#0000" childLayout="vertical">
      <!-- ... -->
    </layer>
  </screen>
  <screen id="hud" controller="de.lessvoid.nifty.screen.DefaultScreenController">
    <layer id="background" backgroundColor="#000f">
      <!-- ... -->
    </layer>
    <layer id="foreground" backgroundColor="#0000" childLayout="horizontal">
      <!-- ... -->
    </layer>
  </screen>
</nifty>
In a layer, you can now add panels and arrange them. Panels are containers that mark the areas where you want to display text, images, or controls (buttons etc) later. To connect a screen with a ScreenController you need to specify the fully qualified class name of
your ScreenController in the controller attribute of the <screen> tag. For this example, we use the DefaultScreenController.
Make Panels
A panel is the inner-most container (that will contain the actual content: text, images, or controls). You place panels inside layers. The following panels go into in the start screen’s foreground layer:
<panel id="panel_top" height="25%" width="75%" align="center" childLayout="center"
  backgroundColor="#f008">
</panel>
<panel id="panel_mid" height="50%" width="75%" align="center" childLayout="center"
  backgroundColor="#0f08">
</panel>
<panel id="panel_bottom" height="25%" width="75%" align="center" childLayout="horizontal"
  backgroundColor="#00f8">
  <panel id="panel_bottom_left" height="50%" width="50%" valign="center" childLayout="center"
    backgroundColor="#44f8">
  </panel>
  <panel id="panel_bottom_right" height="50%" width="50%" valign="center" childLayout="center"
    backgroundColor="#88f8">
  </panel>
</panel>
The following panels go into in the hud screen’s foreground layer:
<panel id="panel_left" width="80%" height="100%" childLayout="vertical" backgroundColor="#0f08">
<!-- spacer -->
</panel>
<panel id="panel_right" width="20%" height="100%" childLayout="vertical" backgroundColor="#00f8">
<panel id="panel_top_right1" width="100%" height="15%" childLayout="center"
backgroundColor="#00f8">
</panel>
<panel id="panel_top_right2" width="100%" height="15%" childLayout="center"
backgroundColor="#44f8">
</panel>
<panel id="panel_bot_right" width="100%" height="70%" valign="center" backgroundColor="#88f8">
</panel>
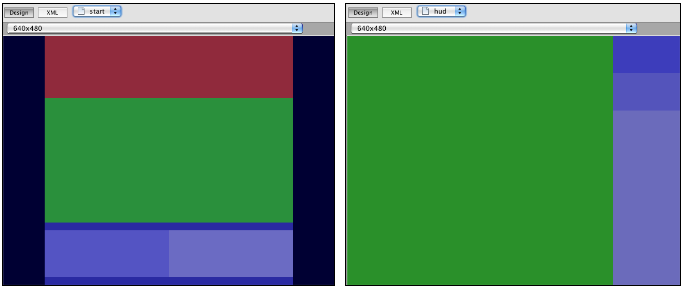
</panel>The result should look as follows:
Adding Content to Panels
See also Nifty GUI - the Manual: Layouts on the Nifty GUI site.
Add Images
The
start-background.png image is a fullscreen background picture. Add it to Interface. In the start screen, add the following image element:
<layer id="background" childLayout="center">
    <image filename="Interface/start-background.png">
    </image>
</layer>
The hud-frame.png image is a transparent frame that we use as HUD decoration. Add it to Interface. In the hud screen, add the following image element:
<layer id="background" childLayout="center">
    <image filename="Interface/hud-frame.png">
    </image>
</layer>
In order to make the hud-frame.png independent of the screen resolution you are using, you could use the imageMode attribute on the image element Nifty GUI - the Manual: Images (ImageMode=resize).
<layer id="background" childLayout="center">
    <image filename="Interface/hud-frame.png"
      imageMode="resize:40,490,110,170,40,560,40,270,40,560,40,40" width="100%" height="100%">
    </image>
</layer>
The face1.png image is an image that you want to use as a status icon. Add it to Interface.
In the hud screen’s foreground layer, add the following image element:
<panel id="panel_top_right2" width="100%" height="15%" childLayout="center">
    <image filename="Interface/face1.png" valign="center" align="center" height="50%"
      width="30%">
    </image>
</panel>
This image is scaled to use 50% of the height and 30% of the width of its container.
Add Static Text
The game title is a typical example of static text. In the start screen, add the following text element:
<panel id="panel_top" height="25%" width="75%" align="center" childLayout="center">
    <text text="My Cool Game" font="Interface/Fonts/Default.fnt" width="100%" height="100%"/>
</panel>
For longer pieces of static text, such as an introduction, you can use wrap="true". Setting wrap="true" will only work when you set a width for the text element, so that Nifty knows when to wrap a line. Add the following text element to the Start screen:
<panel id="panel_mid" height="50%" width="75%" align="center" childLayout="center">
    <text text="Here goes some text describing the game and the rules and stuff. Incidentally,
      the text is quite long and needs to wrap at the end of lines. ..."
      font="Interface/Fonts/Default.fnt" width="100%" height="100%" wrap="true"/>
</panel>
The font used is jME3’s default font “Interface/Fonts/Default.fnt” which is included in the jMonkeyEngine.JAR. You can add your own fonts to your own assets/Interface/Fonts directory.
Adjust the path to your font-name.
Add Controls
Before you can use any control, you must load a Control Definition first. Add the following two lines before your screen definitions:
<useStyles filename="nifty-default-styles.xml"/>
<useControls filename="nifty-default-controls.xml"/>
Note that the useStyles tag must be the first child of the nifty tag, otherwise you will see an error in design view.
Label Control
Use label controls for text that you want to edit dynamically from Java. One example for this is the score display.
In the hud screen’s foreground layer, add the following text element:
<panel id="panel_top_right1" width="100%" height="15%" childLayout="center">
    <control name="label" color="#000" text="123" width="100%" height="100%"/>
</panel>
Note that the width and height do not scale the bitmap font, but indirectly make certain it is centered. If you want a different size for the font, you need to provide an extra bitmap font (they come with fixed sizes and don’t scale well).
Button Control
Our GUI plan asks for two buttons on the start screen. You add the Start and Quit buttons to the bottom panel of the start screen using the <control> element:
<panel id="panel_bottom_left" height="50%" width="50%" valign="center" childLayout="center">
  <control name="button" label="Start" id="StartButton" align="center" valign="center">
  </control>
</panel>
<panel id="panel_bottom_right" height="50%" width="50%" valign="center" childLayout="center">
  <control name="button" label="Quit" id="QuitButton" align="center" valign="center">
  </control>
</panel>
Note that these controls don’t do anything yet – we’ll get to that soon.
Now remove all backgroundColor="" tags from your code. They were only needed to show the layout.
Your screen.xml should look like this:
<?xml version="1.0" encoding="UTF-8"?>
<nifty xmlns="http://nifty-gui.lessvoid.com/nifty-gui" xmlns:xsi="http://www.w3.org/2001/XMLSchema-instance" xsi:schemaLocation="https://raw.githubusercontent.com/void256/nifty-gui/1.4/nifty-core/src/main/resources/nifty.xsd https://raw.githubusercontent.com/void256/nifty-gui/1.4/nifty-core/src/main/resources/nifty.xsd">
    <useStyles filename="nifty-default-styles.xml"/>
    <useControls filename="nifty-default-controls.xml"/>
    <screen id="start" controller="de.lessvoid.nifty.screen.DefaultScreenController">
        <layer id="background" childLayout="center">
            <image filename="Interface/start-background.png"></image>
        </layer>
        <layer id="foreground" childLayout="vertical">
            <panel id="panel_top" height="25%" width="75%" align="center" childLayout="center">
                <text text="My Cool Game" font="Interface/Fonts/Default.fnt" width="100%"
                  height="100%"/>
            </panel>
            <panel id="panel_mid" height="50%" width="75%" align="center" childLayout="center">
                <text text="Here goes some text describing the game and the rules and stuff.
                  Incidentally, the text is quite long and needs to wrap at the end of lines."
                      font="Interface/Fonts/Default.fnt" width="100%" height="100%" wrap="true"/>
            </panel>
            <panel id="panel_bottom" height="25%" width="75%" align="center"
              childLayout="horizontal">
                <panel id="panel_bottom_left" height="50%" width="50%" valign="center"
                  childLayout="center">
                    <control name="button" label="Start" id="StartButton" align="center"
                      valign="center">
                    </control>
                </panel>
                <panel id="panel_bottom_right" height="50%" width="50%" valign="center"
                  childLayout="center">
                    <control name="button" label="Quit" id="QuitButton" align="center"
                      valign="center">
                    </control>
                </panel>
            </panel>
        </layer>
    </screen>
    <screen id="hud" controller="de.lessvoid.nifty.screen.DefaultScreenController">
        <layer id="background" childLayout="center">
            <image filename="Interface/hud-frame.png"
              imageMode="resize:40,490,110,170,40,560,40,270,40,560,40,40" width="100%"
              height="100%">
            </image>
        </layer>
        <layer id="foreground" childLayout="horizontal">
            <panel id="panel_left" width="80%" height="100%" childLayout="vertical">
            </panel>
            <panel id="panel_right" width="20%" height="100%" childLayout="vertical">
                <panel id="panel_top_right1" width="100%" height="15%" childLayout="center">
                    <control name="label" color="#000" text="123" width="100%" height="100%"/>
                </panel>
                <panel id="panel_top_right2" width="100%" height="15%" childLayout="center">
                    <image filename="Interface/face1.png" valign="center" align="center"
                      height="50%" width="30%">
                    </image>
                </panel>
                <panel id="panel_bot_right" width="100%" height="70%" valign="center">
                </panel>
            </panel>
        </layer>
    </screen>
</nifty>Intermediate Result
When you preview this code in the jMonkeyEngine SDK, our tutorial demo should looks as follows: A start screen with two buttons, and a game screen with a simple HUD frame and a blue cube (which stands for any jME3 game content).
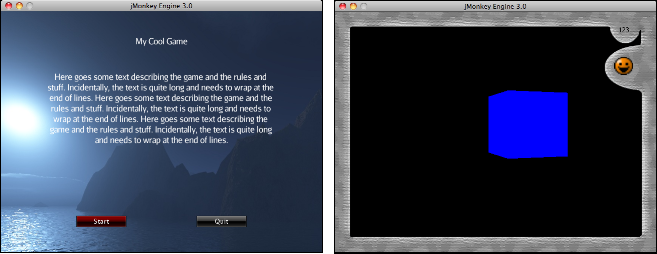
Compare this result with the layout draft above.
Next Steps
Integrate the GUI into the game. Typically, you will overlay the GUI.
-
Nifty GUI Overlay (recommended)
-
Nifty GUI Projection (optional)