Animating Blender Models With Mixamo
Using Mixamo For Model Animation
With very little effort, you can use Adobes Mixamo to fully animate your Blender models. Once you understand the process that is.
This guide requires:
-
Blender version 2.78c+ with its default settings. The exception being
Select With:, underis set toLeft Click. -
Blender FBX file Importing and Exporting, enabled.
-
A Modest amount of Blender knowledge.
-
A Mixamo account.
Prepare to Export
To properly animate your models there are a few rules you should follow.
-
Read the Common Questions guide before you do anything else.
-
Clean up your Blender file prior to exporting. This means you have a game ready model that will become the base for all your animations. Do this in a copy of your file so you have the original as a backup. The following checklist is provided for your convenience.
-
You have no Animations.
-
You have applied a triangulate modifier. Some exporters other than Ogre, have an option to apply the modifier on export. This would be the preferred method.
-
You have UV Mapped your model. It isn’t required by Mixamo, just for loading your models into jme.
-
Your models origin is at the base of the mesh.
-
You have your materials and textures done for your model. It isn’t required by Mixamo, just for loading your model into jme.
-
You have cleared your buffers. It isn’t required by Mixamo, just makes your models cleaner for jme.
-
You have applied the Location, Rotation, and Scale to your model.
-
MOST IMPORTANT OF ALL, in the
set the Unit of Measure to Meters and the Length to Metric. Adobe uses centimeters for the FBX exporter and if this is not set the models scale will be unusual to say the least. JME3 uses 1 WU = whatever you determine but meters will make things easier for all aspects of your modeling. If you are doing this now, you may have to re-scale your model before proceeding.
-
|
See Creating assets in Blender3D for help on creating jME3 compatible models. |
Blender FBX Export
-
In the
3d Viewport, select your model, it will be high-lighted in orange. -
In the
Infoheader, select. -
Enter a file path to export to, usually the same folder as your
.blendfile for simplicity. -
Enter a file name.
-
In the
Export FBXpanel, located in the bottom left of the export dialog:- Main Tab
-
-
Selected Objects
-
Scale = 1
Click the button next to scale to deselect Scale all data. Failure to do so will destroy the scale of your model. If the button is selected, it will be dark in color.
-
Forward = -Z Forward
-
Up = Y Up
-
Which kind of object to export = Mesh
-
- Geometries Tab
-
-
Apply Modifiers
-
-
When you are done, click the Export FBX button to export the file.
|
You can save these FBX export settings by clicking the + button next to Operator Presets. |
Mixamo FBX Import
-
Create an Mixamo account and login.
-
From the
Default Characterpanel, selectUpload Character. -
Navigate to the file to be uploaded or drag and drop it onto the file up-loader.
-
Select
Open.
|
Generally, if at any time during the import and rigging process the model does not appear within the time specified in the dialog that is showing, something has gone wrong and you will have to restart the process over. |
Mixamo Auto-Rigger
If everything went well the Auto-Rigger will open and your model will be facing you. If not, fix your model in Blender before proceeding.
-
If the model is facing you, click Next.
-
In this panel you will rig your model. Place the markers as shown in the Auto-Rigger dialog image.
Remember that the model is facing you so its right is on your left.
-
Select the LOD you are after. This is based off how many bones you want the hand of the model to have. Feel free to cycle through the options to see what each one does.
-
When you are through click the Next button to rig your model.
-
When the model appears, if satisfied with the results, click
Finish.
Mixamo Animations
-
In the far right panel select Find Animations.
-
After deciding on an animation, click the animation to have it applied to your model.
-
After the animation is applied to your model, toggle the In Place checkbox if it’s a moving animation.
You can make small adjustments to the animation by using the sliders. The most common adjustment you will make is the
Character Arm-Space. If you find the models hands are clipping through the model then use this slider to remedy the situation. -
When satisfied with the animation, select the Download button and follow the
Mixamo Downloadinstructions below.
If you wish to add more animations, after the download, remove the animation by clicking on the X button located next to the animations name. Add your new animation and when satisfied, download the new animation. Repeat as often as is necessary.
Mixamo Download
When downloading Animations from Mixamo:
-
Make sure the In Place checkbox is selected if it’s a moving animation.
-
In the
Download Settingsdialog use the default settings.-
Format = FBX
-
Skin = With Skin
-
Frames per second = 30
-
Keyframe Reduction = none
-
-
Click Download and save it to your computer.
When downloading Characters from Mixamo:
-
In the
Download Settingsdialog theFormatis FBX andPoseis TPose. -
Click Download and save it to your computer.
Creating Blender Animations
Download your TPose model using the instructions for downloading Characters given above. We will use it as our newly rigged model for Blender. To keep things organized we will create a .blend file for every animation and later use a separate .blend file to combine all animations into one jME3 compatible animation.
The following steps apply to any animation you want to add in the future.
-
Start Blender if it is not already open.
-
In the
Infoheader, at the top of the program, select. -
Select the default cube and delete it.
- Scene Tab
-
-
In the
Propertiespanel, located at the bottom right, select theScenetab. -
In the
Unitspanel, change theUnits of measuretoMetersandLengthtoMetric. You must always have these settings when importing from or exporting to Mixamo.You should create and save a default startup file in Blender.
. This way you will not have to constantly redo things. Setting yourUnits of measureis the least you should do. You can always restore the default startup file by selectingat any time.
-
-
In the
Infoheader, select. -
Select the FBX file you downloaded earlier.
-
In the
Import Fbxpanel located at the bottom left of the import dialog, leave all settings at their defaults.- Main
-
-
Scale = 1
-
Import Normals
-
Import Animations
-
Armature offset = 1
-
Image Search
-
Decal offset = 0
-
Use pre/post rotation
-
- Armatures
-
-
Nothing checked
-
-
When ready click Import FBX.
-
After Blender imports the file, both the armature and model are selected, in this order, select
. Repeat this for theLocationandScale. Alternatively, select the armature and model individually and repeat the process. -
Select the Armature.
-
In the
Timeline, determine the Length of the animation by RMB selecting the last keyframe in the timeline.
SetEnd:to this value. -
Click the |xref: button to reset timeline back to the first frame.
-
In the
Infoheader, change theDefaultscreen layout toAnimation. -
In the
Dope Sheet Editor, change theDope Sheetmode/context toAction Editor. TheLinked Actionwill now show the action name of the animation you imported. -
Rename this to the name of the imported animation. In this instance it was TPose. . Select the F button to save the action. . Save your file with the same name as the action.
|
Mixamo sets the rotation mode of bones to |
Creating The Rigged Animation File
It’s good practice to have a separate file for combining animations. Things can go wrong, animations may change, and you don’t want to destroy your original model file by accident. Our plan of attack has been we create a .blend file for every animation and then use this separate rigged file to combine them into one. To keep it simple we will use a copy of the first animation we downloaded and created a .blend file for.
You create a rigged animation file only one time per model.
-
If you have closed the TPose.blend file, open it. In the
Infoheader selectand save the file using the models name with the wordRiggedadded. This will be the only file we add animations to, for this model, from now on. It has our default TPose action which will allow us to start our animation track forOgreanimation exporting. -
Select your
Armature.- Object Tab
-
-
In the
Propertiespanel, navigate to theObjecttab. In theDisplaypanel toggleX-Rayon.
-
-
With your mouse inside the
3d Viewport, press Num Pad 1 followed by Numpad 5. -
Tab into
Edit Mode. -
Set the
3d Cursorto the models origin. -
Select
.The models origin and the
Rootbone origin must be at the same location. -
Scale the bone down or up as needed by selecting the
Tip(ball at the narrowest part of the bone) and dragging theZarrow (blue arrow) of the manipulator up or down until you are satisfied with its scale. DO NOT CHANGE THE ANGLE OR MOVE THE BASE OF THE BONE FROM CENTER. -
When satisfied with the scale, select the body of the bone to select the entire bone.
- Bone Tab
-
-
In the
Propertiespanel, navigate to theBonetab. -
Rename the bone to
Root. -
Deselect the
Deformpanel checkbox.
-
-
In the
3d Viewport, select the body of the armaturesHipbone, the lowest bone in the center of the armature, to select the entire bone. -
While holding Shift down, LMB select the
Rootbone. -
Press Ctrl + P.
-
In the
Make Parentdialog chooseKeep Offset. -
With the mouse inside the 3d Viewport, Tab out of
Edit Mode. -
Select your model.
- Data Tab
-
-
In the
Propertiespanel, navigate to theDatatab and make sure theMeshhas the same name as your model.
-
- Material Tab
-
-
In the
Propertiespanel, navigate to theMaterialtab and make sure there is oneMaterialin theMaterial Listand it is the same name as your model. -
In the
Transparencypanel, move theAlphaslider to 1.There appears to be a bug where the FBX importer adds an
Alphamap texture to your model. If theAlphaslider is not at one, and you use the Blender importer of the SDK, or convert a .blend file, it will be transparent.Ogreexport is unaffected. -
Deselect the checkbox of the
Transparencypanel.
-
- Texture Tab
-
-
In the
Propertiespanel, navigate to theTexturetab, you will note that your texture has duplicate names in theTexture List. The bottom texture is actually a transparentAlphatexture and appears to be a bug. Select the second texture in theTexture Listto highlight it. -
While holding down the Shift key, press the X button next to the
Texture Data Blockto delete it. -
Select your remaining texture in the
Texture Listto highlight it. You will note theTexture Data Blockis now red due to no texture being assigned. -
Click on the Browse Texture to be linked button next to the
Texture Data Blockand select your texture. -
In the
Imagepanel, click the Small Box button located next to your texture’s path to pack the image file.
-
-
In the
Infoheader, change the layout fromAnimationtoUV Editing. -
With your mouse inside the
3d Viewportand the model still selected, Tab into edit mode. If your model is not completely orange press A until all vertices are selected. You will see your UV Mapped mesh appear in theUV Image Editorwindow. -
In the
UV Image Editor, click the Browse Image to be linked button and select your UV image. -
Tab out of
Edit Mode. -
In the
Infoheader, change the layout fromUV EditingtoDefaultand then click the + button to create a new layout. -
Rename this new layout
NLA Editing. -
Click the
Current Editor Typebutton, located at the bottom left (small box) of the3d Viewport, and change it from3d ViewtoNLA Editor. Our TPose action is now visible.If the action is not visible, navigate to the Dope Sheet Editorand from theAction Editorcontext, select theAction. -
Click the button to push the action down into the stack.
-
Beneath the TPose strip you will see a slider. Drag this slider to the right until your strip is nested up against the left margin of the window.
-
Save your file.
Export
Your rigged file is now ready to export. Export your model using one of the Supported External File Types of your choice.
Appending Blender Animations
Follow the directions for custom Mixamo Animations, Mixamo Download, Creating Blender Animations, Blender Action Baking and Clearing The Linked Action Buffer for all animations you wish to append to your rigged animation file.
-
If your
Riggedfile is closed, open it. -
From the
Infoheader, change the Layout toDefault. -
In the
3d Viewport, select the armature of the model. -
From the
Infoheader, select. -
Navigate to, and select the
.blendanimation file you want to append. -
From the folders list select the
Actionfolder, followed by your action. -
When ready, select the Append From Library button to finalize your selection.
-
From the
Infoheader, change your layout toAnimation. -
In the
Dope Sheet Editor, change the context toAction Editorif not already selected. -
Click the Action to be linked button and select your append action from the list.
-
Select the F button to save the action.
-
From the
Infoheader, change the layout fromAnimationto theNLA Editinglayout we created in the Creating The Rigged Animation File section of this tutorial. You will see your appendActionat the top of the list. -
From the
NLA Editorheader, select. A new track has now been added to the top of the list. -
Click the button next to the
Actionto push it down into the stack. -
LMB select the strip to make it the only strip selected.
-
LMB drag the selected strip to the right until there is at least a 4 keyframe gap between the furthest strip to the right in the list and the append strip you are dragging.
When the strip is in drag mode it will be purple. While in drag mode you do not need to keep the LMB pressed.
-
When you are satisfied with the position, LMB click the strip to finalize your selection. Your append strip should now be the furthest strip to the right in the list.
You can use the mouse scroll wheel to shrink or expand the strip window to bring all strips into the view.
You can drag the slider, at the bottom of the strip window, to the right or left to position the strips against the side of the window.
-
With the mouse inside the strip window, press the N key to open the properties window.
-
In the
Active Strippanel, underStrip Extents, you will see theEnd Framenumber. In theTimeline, setEnd:to this number. Every time you append anActionyou must increase this number to equal the total length off all strips combined, including the gaps between strips. -
Save your file.
Your file is now ready to xref:jme3/advanced/mixamo#export,export].
|
Prior to export: In the In the An Some export methods bake your actions automatically on export, others don’t. Test the animation in-game and if your animations are all messed up, try baking them or use a different exporter. |
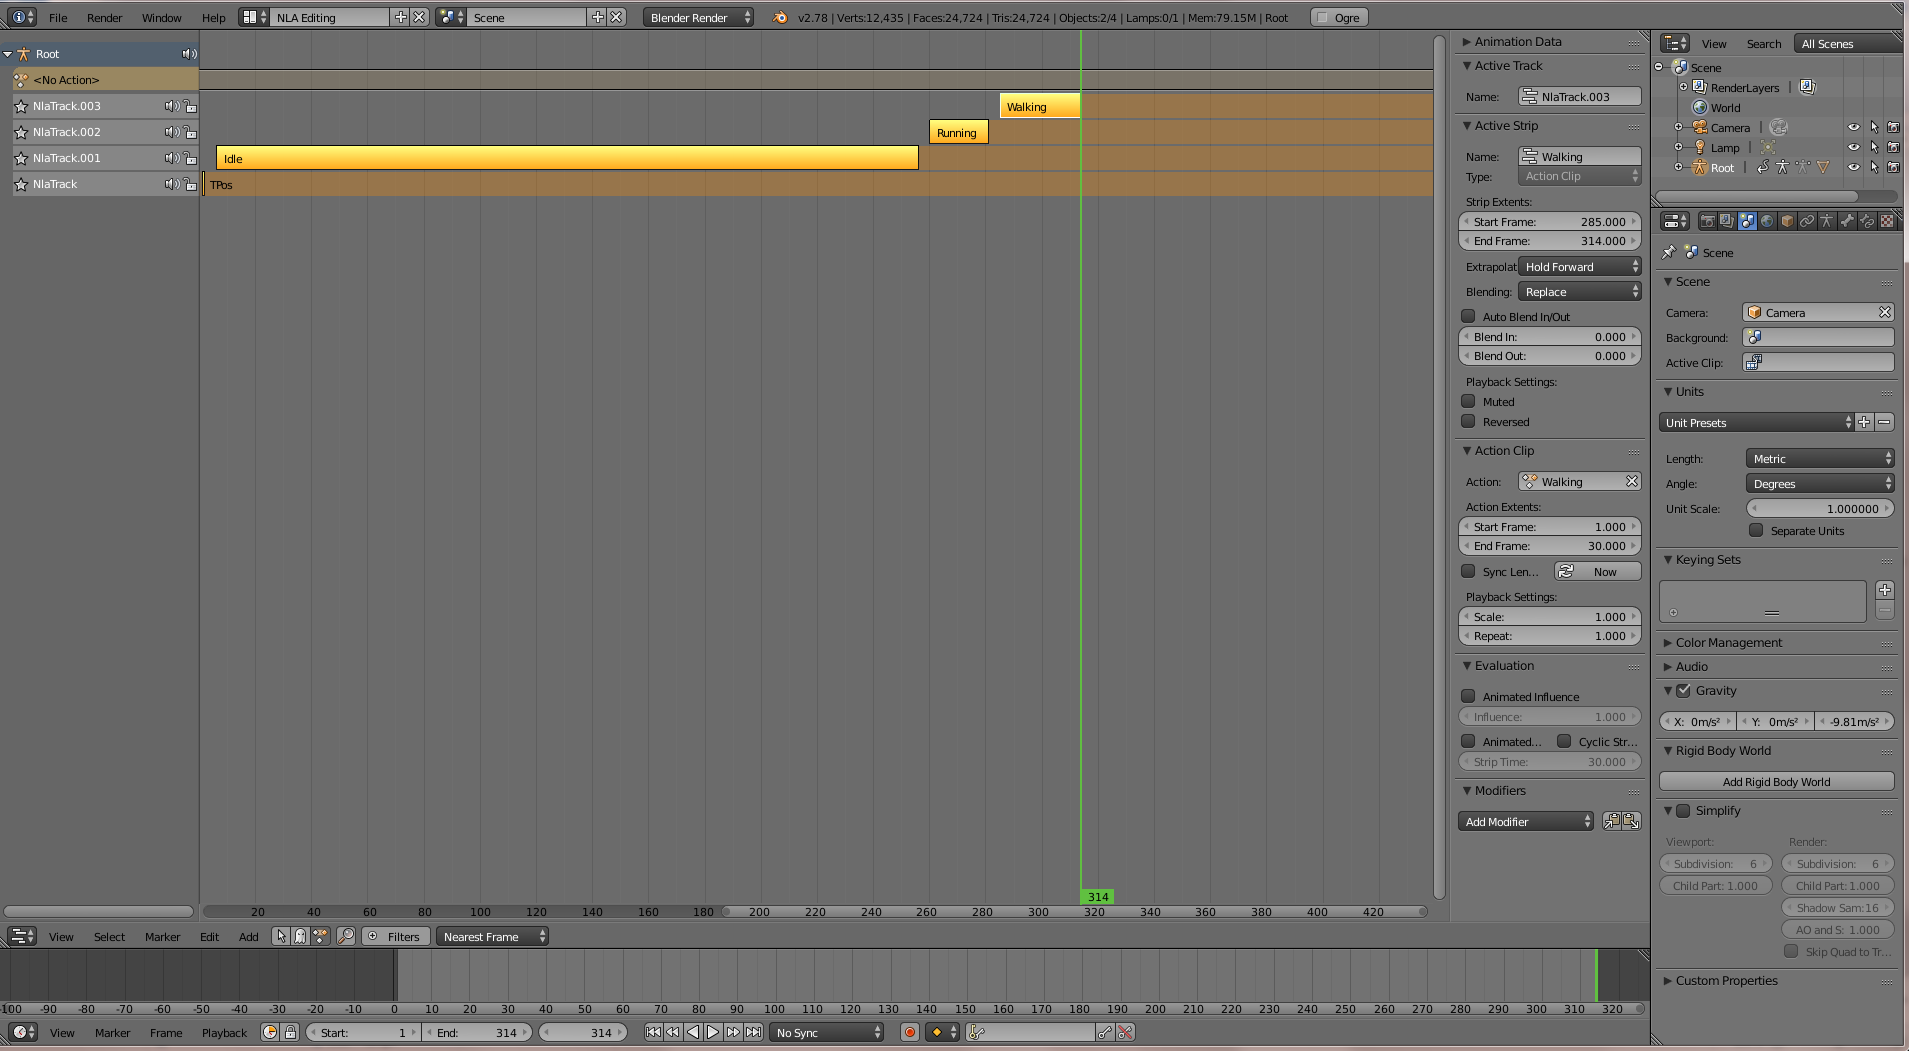
Your NLA strip should look something like this:
Notes
-
See Hello Animation and Animation in JME3 to learn how to use your animated model.